HP Z400 CRU Dataport DX115 kit Installation
HP Z400 - Workstation Manual
 |
UPC - 890552660926
View all HP Z400 manuals
Add to My Manuals
Save this manual to your list of manuals |
HP Z400 manual content summary:
- HP Z400 | CRU Dataport DX115 kit Installation - Page 1
workstation. Kit contents ● Warranty information ● DX115 unit (case, drive carrier, and lock key) ● Installation document ● SATA or SAS cable ● Five M3 screws ● Five 6-32 screw ● Tape label Before you begin To view QuickSpecs and determine the compatibility of this product with your HP workstation - HP Z400 | CRU Dataport DX115 kit Installation - Page 2
Guide. It describes proper workstation setup, posture, health, and work habits for computer users, and provides important electrical and mechanical safety information. This guide is located at http://www.hp to the workstation, observe the NOTE: HP accessories are for use in HP Workstation products. - HP Z400 | CRU Dataport DX115 kit Installation - Page 3
in the service guide for your workstation at http://www.hp.com/support/ workstation_manuals. NOTE: For the HP Workstation series, these procedures are also available in the User Guide on the Documentation and Diagnostics CD that shipped with your workstation. 2. Power down the workstation, and then - HP Z400 | CRU Dataport DX115 kit Installation - Page 4
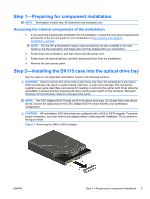
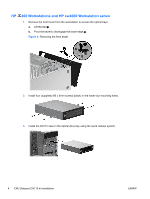
HP 400 Workstations and HP xw4000 Workstation series 1. Remove the front bezel from the workstation to access the optical bays. a. Lift the tab . b. Pivot black) in the lower four mounting holes. 3. Install the DX115 case in the optical drive bay using the quick release system. 4 CRU Dataport DX115 - HP Z400 | CRU Dataport DX115 kit Installation - Page 5
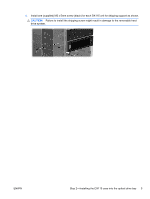
4. Install one (supplied) M3 x 5mm screw (black) for each DX115 unit for shipping support as shown. CAUTION: Failure to install the shipping screw might result in damage to the removable hard drive system. ENWW Step 2-Installing the DX115 case into the optical drive bay 5 - HP Z400 | CRU Dataport DX115 kit Installation - Page 6
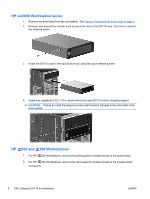
might result in damage to the removable hard drive system. HP 600 and 800 Workstations 1. For HP 800 Workstations, remove the airflow guide to enable access to the optical bays. 2. For HP 800 Workstations, remove the card support to enable access to the system board connectors. 6 CRU Dataport - HP Z400 | CRU Dataport DX115 kit Installation - Page 7
using the quick release system. 4. Install one (supplied) M3 x 5mm screw (black) for each DX115 unit for shipping support. CAUTION: Failure to install the shipping screw might result in damage to the removable hard drive system. ENWW Step 2-Installing the DX115 case into the optical drive bay 7 - HP Z400 | CRU Dataport DX115 kit Installation - Page 8
XP and Windows Vista do not support this action. NOTE: You do not have to remove the DX115 case from the workstation for this step. Install your hard drive in the DX115 carrier. For detailed instructions, see the following: ● The CRU Dataport DX115 User's Guide for SATA or SAS removable drive - HP Z400 | CRU Dataport DX115 kit Installation - Page 9
Windows Vista do not support this action. 1. After the drive is installed in the carrier, insert the drive carrier in the case. a. Press the card. ● Connect SATA drives to SATA ports, and SAS drives to SAS ports, starting with the lowestnumbered available port. ● For HP 400 and 600 Workstations - HP Z400 | CRU Dataport DX115 kit Installation - Page 10
is available in Japanese. See http://www.hp.com/support/workstation_manuals, then select your workstation product and select Japanese from the drop down Manual Language menu http://www.hp.com/support/workstation_manuals Manual Language Japanese 10 CRU Dataport DX115 kit installation ENWW
-
 1
1 -
 2
2 -
 3
3 -
 4
4 -
 5
5 -
 6
6 -
 7
7 -
8
-
9
-
10
 |
 |

CRU Dataport DX115 kit installation
Introduction
This document describes how to install the CRU Dataport DX115® removable media kit in an HP
workstation. The DX115 kit enables you to install removable media in your workstation.
Kit contents
●
Warranty information
●
DX115 unit (case, drive carrier, and lock key)
●
Installation document
●
SATA or SAS cable
●
Five M3 screws
●
Five 6-32 screw
●
Tape label
Before you begin
To view
QuickSpecs
and determine the compatibility of this product with your HP workstation, see
go/productbulletin
.
© 2006–2009 Hewlett-Packard Development Company, L.P. Microsoft, Windows, and
Windows Vista are U.S. registered trademarks of Microsoft Corporation. Printed in the
U.S.
ENWW
Introduction
1