HP d640 HP D640 High-Volume Printer - Technical Reference Manual, C5630-90030 - Page 20
Image Position, Table 4, Command, Action
 |
View all HP d640 manuals
Add to My Manuals
Save this manual to your list of manuals |
Page 20 highlights
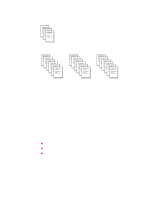
If possible, identify the compression method used on the data you'll be decompressing and printing. With this information, you can more accurately select values for the printer-specific commands. If you cannot identify the type of compressed data, you will have to experiment with the commands when trying to decompress and print the image. You may encounter CCITT compressed data where the data is reversed. For example, the first four bytes of the data file should contain a value representing the width of the image in pixels per row. A typical value might be Ox: 00 00 01 98, indicating a width of 408 pixels. If the bytes were swapped into "little endian" order, they would appear as Ox: 01 98 00 00, which would indicate a very wide picture. The D640 supports a resolution of 200 dpi, so images scanned at this resolution print at their normal size. Image Position The decompressed image will be placed within the PCL 5 default margins unless edge-to-edge printing is selected. Use the printerspecific edge-to-edge commands, along with the following cursor positioning command: *p0x0Y cursor position at 0, 0 Table 4 Image Position Command *r0F *t300R *r800T *r1664S &l0O *r1A *b8M *b9604W *rC Action presentation mode zero 300 dpi resolution image height = 800 image width = 1664 portrait orientation use current cursor position use CCITT4 Group 4 (MMR) decompression mode raster block data length = 9604 bytes raster data end raster image 14 Chapter 2: Printing Options
-
 1
1 -
2
-
3
-
4
-
5
-
6
-
7
-
8
-
9
-
10
-
11
-
12
-
13
-
14
-
 15
15 -
 16
16 -
 17
17 -
 18
18 -
 19
19 -
 20
20 -
 21
21 -
 22
22 -
 23
23 -
 24
24 -
 25
25 -
26
-
27
-
28
-
29
-
30
-
31
-
32
-
33
-
34
-
35
-
36
-
37
-
38
-
39
-
40
-
41
-
42
-
43
-
44
-
45
-
46
-
47
-
48
-
49
-
50
-
51
-
52
-
53
-
54
-
55
-
56
-
57
-
58
-
59
-
60
-
61
-
62
-
63
-
64
-
65
-
66
-
67
-
68
-
69
-
70
-
71
-
72
-
73
-
74
-
75
-
76
-
77
-
78
-
79
-
80
-
81
-
82
-
83
-
84
-
85
-
86
-
87
-
88
-
89
-
90
-
91
-
92
-
93
-
94
-
95
-
96
-
97
-
98
-
99
-
100
-
101
-
102
-
103
-
104
-
105
-
106
-
107
-
108
-
109
-
110
-
111
-
112
-
113
-
114
-
115
-
116
-
117
-
118
-
119
-
120
-
121
-
122
 |
 |