HP t5710 Terminal Emulation User's Guide (XPe) - Page 165
Key Programming, Default Definitions
 |
View all HP t5710 manuals
Add to My Manuals
Save this manual to your list of manuals |
Page 165 highlights
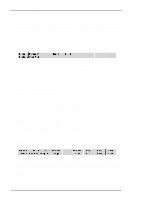
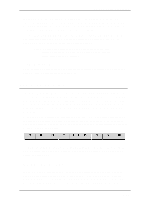
HP 700-92/96 Emulation When data received from the host or entered through the keyboard reaches the specified right margin, the cursor will move to the left margin on the next line down (as long as InhEolWrp is not selected in the HP Settings dialog box and, in the case of keyboard-entered data, auto line feed mode is enabled). To specify the right margin, place the cursor in the column for the margin location and click this button or press F6. The right margin can be reset to column 80 by pressing F7 (this will also reset the left margin to column 1). Note: Margins are disregarded when data is transferred from display memory to the host. The margins will be cleared when Format mode is enabled. Clr All Margins - F7 This function will reset both left and right margin settings so that the left margin is in column 1 and the right margin in column 80. Key Programming The keys F1 through F8 and their equivalent buttons can be programmed by the host or user to perform additional functions to those described in the previous section. The keys may be assigned a string of alphanumeric characters and/or control codes, and you can define whether the key string is executed locally or transmitted to the host, or both. The buttons can also be programmed to display the new functions when in User Keys mode. User Keys mode is entered by pressing the F10 key. The f-key buttons displayed on the screen will change to display the current User Key definitions. If no definitions have been assigned, either by you or the host, the buttons will just display the legends of each f-key as shown below. To define the function of an f-key or equivalent button locally, press the keys Shift + F10 to display the User Key Definition menu as shown overleaf. The menu can be exited by pressing F9. Default Definitions While this menu is displayed the f-keys and equivalent buttons have the functions shown by the buttons at the bottom of the window, so pressing F4 or the Default Values button will cause the default key and button definitions to be asserted. The default definitions will take effect once the User Key Definition menu is exited. 9-13
-
 1
1 -
2
-
3
-
4
-
5
-
6
-
7
-
8
-
9
-
10
-
11
-
12
-
13
-
14
-
15
-
16
-
17
-
18
-
19
-
20
-
21
-
22
-
23
-
24
-
25
-
26
-
27
-
28
-
29
-
30
-
31
-
32
-
33
-
34
-
35
-
36
-
37
-
38
-
39
-
40
-
41
-
42
-
43
-
44
-
45
-
46
-
47
-
48
-
49
-
50
-
51
-
52
-
53
-
54
-
55
-
56
-
57
-
58
-
59
-
60
-
61
-
62
-
63
-
64
-
65
-
66
-
67
-
68
-
69
-
70
-
71
-
72
-
73
-
74
-
75
-
76
-
77
-
78
-
79
-
80
-
81
-
82
-
83
-
84
-
85
-
86
-
87
-
88
-
89
-
90
-
91
-
92
-
93
-
94
-
95
-
96
-
97
-
98
-
99
-
100
-
101
-
102
-
103
-
104
-
105
-
106
-
107
-
108
-
109
-
110
-
111
-
112
-
113
-
114
-
115
-
116
-
117
-
118
-
119
-
120
-
121
-
122
-
123
-
124
-
125
-
126
-
127
-
128
-
129
-
130
-
131
-
132
-
133
-
134
-
135
-
136
-
137
-
138
-
139
-
140
-
141
-
142
-
143
-
144
-
145
-
146
-
147
-
148
-
149
-
150
-
151
-
152
-
153
-
154
-
155
-
156
-
157
-
158
-
159
-
 160
160 -
 161
161 -
 162
162 -
 163
163 -
 164
164 -
 165
165 -
 166
166 -
 167
167 -
 168
168 -
 169
169 -
 170
170 -
171
-
172
-
173
-
174
-
175
-
176
-
177
-
178
-
179
-
180
-
181
-
182
-
183
-
184
-
185
-
186
-
187
-
188
-
189
-
190
-
191
-
192
-
193
-
194
-
195
-
196
-
197
-
198
-
199
-
200
-
201
-
202
-
203
-
204
-
205
-
206
-
207
-
208
-
209
-
210
-
211
-
212
-
213
-
214
-
215
-
216
-
217
-
218
-
219
-
220
-
221
-
222
-
223
-
224
-
225
-
226
-
227
-
228
-
229
-
230
-
231
-
232
-
233
-
234
-
235
-
236
-
237
-
238
-
239
-
240
-
241
-
242
-
243
-
244
-
245
-
246
-
247
-
248
-
249
-
250
-
251
-
252
-
253
-
254
-
255
-
256
-
257
-
258
-
259
-
260
-
261
-
262
-
263
-
264
-
265
-
266
-
267
-
268
-
269
-
270
-
271
-
272
-
273
-
274
-
275
-
276
-
277
-
278
-
279
-
280
-
281
-
282
-
283
-
284
-
285
-
286
-
287
-
288
-
289
-
290
-
291
-
292
-
293
-
294
-
295
-
296
-
297
-
298
-
299
-
300
-
301
-
302
-
303
-
304
-
305
-
306
-
307
-
308
-
309
-
310
-
311
-
312
-
313
-
314
-
315
-
316
-
317
-
318
-
319
-
320
-
321
-
322
-
323
-
324
-
325
-
326
-
327
-
328
-
329
-
330
-
331
-
332
-
333
-
334
-
335
-
336
-
337
-
338
-
339
-
340
-
341
-
342
 |
 |