Hitachi 57F500 Owners Guide
Hitachi 57F500 Manual
 |
View all Hitachi 57F500 manuals
Add to My Manuals
Save this manual to your list of manuals |
Hitachi 57F500 manual content summary:
- Hitachi 57F500 | Owners Guide - Page 1
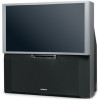
PROJECTION COLOR TV 46F500 51F500 57F500 OPERATING GUIDE 51G500 57G500 IMPORTANT SAFETY INSTRUCTIONS 2-3 FIRST TIME USE 4-19 THE REMOTE CONTROL Video Audio Ch. Manager Locks Setup Move SEL Sel ON-SCREEN DISPLAY USEFUL INFORMATION INDEX As an ENERGY STAR® Partner, Hitachi, Ltd. has - Hitachi 57F500 | Owners Guide - Page 2
• There are no user serviceable parts inside the television. • Model and serial numbers are indicated on back side of the television. CAUTION: Adjust only those controls that are covered in the instructions, as improper changes or modifications not expressly approved by HITACHI could void the user - Hitachi 57F500 | Owners Guide - Page 3
specific instructions pertaining to your resident state. For disposal or recycling information, please contact your local authorities or the Electronic Industries Alliance: www.eiae.org. Projection TV's are heavy and can mark or damage floor surfaces (especially wood flooring) if moved improperly - Hitachi 57F500 | Owners Guide - Page 4
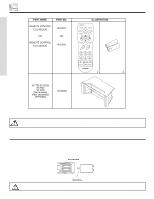
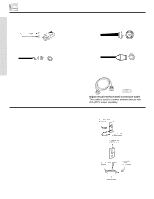
H530056 CAUTION: Television model 46F500 for use only with Hitachi's 46" Television Stand model SP-46W. Use with other stands is capable of resulting in instability causing possible injury. 1. Remote Control Unit is either CLU-4321UG (Part No. HL01831) or CLU-4324UG (Part No. HL01834). 2. Two "AA - Hitachi 57F500 | Owners Guide - Page 5
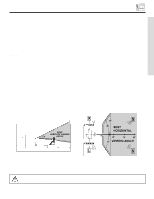
etc. VIEWING The major benefit of the HITACHI Projection Television is its large viewing screen. To see this large screen at its best, test various locations in the room to find the optimum spot for viewing. The best picture is seen by sitting directly in front of the TV and about 10 to 18 feet from - Hitachi 57F500 | Owners Guide - Page 6
the standard video cable to produce a high quality picture. Digital Visual Interface (DVI) Connection Cable This cable is used to connect external devices with DVI-HDTV output capability. ANTENNA CONNECTIONS TO REAR JACK PANEL VHF (75-Ohm) antenna/CATV (Cable TV) When using a 75-Ohm coaxial cable - Hitachi 57F500 | Owners Guide - Page 7
MENU mode. ቦ POWER button Press this button to turn the TV on or off. ቧ MAGIC FOCUS Use this button to automatically adjust your picture quality to optimum performance (see page 36). The Magic Focus button will not work when adjustment mode is set to manual (see page 37). ቨ FRONT INPUT JACKS (INPUT - Hitachi 57F500 | Owners Guide - Page 8
5 S-VIDEO -AUDIO- VIDEO L/MONO R MAGIC FOCUS INPUT 5 S-VIDEO -AUDIO- VIDEO L/MONO R MAGIC FOCUS FIRST TIME USE NOTE: 1. Completely insert connection cord plugs when connecting to front panel jacks. If you do not, the played back picture may be abnormal. 2. If you have a S-VHS VCR, use - Hitachi 57F500 | Owners Guide - Page 9
TO HI-FI L R ባ ቨ ቧ INPUT 1 INPUT 2 DVI-HDTV PR PB Y R (MONO)/L AUDIO PR PB Y/VIDEO R (MONO)/L AUDIO INPUT 3 R (MONO)/L VIDEO INPUT 4 R (MONO)/L VIDEO MONITOR OUT R L AUDIO VIDEO S-VIDEO S-VIDEO S-VIDEO ብ ቤ ቦ ቢ Antenna Input/Output The remote control allows you to switch - Hitachi 57F500 | Owners Guide - Page 10
to adjust TINT to obtain optimum picture quality when using the Y-PBPR inputs. (See page 35) 5. To ensure no copyright infringement, the MONITOR OUT output will be abnormal, when using the Y-PBPR jacks. 6. Input 2 (Y/VIDEO) can be used for composite video and component video input. ቨ DVI-HDTV Input - Hitachi 57F500 | Owners Guide - Page 11
REAR PANEL CONNECTIONS TYPICAL FULL-FEATURE SETUP Outside antenna or cable TV coaxial cable 2-Way signal splitter DVD Player OUTPUT Y PB/CB PR/CR L R HDTV Set-Top Box Y PB PR L R OUTPUT D-VHS DIGITAL OUTPUT LR OUTPUT FIRST TIME USE ANT A TO CONVERTER ANT B AUDIO TO HI-FI L R INPUT 1 DVI- - Hitachi 57F500 | Owners Guide - Page 12
, connect the components CB output to the TV's PB input and the components CR output to the TV's PR input. You may use composite video signal for Input 2~Input 5. It may be necessary to adjust TINT to obtain optimum picture quality when using the Y-PBPR inputs. (See page 35) To ensure no copyright - Hitachi 57F500 | Owners Guide - Page 13
MONITOR OUT R L AUDIO VIDEO S-VIDEO S-VIDEO S-VIDEO LR INPUT Stereo System Amplifier NOTE: 1. To prevent damage to the speaker and distorted sound, set the volume control of the audio amplifier lower and adjust the sound using the remote control of the TV set. 2. See page 41 for AUDIO Advanced - Hitachi 57F500 | Owners Guide - Page 14
connect the VCR, camcorder, laserdisc player, DVD player, or HDTV Set Top Box to your TV set is dependent on the model and features of each component. Check the owner's manual of each component for the location of video and audio inputs and outputs. The following connection diagrams are offered as - Hitachi 57F500 | Owners Guide - Page 15
of the VCR or the laserdisc player to the INPUT (VIDEO) jack, as shown on the TV set below. 2. Connect the cable from the AUDIO OUT of TO HI-FI L R INPUT 1 INPUT 2 DVI-HDTV PR PB Y R (MONO)/L AUDIO PR PB Y/VIDEO R (MONO)/L AUDIO INPUT 3 R (MONO)/L VIDEO INPUT 4 R (MONO)/L VIDEO - Hitachi 57F500 | Owners Guide - Page 16
to rear panel jacks. The picture and sound that is played back will be abnormal if the connection is loose. 2. A single VCR can be used for VCR #1 and VCR #2, but note that a VCR cannot record its own video or line output. (INPUT: 3 in example on page 11) Refer to your VCR operating guide for - Hitachi 57F500 | Owners Guide - Page 17
to rear panel jacks. The picture and sound that is played back will be abnormal if the connection is loose. 2. A single VCR can be used for VCR #1 and VCR #2, but note that a VCR cannot record its own video or line output. (INPUT: 3 in example on page 11) Refer to your VCR operating guide for - Hitachi 57F500 | Owners Guide - Page 18
TIME USE CONNECTING EXTERNAL VIDEO SOURCES CONNECTING A COMPONENT SOURCE WITH DVI-HDTV CAPABILITY TO INPUT 1. 1. Connect the DVI connection cable from the output of the HDTV set top box or DVD player to the DVI-HDTV input as shown on the TV set at right. 2. Connect the cable from the AUDIO OUT R of - Hitachi 57F500 | Owners Guide - Page 19
1 DVI-HDTV PR PB Y R (MONO)/L INPUT 2 PR PB Y/VIDEO R (MONO)/L AUDIO INPUT 3 R (MONO)/L VIDEO INPUT 4 R (MONO)/L VIDEO MONITOR OUT R L VIDEO AUDIO S-VIDEO S-VIDEO S-VIDEO NOTE: 1. Completely insert the connection cord plugs when connecting to rear panel jacks. The picture and - Hitachi 57F500 | Owners Guide - Page 20
your DVD/VCR player. (See pages 28 and 30 for instruction on how to program the remote to control your DVD/VCR player.) POWER TV CBL/SAT DVD/VCR SWAP PIP MODE PIP FREEZE VIDEO PIP CH MENU These buttons allow the remote to control your TV, VCR, DVD or cable/satellite box depending on which - Hitachi 57F500 | Owners Guide - Page 21
the TV set on or off when the remote is in TV mode. ባ PICTURE-IN-PICTURE buttons See separate section on pages 25, 26 and 27 for description. ቤ VIDEO button Press this button to directly access the VIDEO adjustment menu. THE REMOTE CONTROL VIDEO EXIT Contrast Next/Prev 100% Change Value SEL - Hitachi 57F500 | Owners Guide - Page 22
Captioning will display when MUTE/SOFT MUTE is on and Closed Caption is set to AUTO (See remote control is in TV mode, press these buttons to directly select the video input sources between the five video inputs. When the remote control is in Set-Top-Box mode (STB) these buttons will control the Set - Hitachi 57F500 | Owners Guide - Page 23
HOW TO USE THE REMOTE TO CONTROL YOUR TV ቪ ASPECT button Press this button to quickly change the picture format ASPECT ratio. Depending on the input signal, the picture format ratio allows you to adjust the images through the following options. 4:3 STANDARD Use this aspect mode to display - Hitachi 57F500 | Owners Guide - Page 24
"VIRTUAL HD" button on the remote control. Some people like the crisp picture from 540p and some people like the smooth and detailed 1080i. Hitachi offers you the choice. Note: The VIRTUAL HD button will not change the picture with a 1080i HDTV input. HDTV signals bypass the VIRTUAL HD circuitry - Hitachi 57F500 | Owners Guide - Page 25
THE REMOTE CONTROL PICTURE-IN-PICTURE (PIP) Your HITACHI Projection TV incorporates Dual Tuner technology designed for improved viewing enjoyment. This Dual Tuner feature allows you to view antenna inputs on both the main picture and sub-picture simultaneously, with separate tuning control for - Hitachi 57F500 | Owners Guide - Page 26
12 SWAP Ant A 12 Ant A 10 THE REMOTE CONTROL NOTES: 1. The SWAP button will only operate in POP/SPLIT PIP mode. 2. The SWAP function will not operate if ANT B input is set as the main channel (ANT B input cannot be displayed as a sub-picture.) ቤ PIP MODE button To change between the different - Hitachi 57F500 | Owners Guide - Page 27
picture to motion, press the FREEZE button again. NOTE: When PIP is on, the FREEZE function will Order Only 1-800-555-1212 FREEZE MENU Ant A 10 Hot Springs Clay Mask picture you are currently viewing (only the right sub-picture will is useful for viewing a moving picture that has many details, for - Hitachi 57F500 | Owners Guide - Page 28
the TV. POWER TV CBL/SAT DVD/VCR ቢ SWAP PIP MODE PIP FREEZE VIDEO PIP CH MENU SELECT MUTE EXIT LAST CH VOL CH ባ 1 2 3 4 5 6 7 8 9 ANT 0 INFO VID1 REC VID2 VID5 VID3 VID4 ASPECT VIRTUAL HD THE REMOTE CONTROL MY VCR CODE IS: NOTE: Refer to instruction manual of - Hitachi 57F500 | Owners Guide - Page 29
These buttons are for operating the TV. MUTE EXIT LAST CH VOL CH ባ 1 2 3 4 5 6 7 8 9 ANT 0 INFO VID1 REC VID2 VID5 VID3 VID4 ASPECT VIRTUAL HD THE REMOTE CONTROL MY CABLE/SATELLITE BOX CODE IS: NOTE: Refer to instruction manual of the Cable/Satellite Box for operation - Hitachi 57F500 | Owners Guide - Page 30
the TV. POWER TV CBL/SAT DVD/VCR SWAP PIP MODE PIP FREEZE VIDEO PIP CH MENU SELECT MUTE EXIT LAST CH VOL CH 1 2 3 4 5 6 7 8 9 ANT 0 INFO VID1 REC VID2 VID5 VID3 VID4 ASPECT VIRTUAL HD ቢ ባ THE REMOTE CONTROL MY DVD PLAYER CODE IS: NOTE: Refer to instruction manual - Hitachi 57F500 | Owners Guide - Page 31
FOR REMOTE CONTROL CABLE BRAND CODE General Instrument 17 Hamlin 22,23,24,25 Jerrold 00,01,02,03,04,05,06,07,21 Oak 26,27,28 Panasonic 18,19,20 Pioneer 13,14 Scientific Atlanta 08,09,10 Tocom 15,16 Zenith 11,12 SATELLITE BRAND CODE Ecostar 32 Hitachi 29 - Hitachi 57F500 | Owners Guide - Page 32
the different features on your HITACHI Projection TV. 2. Press the CURSOR to highlight a different feature. 3. Press EXIT on the remote control to quickly exit from a menu. 4. Press CURSOR ̇ or ̈ to access Favorite Channels menu. VIDEO MENU SELECT EXIT This part of the screen shows which - Hitachi 57F500 | Owners Guide - Page 33
Magic Focus Color System Advanced Settings Select between the four picture modes: Sports, Movies, News, and Music. Adjust contrast. Adjust brightness. Adjust color. Adjust tint. Adjust sharpness. Centering top and bottom of the picture. Automatic or manual alignment of the Red, Green and Blue - Hitachi 57F500 | Owners Guide - Page 34
Ch. Manager Locks Setup Move SEL Sel CURSOR CURSOR Video Picture Mode Contrast Brightness Color Tint Sharpness Vertical Position Magic Focus Color System Advanced Settings Move SEL Select Sports 100% 50% 50% 50% 0 CURSOR Video Picture Mode Sports Movies News Music Reset Move SEL Return Use - Hitachi 57F500 | Owners Guide - Page 35
levels in the picture. This adjustment will only affect the picture when ADVANCED SETTINGS DIMMER is OFF. Brightness Use this function to adjust overall picture brightness. Color Use this function to adjust the level of color in the picture. Tint Use this function to adjust flesh tones so - Hitachi 57F500 | Owners Guide - Page 36
CURSOR Video Picture Mode Contrast Brightness Color Tint Sharpness Vertical Position Magic Focus Color System Advanced Settings Move SEL Select Sports 100% 50% 50% 50% Video Magic Focus Aligns the Red, Green, and Blue colors to correct for Magnetic Influences. Adjustment Mode Auto Manual If - Hitachi 57F500 | Owners Guide - Page 37
the Red, Green, and Blue colors to correct for Magnetic Influences. Adjustment Mode Auto Manual If you want to adjust now Start Move SEL Return CURSOR CURSOR CURSOR Video Picture Mode Contrast Brightness Color Tint Sharpness Vertical Position Magic Focus Color System Advanced Settings Move - Hitachi 57F500 | Owners Guide - Page 38
both sets of component input jacks, be sure to set the color system feature for both inputs. Advanced Settings Your HITACHI Projection TV has an ADVANCED SETTINGS function which will automatically adjust picture settings to produce the highest quality picture possible. When ADVANCED SETTINGS is - Hitachi 57F500 | Owners Guide - Page 39
Enhancement Advanced Settings Move SEL Select 50% 50% L CURSOR R CURSOR Treble Next/Prev Change Value 50% SEL Return Use CURSOR ̆, ̄ to highlight functions. Press the SELECT button to select the function setting. Press CURSOR ̇ or ̈ to adjust the function. Press EXIT to quit MENU, or select - Hitachi 57F500 | Owners Guide - Page 40
settings will reproduce the "live" sound you would hear in concert halls, sports stadiums, movie theaters, etc. with only two speakers. Audio Treble Bass Balance Sound Enhancement Advanced Settings Move can then more easily recognize the unique tonal colors of each sound as though the sound was - Hitachi 57F500 | Owners Guide - Page 41
sound performance of your TV, depending on listening conditions. Audio Treble Bass Balance Sound Enhancement Advanced Settings Move SEL Select 50% 50% L Audio Advanced Settings Audio Source R Stereo Mono 2nd Audio Prog. CURSOR Internal Speakers On Off Auto Noise Cancel Perfect Volume - Hitachi 57F500 | Owners Guide - Page 42
review more channels. Press EXIT to quit menu. Scan Use this feature after Auto Channel Scan is completed to add (On) or skip (Off) additional channels to the remote control Move ̇/ SEL Return Lock ] CURSOR Ch. Manager Ant A CH# [2 3 4 5 6 7 8 9 Scan On Off Off Off Off Off Off Off Move Set - Hitachi 57F500 | Owners Guide - Page 43
On On Off Off Off Off Off Off CH ID Lock ] Move Edit (A-Z, 0-9, _, -) SEL Return Channel Manager Ant A CH# Move Edit (A-Z, 0-9, _, -) SEL Return NOTES: 1. If ANT A and ANT B are in the same ANTENNA/CABLE mode, the CHANNEL ID for both antenna inputs will be the same. 2. CHANNEL ID will - Hitachi 57F500 | Owners Guide - Page 44
preference. When ENGAGE LOCK is selected, SET CHANNEL LOCK, SET INPUT LOCK, and SET FRONT PANEL LOCK can be set individually. When SET CHANNEL LOCK is turned on, the picture and sound for the chosen channel will be blocked out. When SET INPUT LOCK is turned on, the picture and sound for all video - Hitachi 57F500 | Owners Guide - Page 45
rating is selected, for example PG-13, all movies rated PG-13 and higher (R, NC-17, and X) will be blocked. Press EXIT to quit menu or select MOVIE RATING to return to the previous menu. Motion Picture Ratings Chart G PG PG-13 R NC-17 X NOT RATED (NR) General audiences. All ages admitted. Parental - Hitachi 57F500 | Owners Guide - Page 46
TV-Y7: TV-YG: TV-PG: TV-14: TV-MA: Move SEL Return Sub Rating L S V FV Use CURSOR ̆ or ̄ to highlight the category that you want to block. Press SELECT to block the TV RATING that you have selected. Press EXIT to quit menu or select TV RATING to return to the previous menu. TV Parental Guide - Hitachi 57F500 | Owners Guide - Page 47
Lock Movie Ratings TV Ratings Canadian Ratings (Eng) Canadian Ratings (Frn) Move SEL Select CURSOR Locks Canadian Ratings (Eng) Status C: C8+: G: PG: 14+: 18+: Move SEL Return Use CURSOR ̆ or ̄ to select the CANADIAN RATINGS (Eng) category that you want to block. Press SELECT to set the CANADIAN - Hitachi 57F500 | Owners Guide - Page 48
the category that you want to block. Press SELECT to set the CANADIAN RATINGS (FRN) that you have selected. Once rating is selected, for example 8 ans+, all movies and television programs rated 8 ans+ and higher will be automatically blocked. Press EXIT to quit menu or select CURSOR ̇ to return to - Hitachi 57F500 | Owners Guide - Page 49
. MENU CURSOR Setup Menu Preference Set The Clock Set The Channels Set The Inputs Set Event Timer Set Closed Captions About Your TV Move SEL Select CURSOR Setup Menu Preferences Set The Language English Francais Español Set The Menu Background Shaded Solid Move SEL Return Setup Menu - Hitachi 57F500 | Owners Guide - Page 50
The time must be adjusted before you can use the "Set Event Timer" or "TV Time Out" features. Setup Menu Preference Set The Clock Set The Channels Set The Inputs Set Event Timer Set Closed Captions About Your TV Move SEL Select Setup Set The Clock Time : Sun --:-- AM Move Set SEL Return CURSOR - Hitachi 57F500 | Owners Guide - Page 51
Menu Preference Set The Clock Set The Channels Set The Inputs Set Event Timer Set Closed Captions About Your TV Move SEL Select CURSOR Setup Set The Channels Ant A Ant B Move SEL Return Setup Set The Channels Ant A Ant B Move SEL Select Setup Set The Channels Ant A Source Antenna Cable(1) Auto - Hitachi 57F500 | Owners Guide - Page 52
Scan Move SEL Select Cable(2) Start Setup Set The Channels Ant A Auto Channel Scan Scanning Channel Number: 66 SEL Cancel Cancel SELECT If the EXIT button is pressed while AUTO CHANNEL SCAN function is engaged, programming will stop. If two antenna are connected, switch antenna inputs with - Hitachi 57F500 | Owners Guide - Page 53
a name to any of the five video inputs. MENU CURSOR Setup Menu Preference Set The Clock Set The Channels Set The Inputs Set Event Timer Set Closed Captions About Your TV Move SEL Select Setup Set The Inputs Video1 Rename Video2 Rename Video2 Auto Link Video3 Rename Video4 Rename Video5 Rename - Hitachi 57F500 | Owners Guide - Page 54
Remote Control Sensor Off CURSOR CURSOR Setup Set The Inputs Video2 Auto Link Auto Input Signal Sensor Remote Control Sensor Off Move SEL Return Move SEL Select Use CURSOR ̆ or ̄, then press the SELECT button to change AUTO LINK setting. When AUTO INPUT SIGNAL SENSOR is selected, the TV will - Hitachi 57F500 | Owners Guide - Page 55
goes to the clock setup mode (see page 50). Please Set Clock First. Setup Menu Preference Set The Clock Set The Channels Set The Inputs Set Event Timer Set Closed Captions About Your TV Move SEL Select CURSOR CURSOR Setup Set Event Timer Event 1 --:-- AM Ant A Ch -- Event 2 --:-- AM Ant - Hitachi 57F500 | Owners Guide - Page 56
Caption will not work. About Your TV The TV model name and set dimensions will be displayed on the TV screen. The set dimensions of each TV model are listed on page 60. Setup Menu Preference Set The Clock Set The Channels Set The Inputs Set Event Timer Set Closed Captions About Your TV Move SEL - Hitachi 57F500 | Owners Guide - Page 57
CARE OF YOUR HITACHI TELEVISION AND YOUR REMOTE CONTROL DO Dust the screen and cabinet with a soft cloth. Clean the screen with a to cease operation. When the batteries run down, remote control operation will become erratic or possibly stop altogether. Replace the old batteries with two new "AA" size - Hitachi 57F500 | Owners Guide - Page 58
may be necessary to install a special antenna to improve the picture. • RADIO FREQUENCY INTERFERENCE: The interference produces moving ripples or diagonal streaks, and in some cases, causes loss of contrast in the picture. NOTE: The TV set can generate sound distortion in external devices such as - Hitachi 57F500 | Owners Guide - Page 59
©©© © Lines or streaks in picture © ©©© © Poor reception on some channels © ©©© © Picture rolls vertically © © No color © © ©©© © Poor color © © ©©© ©© HITACHI Projection Television incorporates advanced power surge protection technology designed to protect against component or circuit - Hitachi 57F500 | Owners Guide - Page 60
) On-Screen Menu • Full Set of Input Jacks, including S-VIDEO • COMPONENT VIDEO: Y-PB/PR • Velocity Modulation • Six Aspect Modes • Closed Caption Decoder • 2-Tuner Picture in Picture • Magic Focus (Auto Digital Convergence and Manual Adjustment) • Dual Antenna Inputs • Video Input Sensor - Hitachi 57F500 | Owners Guide - Page 61
made every effort to assure you hours of trouble free operation from your unit. However, should you require service, a network of Hitachi Authorized Service Facilities has been established in all 50 states and Puerto Rico. Each facility will provide you with convenient and expedient assistance. Our - Hitachi 57F500 | Owners Guide - Page 62
EST 9:00am - 7:00pm Saturday EST 9:00am - 5:00pm Look for your French Manual on the outside of the box. If the manual is missing, call 1-800-HITACHI (1-800-448-2244) for a copy. Pour de plus amples renseignements sur le service durant la période couverte par la garantie, sur le fonctionnement ou - Hitachi 57F500 | Owners Guide - Page 63
48 Loudness, 41 M Magic Focus Auto Convergence, 7, 36 Manual Convergence, 37 Menu Preference Language, 49 Background, 49 Monitor Out, 9 N Noise Reduction, 38 P Perfect Volume, 41 Picture Mode, 34 Picture-in-Picture (PIP), 25 - 27 Picture-outside-Picture (POP), 25 R Remote Control Functions, 20 - 31 - Hitachi 57F500 | Owners Guide - Page 64
QR54412
-
 1
1 -
 2
2 -
 3
3 -
 4
4 -
 5
5 -
 6
6 -
 7
7 -
8
-
9
-
10
-
11
-
12
-
13
-
14
-
15
-
16
-
17
-
18
-
19
-
20
-
21
-
22
-
23
-
24
-
25
-
26
-
27
-
28
-
29
-
30
-
31
-
32
-
33
-
34
-
35
-
36
-
37
-
38
-
39
-
40
-
41
-
42
-
43
-
44
-
45
-
46
-
47
-
48
-
49
-
50
-
51
-
52
-
53
-
54
-
55
-
56
-
57
-
58
-
59
-
60
-
61
-
62
-
63
-
64
 |
 |
PROJECTION COLOR TV
46F500
51G500
51F500
57G500
57F500
OPERATING GUIDE
IMPORTANT SAFETY INSTRUCTIONS
2-3
FIRST TIME USE
4-19
THE REMOTE CONTROL
ON-SCREEN DISPLAY
USEFUL INFORMATION INDEX
57-63
32-56
20-31
Setup
Locks
Ch. Manager
Audio
Video
Move
SEL
Sel
As an E
NERGY
S
TAR
®
Partner, Hitachi, Ltd. has determined that this
product meets the E
NERGY
S
TAR
®
guidelines for energy efficiency.