Hitachi 60VG825 Owners Guide - Page 24
Input 1, Input 2, Input 3, Input 4, Input 5, Cable, Photo Input
 |
View all Hitachi 60VG825 manuals
Add to My Manuals
Save this manual to your list of manuals |
Page 24 highlights
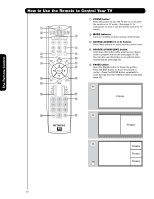
The Remote Control How to Use the Remote to Control Your TV ቨ DAY/NIGHT button Press this button to toggle between Day and Night picture mode settings. Select Day for day time viewing with more brightness and contrast to compete with room light. Select Night for night time viewing with less brightness and contrast for a more detailed picture (see page 46 for settings changes). NOTE: For automatic DAY/NIGHT picture mode settings, see page 41. ቩ PICTURE-IN-PICTURE button See separate section on pages 28-30 for a description. ቪ MENU button The MENU button will start the On-Screen Display. ቫ INFO button Press this button when you want to check the channel being received, the picture source, if the channel has stereo (ST) or second audio program (SAP), the time, CHANNEL ID and if the TIMER is set. ቭ EXIT button This button will exit all On-Screen Displays. ቮ CURSOR PAD/SELECT button All the On-Screen Display features can be set or adjusted by using the CURSOR PAD, except for numeric entries. The CURSOR PAD will highlight functions or adjust and set different features. Press the CURSOR PAD toward desired direction and press the SELECT button to select. ቯ GUIDE button Press this button to access the TV Guide On ScreenTM interactive display (see page 57). Press this button to access the Channel Guide of the (CBL), and (SAT/STB) while in (CBL)(SAT/STB) mode. ተ INPUTS button When the remote control is in TV mode, press this button to access the INPUTS menu. Use the CURSOR PAD and SELECT button to select the inputs that are being used. Pressing the INPUTS button repeatedly will also cycle through the Inputs menu items. Then press the SELECT button to select. ANALOG/DIGITAL CHANNELS Program Information Event Timer INFO Day/Night Mode No Info --:-- AM --:-- PM ST TV-14 V Audio Broadcast Broadcast Rating Closed Captioning Day CC Off Cable 6 11:00PM Aspect Mode 16:9 Standard Main Picture Source Time When an S-VIDEO Input is connected to INPUT 3 S-IN:3 480i 11:00PM INFO Day CC Off 4:3 Expanded When a Component Video: Y-PbPr Input is connected to INPUT 1 YPBPR:1 480i 11:00PM INFO Input 5 Photo Input Cable Air Input 1 Move SEL Sel. INPUT 1 Select to choose INPUT 1. INPUT 2 Select to choose INPUT 2. INPUT 3 Select to choose INPUT 3. INPUT 4 Select to choose INPUT 4. INPUT 5 Select to choose INPUT 5. CABLE Select to choose Cable. AIR Select to choose Air. PHOTO INPUT Select to access your pictures from a digital camera, USB memory or memory card USB drive connected to the Photo Input in the side panel of the LCD TV (see pages 25-26). Day CC Off 4:3 Expanded NOTE: 1. 2. The Sleep Timer info will show momentarily after releasing INFO button. The Aspect setting will not be shown if the channel is locked. 24
-
 1
1 -
2
-
3
-
4
-
5
-
6
-
7
-
8
-
9
-
10
-
11
-
12
-
13
-
14
-
15
-
16
-
17
-
18
-
 19
19 -
 20
20 -
 21
21 -
 22
22 -
 23
23 -
 24
24 -
 25
25 -
 26
26 -
 27
27 -
 28
28 -
 29
29 -
30
-
31
-
32
-
33
-
34
-
35
-
36
-
37
-
38
-
39
-
40
-
41
-
42
-
43
-
44
-
45
-
46
-
47
-
48
-
49
-
50
-
51
-
52
-
53
-
54
-
55
-
56
-
57
-
58
-
59
-
60
-
61
-
62
-
63
-
64
-
65
-
66
-
67
-
68
-
69
-
70
-
71
-
72
-
73
-
74
-
75
-
76
-
77
-
78
-
79
-
80
-
81
-
82
-
83
-
84
-
85
-
86
-
87
-
88
-
89
-
90
-
91
-
92
-
93
-
94
-
95
-
96
-
97
-
98
-
99
-
100
-
101
-
102
-
103
-
104
 |
 |
