Hitachi DZ-HS803A Owners Guide - Page 130
Preparation before, importing images, Connecting the, camcorder to your PC, using the provided, USB
 |
View all Hitachi DZ-HS803A manuals
Add to My Manuals
Save this manual to your list of manuals |
Page 130 highlights
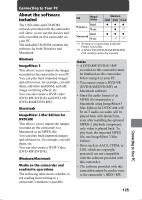
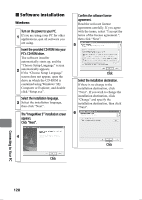
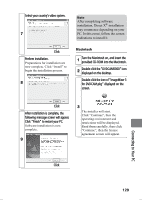
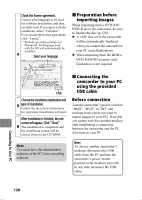
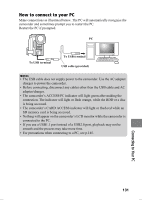
Check the license agreement. Choose your language to be used for software installation, and then carefully read. If you agree with the conditions, select "Continue". If you accept the license agreement, click "I agree". * With the provided software for Macintosh, the language used with the OS will automatically be installed. 4 Select your language „ Preparation before importing images When importing from a DVD-RW/ DVD-R set in the camcorder, be sure to finalize the disc (p.120). z A +RW disc set in the camcorder will be automatically finalized when you connect the camcorder to your PC (auto finalization). z When importing from the HDD/a DVD-RAM/SD memory card, finalization is not required. Click Choose the installation destination and 5 type of installation. Follow the on-screen instructions for operation. Installation will start. After installation is finished, the exit screen will appear. Click "Close". 6 The installation is completed and the installation screen will be closed. Remove the CD-ROM. „ Connecting the camcorder to your PC using the provided USB cable Before connection Turn the camcorder's power switch to "HDD", "DVD", or "SD" (the medium from which you want to import images to your PC). Note that you cannot switch to another medium after establishing a connection between the camcorder and the PC. Also turn on your PC. Note You must have the administrator authority of the PC before installing software. Hint To choose another camcorder's medium, disconnect the USB cable from the PC and turn the camcorder's power switch position to the medium you wish to use, then reconnect the USB cable. Connecting to Your PC 130
-
 1
1 -
2
-
3
-
4
-
5
-
6
-
7
-
8
-
9
-
10
-
11
-
12
-
13
-
14
-
15
-
16
-
17
-
18
-
19
-
20
-
21
-
22
-
23
-
24
-
25
-
26
-
27
-
28
-
29
-
30
-
31
-
32
-
33
-
34
-
35
-
36
-
37
-
38
-
39
-
40
-
41
-
42
-
43
-
44
-
45
-
46
-
47
-
48
-
49
-
50
-
51
-
52
-
53
-
54
-
55
-
56
-
57
-
58
-
59
-
60
-
61
-
62
-
63
-
64
-
65
-
66
-
67
-
68
-
69
-
70
-
71
-
72
-
73
-
74
-
75
-
76
-
77
-
78
-
79
-
80
-
81
-
82
-
83
-
84
-
85
-
86
-
87
-
88
-
89
-
90
-
91
-
92
-
93
-
94
-
95
-
96
-
97
-
98
-
99
-
100
-
101
-
102
-
103
-
104
-
105
-
106
-
107
-
108
-
109
-
110
-
111
-
112
-
113
-
114
-
115
-
116
-
117
-
118
-
119
-
120
-
121
-
122
-
123
-
124
-
 125
125 -
 126
126 -
 127
127 -
 128
128 -
 129
129 -
 130
130 -
 131
131 -
 132
132 -
 133
133 -
 134
134 -
 135
135 -
136
-
137
-
138
-
139
-
140
-
141
-
142
-
143
-
144
-
145
-
146
-
147
-
148
-
149
-
150
-
151
-
152
-
153
-
154
-
155
-
156
-
157
-
158
-
159
-
160
-
161
-
162
-
163
-
164
-
165
-
166
-
167
-
168
-
169
-
170
-
171
-
172
-
173
-
174
-
175
-
176
-
177
-
178
-
179
-
180
-
181
-
182
-
183
-
184
-
185
-
186
-
187
-
188
-
189
-
190
-
191
 |
 |
