Hitachi DZ-MV350A Owners Guide - Page 95
Disc Navigation
 |
View all Hitachi DZ-MV350A manuals
Add to My Manuals
Save this manual to your list of manuals |
Page 95 highlights
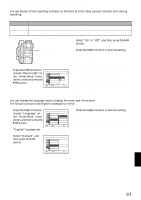
Disc Navigation Using Disc Navigation STARTING DISC NAVIGATION Disc Navigation is a tool for editing scenes recorded on this DVD video camera/recorder. Here is an explanation on "scene" and "program", so that you will be able to make most use of Disc Navigation function. The screens in this instruction manual are basically those that will appear when DVD-RAM disc is used: Some items will not appear when DVD-R disc or card is used, but the operation is the same. 1 Press the DISC NAVIGATION button. Note: Do not proceed with a following step while the disc is being recognized or the ACCESS/PC indicator is blinking. The Disc Navigation screen (shown on page 96) will appear. ● Thumbnail: This refers to a reduced image that helps to distinguish recorded scenes quickly. Immediately recording is finished, the first image of the recorded scene will be used as a thumbnail of the scene: The thumbnail can be changed later on this DVD video camera/recorder. ● Scene: Movie (video): One scene refers to images recorded from one press of the REC button until recording is temporarily stopped by pressing REC again. Still (photo): One scene refers to a photo recorded by pressing the REC button. English 95
-
 1
1 -
2
-
3
-
4
-
5
-
6
-
7
-
8
-
9
-
10
-
11
-
12
-
13
-
14
-
15
-
16
-
17
-
18
-
19
-
20
-
21
-
22
-
23
-
24
-
25
-
26
-
27
-
28
-
29
-
30
-
31
-
32
-
33
-
34
-
35
-
36
-
37
-
38
-
39
-
40
-
41
-
42
-
43
-
44
-
45
-
46
-
47
-
48
-
49
-
50
-
51
-
52
-
53
-
54
-
55
-
56
-
57
-
58
-
59
-
60
-
61
-
62
-
63
-
64
-
65
-
66
-
67
-
68
-
69
-
70
-
71
-
72
-
73
-
74
-
75
-
76
-
77
-
78
-
79
-
80
-
81
-
82
-
83
-
84
-
85
-
86
-
87
-
88
-
89
-
 90
90 -
 91
91 -
 92
92 -
 93
93 -
 94
94 -
 95
95 -
 96
96 -
 97
97 -
 98
98 -
 99
99 -
 100
100 -
101
-
102
-
103
-
104
-
105
-
106
-
107
-
108
-
109
-
110
-
111
-
112
-
113
-
114
-
115
-
116
-
117
-
118
-
119
-
120
-
121
-
122
-
123
-
124
-
125
-
126
-
127
-
128
-
129
-
130
-
131
-
132
-
133
-
134
-
135
-
136
-
137
-
138
-
139
-
140
-
141
-
142
-
143
-
144
-
145
-
146
-
147
-
148
-
149
-
150
-
151
-
152
-
153
-
154
-
155
-
156
-
157
-
158
-
159
-
160
-
161
-
162
-
163
-
164
-
165
-
166
-
167
-
168
-
169
-
170
 |
 |
