HoMedics SS-4510 Downloadable Instruction Book - Page 5
Setting and Using the Alarm, Using the Projection Feature, Setting the Time/Date, Maintenance - review
 |
View all HoMedics SS-4510 manuals
Add to My Manuals
Save this manual to your list of manuals |
Page 5 highlights
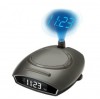
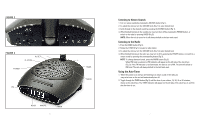
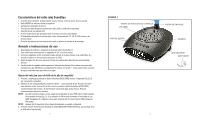
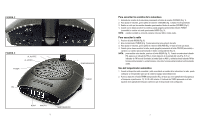
Setting and Using the Alarm 1. Press the AL SET button (Fig 3). The alarm hour will flash. 2. While the time is flashing press + button (Fig 3) until you reach the correct hour. Then press the - button (Fig 4) until you reach the desired minute. 3. After 10 seconds the alarm set time will stop flashing and it will be programmed, or you may press the ALARM SET button. NOTE: The PM indicator also applies to the alarm. You can review the alarm setting anytime by pressing the ALARM SET button. 4. To activate the alarm you may choose one of 3 wake options: a. To wake to RADIO (Fig. 3) press the AL MODE button (Fig. 3) once. You may leave it on the current station or adjust the TUNER. b. To wake to a SOUND, press the AL MODE button a second time. It will set to the last sound you listened to. If you wish to change it, press the sound you wish to wake to and then press the POWER button (Fig 3). c. To wake to BEEP, press the AL MODE button a third time. NOTE: The ALARM MODE indicator (RADIO/SOUND/BEEP) will appear on the right side of the clock face (Fig. 3), and will indicate that the alarm is set. 5. When the alarm sounds, the corresponding ALARM indicator (RADIO/SOUND/BEEP) blinks. You may either: a. SNOOZE: Press the SNOOZE button (Fig 1). Your sleep time will be extended by 9 minutes. You may use this feature until you turn the alarm off. b. RESET: Turn the alarm off by pressing ANY button on the unit, except for the SNOOZE button (Fig 1). The alarm clock will automatically reset for the next day in its current mode. The corresponding ALARM indicator (RADIO/SOUND/BEEP) will indicate this. If you wish to change the wake mode follow step 1 under Setting and Using the Alarm. c. OFF: To completely turn off the alarm so it is not set for the next day, continue to press the AL MODE button until all the ALARM indicators (RADIO/SOUND/BEEP) are all off. NOTE: If the alarm sounds for 30 minutes continuously it will automatically turn off and reset for the next day. Using the Projection Feature 1. To turn the projection feature on, press the PROJECT ON/OFF button on the back of the unit (Fig 2). The time is now projected on the ceiling. Press the button again to turn off projection feature. NOTE: If the projection feature is off you may press the SNOOZE button (Fig 1) to trigger 5 seconds of projection. 2. To turn the angle of the time that appears on the ceiling, rotate the TIME ROTATION KNOB (Fig.1) until you have reached your desired result. NOTE: The TIME ROTATION KNOB will rotate up to 350 degrees. 3. To focus the time on the ceiling, rotate the FOCUS KNOB (Fig 1) until you have reached your desired result. 4. The angle of the projector can be adjusted by angling forward or backward. 8 Setting the Time/Date NOTE: This unit features automatic time set. The unit is preprogrammed with the current date and eastern standard time. Use the TIME ZONE slide switch (Fig 2) to change to your time zone (E-EST, C-CST, M-MST, P-PST). The time/date will only need to be reset if the backup battery fails. The below information should be used if the automatic time is not correct. 1. Press and hold the HOUR button for 5 seconds (Fig 3). The time will begin to flash. 2. While the time is flashing, press the HOUR button until you reach the correct hour. Then press the MINUTE button (Fig 3) until you reach the correct minute. NOTE: PM indicator will appear on the left side of the clock face for evening hours (Fig 3). If the PM indicator is not illuminated, the hour is set to AM. Be sure to set the time for the correct 12-hour period-AM (morning) or PM (evening). NOTE: After 5 seconds, the time will stop flashing and it will be set. 3. Press the BACKLIGHT HIGH/LOW button (Fig 2) to choose between high and low clock brightness. 4. In the event of battery and power failure, you will need to reset the alarm. Maintenance To Store You may store the unit in its box or a cool, dry place. To Clean Wipe off dust with a damp cloth. NEVER use liquids or abrasive cleaner to clean. Modifications not authorized by the manufacturer may void users authority to operate this device. NOTE: This equipment has been tested and found to comply with the limits for a Class B digital device, pursuant to Part 15 of the FCC Rules. These limits are designed to provide reasonable protection against harmful interference in a residential installation. This equipment generates, uses and can radiate radio frequency energy and, if not installed and used in accordance with the instructions, may cause harmful interference to radio communications. However, there is no guarantee that interference will not occur in a particular installation. If this equipment does cause harmful interference to radio or television reception, which can be determined by turning the equipment off and on, the user is encouraged to try to correct the interference by one or more of the following measures: • Reorient or relocate the receiving antenna. • Increase the separation between the equipment and receiver. • Connect the equipment into an outlet on a circuit different from that to which the receiver is connected. • Consult the dealer or an experienced radio/TV technician for help NOTE: The manufacturer is not responsible for any radio or TV interference caused by unauthorized modifications to this equipment. Such modifications could void the users authority to operate the equipment. 9
-
 1
1 -
 2
2 -
 3
3 -
 4
4 -
 5
5 -
 6
6 -
 7
7 -
 8
8 -
 9
9 -
 10
10
 |
 |