Honeywell 99-99011 Assembly Guide - Page 2
Outils requis
 |
View all Honeywell 99-99011 manuals
Add to My Manuals
Save this manual to your list of manuals |
Page 2 highlights
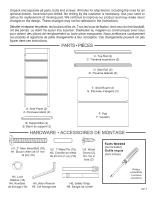
Unpack and separate all parts, bolts and screws. All holes for attachment, including the ones for an optional drawer, have been pre-drilled. No drilling by the customer is necessary. Ask your store or call us for replacement of missing part. We continue to improve our product and may make minor changes to the design. These changes may not be reflected in the instructions. Déballer et séparer les pièces, les boulons et les vis. Tous les trous de fixation, dont ceux du tiroir facultatif, ont été percés. Le client n'a aucun trou à percer. S'adresser au magasin ou communiquer avec nous pour obtenir des pièces de remplacement ou toute pièce manquante. Nous améliorons constamment nos produits et apportons de petits changements à leur conception. Ces changements peuvent ne pas figurer dans ces instructions. PARTS • PIÈCES C. Top Rail (2) C. Traverse supérieure (2) D. Side Rail (6) D. Traverse latérale (6) E. Shelf Board (3) E. Panneau d'étagère (3) A. Side Panel (2) A. Panneau latéral (2) F. Pad F. Coussin B. Support Bar (3) B. Barre de support (3) HARDWARE • ACCESSOIRES DE MONTAGE H1. 2" Allen Head Bolt (16) H1. Boulon Allen de 51 mm (2 po) (16) H2. 1" Metal Pin (16) H2. Cheville de métal de 25 mm (1 po) (16) H3. Wood Screw (2) H3. Vis à bois (2) Tools Needed (not included) Outils requis (non inclus) H4. Lock Washer (16) H4. Rondelle de blocage (16) H5. Allen Wrench H5. Clé hexagonale H6. Safety Strap H6. Sangle de sûreté Phillips screwdriver Tournevis cruciforme page 2
-
 1
1 -
 2
2 -
 3
3 -
 4
4 -
 5
5 -
 6
6 -
 7
7 -
 8
8 -
9
-
10
 |
 |
