Honeywell HJC5000 User Guide
Honeywell HJC5000 Manual
 |
View all Honeywell HJC5000 manuals
Add to My Manuals
Save this manual to your list of manuals |
Honeywell HJC5000 manual content summary:
- Honeywell HJC5000 | User Guide - Page 1
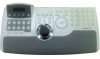
UltraKey Lite Keyboard controller for VideoBloX and MAXPRO-Net Matrix Systems HJC5000 Installation and User Guide Document 800-07422 - Rev A - 08/10 - Honeywell HJC5000 | User Guide - Page 2
- Honeywell HJC5000 | User Guide - Page 3
Installation and User Guide - Honeywell HJC5000 | User Guide - Page 4
to Step 3: Configure Address, Baud Rate or IP for VideoBloX Mode; Step 4: Configure VideoBloX Mode Default Settings While Powering Up; Step 4: Configure the Controller for an Ethernet Connection; added Step 5: Setting the Keyboard Address While Powering Up; and, the System Configuration Menu screen - Honeywell HJC5000 | User Guide - Page 5
and may contain important operating and maintenance servicing information. FCC Compliance Statement Information to the User: This equipment has been tested and , if not installed and used in accordance with the instruction manual, may cause harmful interference to radio communications. However, - Honeywell HJC5000 | User Guide - Page 6
that the equipment supplied with this guide is compliant with the essential protection requirements Users of the product are responsible for checking and complying with all federal, state, and local laws and statutes concerning the monitoring and recording of video and audio signals. Honeywell - Honeywell HJC5000 | User Guide - Page 7
. CAUTION RISK OF ELECTRIC SHOCK DO NOT OPEN CAUTION: TO REDUCE THE RISK OF ELECTRIC SHOCK, DO NOT REMOVE COVER (OR BACK). NO USER-SERVICEABLE PARTS INSIDE. REFER SERVICING TO QUALIFIED SERVICE PERSONNEL. Important Safety Instructions BEFORE OPERATING OR INSTALLING THE UNIT, READ AND FOLLOW ALL - Honeywell HJC5000 | User Guide - Page 8
or replace, at its sole option, free of charge, any defective products returned prepaid. In the event you have a problem with any Honeywell product, call Customer Service for assistance or to request a Return Merchandise Authorization (RMA) number. Be sure to have the model number, serial number - Honeywell HJC5000 | User Guide - Page 9
and User Guide Contents 1 About this Document and the UltraKey Lite 15 Document Overview 15 Finding More Information 16 Typographical Conventions 16 UltraKey Lite Specifications 17 Shipping Checklist 18 UltraKey Lite Port Connections and Descriptions 19 2 Using the UltraKey Lite Controller - Honeywell HJC5000 | User Guide - Page 10
10 - Honeywell HJC5000 | User Guide - Page 11
UltraKey Lite Controller Installation and User Guide Figures Figure 1-1 Figure 1-2 Figure 2-1 Figure UltraKey Lite Port Connections 19 Terminal Box Front and Back Ports 20 UltraKey Lite Controller Keyboard Layout 22 The UltraKey Navigation Controls 23 LCD and LCD Navigation Keys 32 VideoBloX - Honeywell HJC5000 | User Guide - Page 12
Figure 5-2 Figure 5-3 Change Password Page 69 System Configuration LCD Menu Tree - All Modes 70 12 - Honeywell HJC5000 | User Guide - Page 13
UltraKey Lite Controller Installation and User Guide Tables Table 1-1 Table 1-2 Table 2-1 Table 2-2 Table 2-3 Table 3-1 Table 3-2 Table 3-3 Table 4-1 Table 4-2 Table 4-3 Table 4-4 Table 5-1 UltraKey Lite Specifications 17 Shipping Checklist 18 LCD Menu Navigation During Set Up 23 VideoBloX Key - Honeywell HJC5000 | User Guide - Page 14
14 - Honeywell HJC5000 | User Guide - Page 15
the Honeywell VideoBloX and MAXPRO-Net Video Matrix mode installation and set-up. Future product and documentation releases will include the Standalone mode for PTZ and DVR functionality. Document Overview The following is included in this user guide: • UltraKey Lite controller user instructions - Honeywell HJC5000 | User Guide - Page 16
UltraKey Lite Finding More Information Refer to the online literature library to access other electronic documents in PDF format including data sheets, quick references, installation and user guides program. actions. Pressing a key on the keyboard. Press and hold Logon. Courier Text that - Honeywell HJC5000 | User Guide - Page 17
UltraKey Lite Controller Installation and User Guide UltraKey Lite Specifications Table 1-1 UltraKey Lite Specifications Parameter Power Blue-White Characters: 122×32 Dots Type: A Version: USB1.1 (For USB PC Keyboard) EN55022 for radiated and conducted emissions Dimensions: 408 mm (L) × 215 mm (W) - Honeywell HJC5000 | User Guide - Page 18
Checklist Part Use with... Ultrakey Lite keyboard controller All installations. Ultrakey Lite installation and user guide All installations. Power adapter for RS232 Backwards compatibility with VideoBloX and VideoBloX Lite CPU installations. VideoBloX master port. Backwards compatibility with - Honeywell HJC5000 | User Guide - Page 19
UltraKey Lite Controller Installation and User Guide UltraKey Lite Port Connections and Descriptions Figure 1-1 UltraKey Lite Port Connections Power RJ45 Ethernet RS232 and RS422/485 Serial port USB 8 18 1 Pins numbered from right to left DC Power Port Supports • For VideoBloX, the - Honeywell HJC5000 | User Guide - Page 20
and the UltraKey Lite RS232, RS422/485 Serial Port Note These ports are used to connect to MAXPRO-Net RS232 or RS422 and to VideoBloX NetCPU, Standard CPU and Lite CPU RS422. Terminal plug (pin numbers can be assigned by user) RJ45 Ethernet The USB port is not used with VideoBloX or MAXPRO-net. - Honeywell HJC5000 | User Guide - Page 21
the Controller, page 21 • Using the UltraKey Lite to Navigate the LCD Menus, page 22 • VideoBloX Key Functions, page 24 • MAXPRO Key and will be included in future releases. Logging Onto the Controller 1. Connect the keyboard with a power adapter (12V (±10%) DC/1 A included) or a network cable - Honeywell HJC5000 | User Guide - Page 22
keys and other elements of the UltraKey Lite controller. See Table 2-2 for UltraKey Lite key functions when used with a VideoBloX system. See Table 2-3 for UltraKey Lite key functions when used with a MAXPRO-Net system. Figure 2-1 UltraKey Lite Controller Keyboard Layout 1 4 6 8 10 12 14 23 - Honeywell HJC5000 | User Guide - Page 23
UltraKey Lite Controller Installation and User Guide Figure 2-2 The UltraKey Navigation Controls Touch Pad and Ring Touch pad ring Left arrow key Forward key (or up) Right arrow key Touch pad - Use like a laptop mouse pad LCD Keys Joystick Left arrow key Up arrow key Backward or reverse key ( - Honeywell HJC5000 | User Guide - Page 24
UltraKey Lite the right / left arrows • JOYSTICK: Move right/left To scroll through keyboard supports dynamic key configuration. The key functions listed in Table 2-2 are all default functions. Contact Honeywell Technical Support or refer to the applicable VideoBloX manual. Table 2-2 VideoBloX - Honeywell HJC5000 | User Guide - Page 25
UltraKey Lite Controller Installation and User Guide Table 2-2 VideoBloX Key Functions (cont'd) ID Key Description Function in Camera Mode PCK (Cam Mode) PCK (Device Mode) 7 Pause Play Rev Selects previous camera Prev Stop 8 Review Puts keyboard in Device mode NA Pause 9 Record - Honeywell HJC5000 | User Guide - Page 26
Using the UltraKey Lite Controller ID 28 29 30 30 30 30 30 30 30 30 30 30 21+1 21+2 21+3 21+30 21+30 21+30 21+30 21+30 21+30 21+4 21+5 21+6 21+7 21+8 21+F10 21+F7 21+F8 21+F9 24/26 24/26 Table 2-2 VideoBloX Key Functions - Honeywell HJC5000 | User Guide - Page 27
UltraKey Lite Controller Installation and User Guide MAXPRO Key Functions Note Use Figure 2-1 16-9 Number 9 72 Keypad key 9 16-0 Number 0 75 Keypad key 0 17 Enter 76 Enter UltraKey Halt Group 2 Iris + Iris None Tour VCR Rewind Review Rec Stop Play Flashback View None (Menu) Alternate - Honeywell HJC5000 | User Guide - Page 28
Using the UltraKey Lite Controller ID 18 19 20 21 22 23 23 23 23 23 Up Arrow Touch ring Down 69 Down Arrow Touch ring Left 23 None Touch ring Right 25 None Joystick Left Joystick Right Joystick Up Joystick Down Twist Zoom right Twist Zoom left Mon B 58 F10 Mon A 57 F9 Login 41 - Honeywell HJC5000 | User Guide - Page 29
UltraKey Lite Controller Installation and User Guide ID 21+30 21+30 21+30 21+30 21+30 24/26 24/26 Table 2-3 54 F6 F10+F9 28 Scan Halt Focus + 89 Focus Near Focus - 88 Focus Far UltraKey Group 6 Print Select Scroll Down Freeze Group 10 Focus + Focus - Document 800-07422 Rev A 29 08/10 - Honeywell HJC5000 | User Guide - Page 30
Using the UltraKey Lite Controller 30 - Honeywell HJC5000 | User Guide - Page 31
, refer to the applicable VideoBloX or VideoBloX Lite installation or user guides for more information. This section explains how to connect the UltraKey Lite controller to VideoBloX and how to enter the basic configuration settings specific to VideoBloX. UltraKey Lite can control the remote - Honeywell HJC5000 | User Guide - Page 32
Installing UltraKey Lite with VideoBloX Figure 3-1 LCD and LCD Navigation Keys Numeric keypad and Ent key Left arrow key Up arrow key Down arrow key Right arrow key Figure 3-2 VideoBloX LCD Configuration Menu Tree Mode Selection: VideoBloX Connection Configuration Serial Port Ethernet - Honeywell HJC5000 | User Guide - Page 33
and User Guide Table 3-1 Serial Port COM1 Serial Port COM1 and COM2 Pin Assignments Type Pin RS422 1 2 5 7 8 RS485 7 8 Signal RX + RX - GND TX - TX + T/R - T/R + Note For a list of accessories see Shipping Checklist on page 18 and for port connections see UltraKey Lite Port - Honeywell HJC5000 | User Guide - Page 34
Installing UltraKey Lite with VideoBloX Figure 3-4 VideoBloX RJ45 to DB9 Male Adapter for VideoBloX and VideoBloX Lite CPUs RJ45 to DB9 male adapter Controller Serial Port RJ45 network cable Figure 3-5 VideoBloX Direct RJ45 Serial Port Connection for VideoBloX NetCPUs Controller RJ45 - Honeywell HJC5000 | User Guide - Page 35
UltraKey Lite Controller Installation and User Guide 1. If not already done, install and connect the to enter the Mode Selection menu. 5. Scroll to and select VideoBloX. Press Ent. Step 3: Configure Address, Baud Rate or IP for VideoBloX Mode 1. Press Alt > Clr. If prompted, enter the password - Honeywell HJC5000 | User Guide - Page 36
see UltraKey Lite Port Connections and Descriptions on page 19. The UltraKey Lite Controller runs TCP/IP keyboard protocol. Step 1: Connect to the UltraKey Lite Ethernet Port Note The direct RJ45 connection using the Ethernet port is only available with newer model VideoBloX NetCPU systems - Honeywell HJC5000 | User Guide - Page 37
UltraKey Lite Controller Installation and User Guide Table 3-2 RJ45 Ethernet Pin Assignments Port Pin RJ45 Ethernet 1 2 3 VideoBloX to the network. Refer to the applicable VideoBloX Installation Guide for instructions. Figure 3-7 VideoBloX Ethernet Port Connections to VideoBloX Ethernet - Honeywell HJC5000 | User Guide - Page 38
: IP Address menu displays. 10. Press Ent. Set Up Address 4 Control Mode: Ethernet Note In this field, you are setting the VideoBloX NetCPU IP address. To set the UltraKey Lite IP address or enter the main configuration menus, press Alt > Clr. 11. Use the numeric keypad to enter an IP address as - Honeywell HJC5000 | User Guide - Page 39
UltraKey Lite Controller Installation and User Guide 5. Press Show Net Infor Show Net Infor DHCP Manual Setting Network: Manual Setting Show Net Infor Menu The to the Network: DHCP menu. 2. Press Ent and the keyboard's network will be configured automatically. • If the network configuration - Honeywell HJC5000 | User Guide - Page 40
Installing UltraKey Lite with VideoBloX 2. When you are at the Network: Manual Setting menu, press Ent, then . IP Addr Changed Yes Note In this field, you are setting the UltraKey Lite IP address. To set the VideoBloX IP address (for communication purposes), see Step 3: Set and Configure for - Honeywell HJC5000 | User Guide - Page 41
UltraKey Lite Controller Installation and User Guide Step 5: Setting the Keyboard Address While Powering Up While powering up, when the Time Left 3 menu displays, press certain keys (see Table 3-3) to set the keyboard address. Table 3-3 Setting the Keyboard Address Key Alt > 1 Alt > 2 Alt > 3 - Honeywell HJC5000 | User Guide - Page 42
Installing UltraKey Lite with VideoBloX Figure 3-8 UltraKey Lite Login Page Step 1: Configure UltraKey Lite to VideoBloX Mode 1. Log into the web Step 2: Configure VideoBloX Network Settings 1. From the side menu, click VideoBloX Configuration. See Figure 3-10. 2. Under Keyboard ID Setting, enter - Honeywell HJC5000 | User Guide - Page 43
UltraKey Lite Controller Installation and User Guide Note By default, addresses 1- 5 in the VideoBloX NetCPU are set for serial connection. Please change this in the NetCPU configuration if you want to use addresses 1- 5 for Ethernet connection. 3. Under VB Device - Honeywell HJC5000 | User Guide - Page 44
Installing UltraKey Lite with VideoBloX 2. Under Serial Port1 Settings, select the following from each drop-down list as required: • Baud Rate: 1200, 9600, 19200 or 57600 bps. The default for VideoBloX is 19200. • Parity: none • Stop Bits: 1 bit • Data Bits: 8 bits • Serial Mode: RS422 3. Click - Honeywell HJC5000 | User Guide - Page 45
UltraKey Lite Controller Installation and User Guide Step 4: Configuring the Dynamic Keys You can configure the hard keys on the web server. 1. From the side menu, click DynKey Configuration. Figure 3-13 DynKey - Honeywell HJC5000 | User Guide - Page 46
Installing UltraKey Lite with VideoBloX 46 - Honeywell HJC5000 | User Guide - Page 47
specific to MAXPRO-Net. For other user configurations see the index or table of contents. Navigating the LCD Configuration Menus Note The use of the arrow keys under the LCD is used for the following instructions. See Figure 4-1. Also see Using the UltraKey Lite to Navigate the LCD Menus on page - Honeywell HJC5000 | User Guide - Page 48
Installing UltraKey Lite with MAXPRO-Net Figure 4-1 LCD and Navigation Keys Numeric keypad RS232 directly RS422 indirectly Configuration Maxpro offline keyboard 1 Fixed Camera Camera 1 Maxpro Setting Maxpro Key Code Keyboard ID 1 to 32 Baud Rate Joystick Speed Server IP 9600 / 19200 bps - Honeywell HJC5000 | User Guide - Page 49
UltraKey Lite Controller Installation and User Guide Installing and Configuring a Serial Connection Step 1: Connect to the UltraKey Lite Serial Port Note For a list of accessories see Shipping Checklist on page 18 and for port connections see UltraKey Lite Port Connections and Descriptions on - Honeywell HJC5000 | User Guide - Page 50
RS232RX 5--RS232GND 6--RS232TX 7--RS485_1-/RS422_1_TX8--RS485_1+/RS422_1_TX+ *RS485_2/RS422_2_TX and RS232 use same UART_AC 4 RJ45 to DB9 female RJ45 (Ultrakey Lite) DB9(M axpro) #4(RX) #5(GND) #6(TX) #3(TX) #5(GND) #2(RX) 1 RJ45 Network Cable 4 RJ45 to DB9 female 1 RJ45 Network Cable 3 PSU - Honeywell HJC5000 | User Guide - Page 51
UltraKey Lite Controller Installation and User Guide Figure 4-5 RS232 Serial Port Connection and MX18 MAXPRO Serial Port (RS232) and MX18 RJ45 define: 1--RS485_2+/RS422_2_TX+/ RS422_1_RX+ 2--RS485_2-/RS422_2_TX-/ RS422_1_RX3-NC 4--RS232RX 5--RS232GND 6--RS232TX 7-- - Honeywell HJC5000 | User Guide - Page 52
Installing UltraKey Lite with MAXPRO-Net RS422 Connections Using a Converter and the Terminal Box 1. Select the applicable adapter plug and insert it into the AC adapter. Push to - Honeywell HJC5000 | User Guide - Page 53
UltraKey Lite Controller Installation and User Guide Figure 4-9 RS232 Serial Port Connection and Terminal Box RS422 MAXPRO Serial Port (RS232) and Terminal Box (RS422) RS232 to RS422 RS232 PL1 1--RS485_1+/RS422_1_TX+ 2--RS485_1-/ - Honeywell HJC5000 | User Guide - Page 54
to VideoBloX mode, Address 1, baud rate 19200 bps. 1. If not already done, install and connect the controller to a power source. The UltraKey Lite or ethernet connections in the next step. FIXED CAMERA Camera 1 Maxpro offline Keyboard 1 Step 3: Configure Address, Baud Rate, or IP for MAXPRO-Net - Honeywell HJC5000 | User Guide - Page 55
UltraKey Lite Controller Installation and User Guide Note If the controller cannot connect to the MAXPRO the default baud rate for most MAXPRO systems. 8. Press the down LCD arrow key to scroll to Joystick Speed. Press Ent and use the up/down arrow keys to select Normal or High. Press Ent to - Honeywell HJC5000 | User Guide - Page 56
1 Installing and Configuring an Ethernet Connection Step 1: Connect to the UltraKey Lite Ethernet Port Table 4-3 Port RJ45 Ethernet RJ45 Ethernet Pin Assignments Pin network. Refer to the applicable MAXPRO-Net Installation Guide for instructions. Figure 4-11 Ethernet Port Connections to MAXPRO - Honeywell HJC5000 | User Guide - Page 57
UltraKey Lite Controller Installation and User Guide Step 2: Configure the Controller for MAXPRO Mode Note The controller factory defaults to VideoBloX mode, Address 1, baud rate 19200 bps. Follow the same steps as with the serial connection, Step 2: Configure the Controller for MAXPRO Mode on - Honeywell HJC5000 | User Guide - Page 58
UltraKey Lite with MAXPRO-Net Step 4: Configure the Controller for an Ethernet Connection 1. Press Alt > Clr to exit from the VideoBloX Net Infor DHCP Manual Setting Network: Manual Setting Show Net : DHCP menu. 2. Press Ent and the keyboard's network will be configured automatically. • If - Honeywell HJC5000 | User Guide - Page 59
UltraKey Lite Controller Installation and User Guide When the nework configures successfully, the user can enter the Show Net Infor menu to see the IP Address, IP Address, DNS, Gateway and Netmask. Network: Manual Setting Manually Configuring the Network Manually configuring the network using - Honeywell HJC5000 | User Guide - Page 60
Installing UltraKey Lite with MAXPRO-Net Step 5: Setting the Keyboard Address While Powering Up While powering up, when the Time Left 3 menu displays, press certain keys (see Table 4-4) to set the keyboard address. Table 4-4 Setting the Keyboard Address Key Alt > 1 Alt > 2 Alt > 3 Alt > 4 Alt > - Honeywell HJC5000 | User Guide - Page 61
UltraKey Lite Controller Installation and User Guide Figure 4-12 UltraKey Lite Login page Step 1: Configure UltraKey Lite to MAXPRO Mode 1. Log into From the side menu, click MAXPRO Configuration. See Figure 4-14. 2. Under Keyboard ID Setting, enter a number between 1 and 99 to set the controller ID - Honeywell HJC5000 | User Guide - Page 62
Installing UltraKey Lite with MAXPRO-Net 3. Enter the IP address and Port Number of the bps. 5. Select a Connect Mode from the drop-down list. Options are 232 or 422. 6. From the Joystick speed drop-down list, select Normal or High. 7. Click Apply to save the configuration, Cancel to exit without - Honeywell HJC5000 | User Guide - Page 63
UltraKey Lite Controller Installation and User Guide 4. Click Apply to save the configuration, Cancel to exit without saving or Default to restore all factory default values. Figure 4-15 Serial Port Configuration Tab - Honeywell HJC5000 | User Guide - Page 64
Installing UltraKey Lite with MAXPRO-Net Figure 4-17 DynKey Configuration Tab 2. In the drop-down menu, select the key you want to configure. 3. In the right column, select - Honeywell HJC5000 | User Guide - Page 65
5 System Administration and Troubleshooting In this section: • System Administration Using the : Config Menu 1. If not already done, install and connect the controller to a power source. The UltraKey Lite LCD displays. 2. From the home screen, press Alt > Clr to enter the Password menu. 3. - Honeywell HJC5000 | User Guide - Page 66
System Administration and Troubleshooting Adjusting the Back Light 1. Log into the controller. slider firmware. Note Slider firmware can be downloaded using the web browser. See Upgrading the UltraKey Lite Firmware on page 68 to download the firmware. Using the procedure on page 68 will download - Honeywell HJC5000 | User Guide - Page 67
UltraKey Lite Controller Installation and User Guide Testing the HJC5000 UltraKey Lite Controller Default Settings Settings Protocol Network Settings for the Keyboard IP 192.168.1.9 Net Mask 255.255.255.0 GateWay 192.168.1.1 DNS 192.168.1.1 Default Mode: VideoBlox Maxpro Mode Keyboard - Honeywell HJC5000 | User Guide - Page 68
Administration and Troubleshooting Table 5-1 HJC5000 UltraKey Lite Controller Default Settings (cont'd) Settings VideoBlox Mode In the User Name field enter Administrator (case sensitive). 3. In the Password field enter 1234 (default). 4. Click Login. Upgrading the UltraKey Lite Firmware 1. - Honeywell HJC5000 | User Guide - Page 69
UltraKey Lite Controller Installation and User Guide When the process is complete, the message Upgrade success displays and the system reboots. WARNING! Do not power off the keyboard during upgrading. Serious damage can occur to the firmware, rendering the keyboard inoperable. Figure 5-1 - Honeywell HJC5000 | User Guide - Page 70
System Administration and Troubleshooting Figure 5-3 System Configuration LCD Menu Tree - All Modes Maxpro Settings VB Settings Restore Defaults Address Baud Rate Control Mode IP Address Keyboard ID Serial Port Mode Server Port Server IP Joystick Speed Baud Rate About Configuration System - Honeywell HJC5000 | User Guide - Page 71
- Honeywell HJC5000 | User Guide - Page 72
.com/security/es +34.902.667.800 www.honeywellvideo.com +1.800.796.CCTV (North America only) [email protected] Document 800-07422 - Rev A - 08/10 © 2010 Honeywell International Inc. All rights reserved. No part of this publication may be reproduced by any means without written permission
-
 1
1 -
 2
2 -
 3
3 -
 4
4 -
 5
5 -
 6
6 -
 7
7 -
8
-
9
-
10
-
11
-
12
-
13
-
14
-
15
-
16
-
17
-
18
-
19
-
20
-
21
-
22
-
23
-
24
-
25
-
26
-
27
-
28
-
29
-
30
-
31
-
32
-
33
-
34
-
35
-
36
-
37
-
38
-
39
-
40
-
41
-
42
-
43
-
44
-
45
-
46
-
47
-
48
-
49
-
50
-
51
-
52
-
53
-
54
-
55
-
56
-
57
-
58
-
59
-
60
-
61
-
62
-
63
-
64
-
65
-
66
-
67
-
68
-
69
-
70
-
71
-
72
 |
 |

Document 800-07422 – Rev A – 08/10
Installation and User Guide
UltraKey Lite
Keyboard controller for VideoBloX
and MAXPRO-Net Matrix Systems
HJC5000