Honeywell HTR4 Quick Start Guide - Page 2
Finding and Playing Video
 |
View all Honeywell HTR4 manuals
Add to My Manuals
Save this manual to your list of manuals |
Page 2 highlights
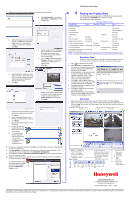
11. Define up to nine record rules that determine when recording takes place. a. Click Add New Rule. You can also Edit, Delete or Duplicate previously created rules. b. Select the trigger(s) to use to activate the rule. You must add at least one trigger to the rule. Only enabled triggers are available for selection. c. Click Next. d. Add up to eight record schedules to the rule (optional). A rule becomes active only when events occur during the day and time defined in the rule schedule(s). e. You can Add predefined schedules, Wakeup schedules, or create new schedules for specific days or a range of days. f. Click Next. g. Select at least one camera you want audio and video to record from in the rule. You can also specify the image quality, resolution and frame rate settings of the camera. h. Click Next. i. Select the camera(s) to be displayed on the spot monitor when the rule is active. You can also select the Display Duration of each camera. j. Click Next. k. Review the storage information you are using. Do not exceed your capacity. l. Click Next. m. Name and enable the record rule. Provide a rule description, if required. n. Click Finish. o. Repeat these steps for each rule you are adding. p. Review the rules. The recorder reacts to the record rule at the top of the list first. q. To change the rule priority, highlight a rule, then click the up or down arrow. r. Click Next when you are finished configuring rules. 12. Review your configuration summary. Click Save (recommended) to save the configuration file on your PC for future use. 13. You must upload the configuration to the recorder to have your settings take effect. This overwrites the current configuration. Click Upload this Configuration. 14. On the Users tab, select the Password Protection Enabled check box to secure recorded data from unwanted access. 15. Assign up to 50 user accounts and set passwords (this requires administrator privilege and password protection to be enabled). To create new user accounts, you must select the privilege level for the user. Choose between Configuration, Viewer, or both. HTR4 System Quick Setup 4 Finding and Playing Video If the HTR4 Recorder is not already on (POWER LED is solid green when on), briefly press the POWER button on the front panel. Start the BusView Player application. Front Panel Indicators (LEDs) Recorder State Service Temperature Record Power No power to recorder OFF Sleep mode ON (Blinking) ON (wake up) ON (Rapid blinking) ON (not recording) ON (Solid) ON (recording) ON (Solid) ON (Solid) Error ON (Solid) ON (Solid) Error (HD specific) ON (Blinking) ON (Solid or blinking) Storage Full and Protected ON (Blinking) ON (Blinking) ON (Solid) Outside Temperature Range ON (Solid) ON (Blinking) Firmware Upgrade in Progress ON (Blinking) ON (Blinking) ON (Blinking) HD Erase (Full Erase) ON (Rapid Blinking) ON (Solid) Recording without all cameras ON (Blinking) present for the active rule ON (Solid) ON (Solid) Note The Service LED will flash a few times during wake up. This is normal operation and not an error. Search for Video Search for video data stored on a recorder or archived (saved) on a PC. You do not have to be connected to a recorder to search for archived data. 1. Click on the Player quad screen. 2. Select Recorders (or Archives) on the Source tab. If you are not connected to a recorder, select the recorder from the recorders list. Click Add. 3. Enter parameters on the appropriate tab to search by: date and time range, trigger(s), camera(s), rule(s), or GPS data. To locate a specific instance, narrow your search parameters. 4. Click Add to add the search criteria to this search file. This only adds the criteria currently displayed on the open tab. 5. Click Save (optional) to save the search criteria for future use. 6. Click GO to locate the clips that match your search criteria. 7. Select the desired clip from the Search Results, then click Load. Use the Player controls to start viewing the video. Play Video 1. Select the recorder on the Recorders tab of the Explorer Pane, then click Connect. 2. Clips on a connected recorder appear under its name. Select the desired clip from the list, then click Load. Use a search to locate a specific clip. Use the Player controls (see below) to start viewing. Clip information: date, start and end time Indicates active audio source when green Information Print image Camera name Save Image Recorders - lists video clips by connected recorder Archives - lists recordings previously saved to the PC Search Results - lists clips matching search criteria Player Controls Location of current image Progress bar indicates clip length Current clip time, playback speed GPS information: speed, direction, location (latitude + longitude) Advanced views (time, triggers, cameras, rules) Next/ Prev Clip Clip Start Fast Single Rev Stop/ Fwd Single Fast Clip Reverse Frame Play Pause Play Frame Forward End Rev Fwd Previous/next event Global controls (all cameras) Print images Archive (save) Search Help Audio control Player controls Displays active trigger information www.honeywellvideo.com +1.800.796.CCTV (North America only) [email protected] Document 800-00275 - Rev A - 03/08 © 2008 Honeywell International Inc. All rights reserved. No part of this publication may be reproduced by any means without written permission from Honeywell Video Systems. The information in this publication is believed to be accurate in all respects. However, Honeywell Video Systems cannot assume responsibility for any consequences resulting from the use thereof. The information contained herein is subject to change without notice. Revisions or new editions to this publication may be issued to incorporate such changes.
-
 1
1 -
 2
2
 |
 |
