Honeywell HW5500 Owners Manual - Page 15
Step 2: Install Wheel Axle and Wheels, To install wheel assembly, you will need
 |
UPC - 894190002018
View all Honeywell HW5500 manuals
Add to My Manuals
Save this manual to your list of manuals |
Page 15 highlights
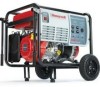
Assembly Step 2: Install Wheel Axle and Wheels To install wheel assembly, you will need: ‰ Socket wrench with 10 mm socket* ‰ Needlenose Pliers* ‰ Wheel Axle (1) ‰ 16 mm full-thread hex bolts (4) ‰ 13 mm flange serrated nuts (4) ‰ Axle Bracket† (1) ‰ Wheels (2) ‰ 9/16" Washers (4) ‰ Cotter Pins (2) * Not included. † Two brackets are needed to install wheel axle. One bracket comes already attached to wheel axle; other bracket is included in wheel kit hardware bag. 1. Install wheel axle brackets to frame using 16 mm fullthread hex bolts and 13 mm flange serrated nuts. 1A. Install pre-attached bracket to frame first. 1B. Install other bracket (included in hardware bag) to frame. 4. Slide second 9/16" washer onto axle. 5. Slide cotter pin into pre-drilled hole until fully seated. 6. Using needlenose pliers, bend each end of cotter pin in opposing directions to secure wheel to axle. FIGURE 8: Cotter Pin Installation 7. Return generator in upright position (so that wheels and leg supports are touching ground). FIGURE 6: Wheel Axle Attached to Generator On each end of axle: 2. Slide 9/16" washer onto axle. 3. Slide and push wheel onto axle until it fits snug against washer. FIGURE 7: Slide Wheel onto Wheel Axle HW5500/5500E Portable Generator Owner's Manual www.honeywellgenerators.com 9
-
 1
1 -
2
-
3
-
4
-
5
-
6
-
7
-
8
-
9
-
 10
10 -
 11
11 -
 12
12 -
 13
13 -
 14
14 -
 15
15 -
 16
16 -
 17
17 -
 18
18 -
 19
19 -
 20
20 -
21
-
22
-
23
-
24
-
25
-
26
-
27
-
28
-
29
-
30
-
31
-
32
-
33
-
34
-
35
-
36
-
37
-
38
-
39
-
40
-
41
-
42
-
43
-
44
-
45
-
46
-
47
 |
 |
