Honeywell HZ339BP User Guide - Page 3
Step 1: Power, Step 4: Fahrenheit/celsius Function, Step 5: Oscillation - controls
 |
UPC - 092926344832
View all Honeywell HZ339BP manuals
Add to My Manuals
Save this manual to your list of manuals |
Page 3 highlights
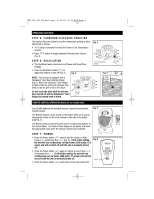
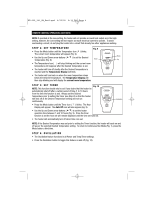
HZ-339_341_OM_Rev2.qxd 6/22/05 5:15 PM Page 3 OPERATION (CONTINUED) STEP 4: FAHRENHEIT/CELSIUS FUNCTION This heater offers the option to read the temperature setting in either Fahrenheit or Celsius. • °F/°C feature functions from only the Power or Set Temperature screens. • Press °F/°C button to toggle between Fahrenheit and Celsius (Fig. 4). Fig. 4 STEP 5: OSCILLATION • The Oscillation feature functions in all Power and Temp/Timer settings. • Press the Oscillation button ( ) to toggle this feature on and off (Fig. 5). Fig. 5 NOTE: This product is equipped with a SafeGuard™ Alert Heat Indicator Badge (Fig 6). When the SafeGuard™ Alert Badge located on the top of the grill changes from black to red the grill is hot to the touch. Do not touch the grille until the unit has been turned off and the SafeGuard™ Alert Badge has turned back to black. °F/°C Temperature Display Fig. 6 Heat Indicator Badge REMOTE CONTROL OPERATION (MODEL HZ-341 SERIES ONLY) Two (2) AAA batteries are included and are required to operate the Remote Control. Fig. 7 The Remote Control can be stored on the heater when not in use by hanging the remote on the hook located on the side of the heater (See Fig. 7). The Remote Control works the same as the corresponding buttons on the Control Panel. The Control Panel display on the heater will show the appropriate icons when the various functions are activated. STEP 1: POWER • Press the Power button ( ) once to start the heater on High Power ( ), Continuous Run ( ) (Fig. 8). If left at this setting, the unit will run continuously on High Power (1500 watts, 12.5 amps) and will not shut off until the unit is manually turned off. • Press the Power button ( ) again to change to Low Power ( ), Continuous Run ( ). If left at this setting, the unit will run continuously on Low Power (900 watts, 7.5 amps) and will not shut off until the unit is manually turned off. • Press the Power button ( ) a third time to turn the heater OFF. Fig. 8 Power
-
 1
1 -
 2
2 -
 3
3 -
 4
4 -
 5
5 -
 6
6 -
 7
7 -
 8
8 -
 9
9 -
10
-
11
-
12
-
13
-
14
-
15
-
16
-
17
-
18
-
19
 |
 |
