Hoover C1320 Manual - Page 6
How To Assemble, Assemblage De L'appareil
 |
UPC - 073502029060
View all Hoover C1320 manuals
Add to My Manuals
Save this manual to your list of manuals |
Page 6 highlights
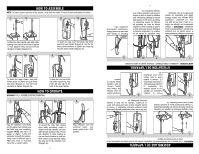
Plug the extension cord firmly into the pigtail cord making sure that both ends are completely engaged. NOTE: Use only a 17 gauge or higher 3-wire SJT extension cord with this cleaner. Using a cord of different type or AWG may result in increased risk of fire or electric shock. To prevent the cords from coming apart while vacuuming, create a loophole with the extension cord and slide through opening at top of cord lock (Diagram 2). Allow loophole to slip over hook at bottom of cord lock then remove excess slack by pulling the long end of the extension cord (Diagram 2a). 6 ASSEMBLAGE DE L'APPAREIL REMARQUE : Pour assurer le bon fonctionnement de l'aspirateur, vérifiez que le joint torique en caoutchouc est en place et serrez toutes les bagues. 1. 1a. 2. 2a. FRONT Plug extension cord into electrical outlet. Turn power switch to the "ON" position. 1. 2. 2a. 3. HOW TO OPERATE WARNING: FULLY ASSEMBLE BEFORE OPERATING. To attach the upper handle, align with middle section of cleaner and push firmly into place (Diagram 3). Turn the knob clockwise to tighten (Diagram 3a). To keep the cord out of the way while vacuuming, snap it into the cord clip on the back of the upper handle. Fixez la poignée inférieure en l'alignant sur l'ouverture du suceur située sur la base de l'aspirateur (illustration 1). Poussez fermement et serrez en tournant le bouton dans le sens horaire (illustration 1a). Pour fixer le sac, tenez la poignée et poussez fermement dans la poignée inférieure (illustration 2). Tournez le bouton supérieur dans le sens anti-horaire pour serrer et enclencher l'attache du sac dans la poignée inférieure (illustration 2a). 3. 3a. 4. Fixez la poignée supérieure en l'alignant sur la section médiane de l'aspirateur et poussez fermement pour l'enclencher (illustration 3). Tournez le bouton dans le sens horaire pour serrer (illustration 3a). UTILISATION DE L'APPAREIL AVERTISSEMENT : ASSEMBLEZ COMPLÈTEMENT L'APPAREIL AVANT DE VOUS EN SERVIR. Pour que le cordon ne vous dérange pas lorsque vous aspirez, coincezle dans l'attache située derrière la poignée. 1. 2. 2a. 3. Branchez la rallonge fermement dans le cordon spirale en vous assurant d'enclencher complètement les deux extrémités. REMARQUE : Utilisez uniquement une rallonge de calibre 17 ou plus à trois fils de type SJT avec cet aspirateur. L'utilisation d'une rallonge d'un calibre différent (AWG) peut augmenter les risques d'incendie ou de choc électrique. Pour empêcher le cordon de se séparer de l'aspirateur pendant le nettoyage, formez une boucle avec le cordon et glissez-la dans l'ouverture située en haut du dispositif de blocage du cordon (illustration 2). Passez la boucle sur le crochet situé en bas du dispositif de blocage, puis dégagez la partie en trop du cordon en tirant sur l'extrémité longue de la rallonge (illustration 2a). 6 AVANT Branchez la ralonge dans une prise de courant. Mettre l'interrupteur marche/arrêt en position « ON ». 3. 3a. To attach the lower handle, align with nozzle opening in the base of the cleaner (Diagram 1). Push together firmly and turn the knob clockwise to tighten (Diagram 1a). To attach the bag, hold the handle and firmly push into lower handle (Diagram 2). Turn the top knob counterclockwise to tighten and snap bag clip onto lower handle (Diagram 2a). 4. 1. 1a. 2. 2a. HOW TO ASSEMBLE NOTE: To ensure proper operation of the cleaner, verify that the rubber O-ring is in place and tighten all collars.
-
 1
1 -
 2
2 -
 3
3 -
 4
4 -
 5
5 -
 6
6 -
 7
7 -
 8
8 -
 9
9 -
 10
10 -
 11
11 -
 12
12 -
13
-
14
 |
 |
