Hoover C1660 Manual
Hoover C1660 Manual
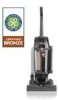 |
UPC - 073502027899
View all Hoover C1660 manuals
Add to My Manuals
Save this manual to your list of manuals |
Hoover C1660 manual content summary:
- Hoover C1660 | Manual - Page 1
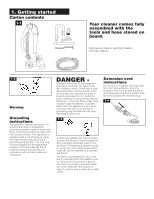
of your HOOVER product. Read this manual before operating cleaner Contents Getting Started 2 How to use 3 Cleaner Description 3 Cleaning Tools 5 If You Have a Problem 11 Clearing Blockages 12 Important Safeguards 1 Maintenance Authorized Service 11 Cleaning Filters 7-8 Emptying Dirt - Hoover C1660 | Manual - Page 2
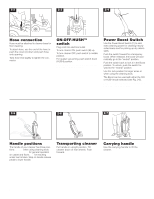
Hose, cleaning tools and wands (packed on cleaner) C C. Extension cord A 1-2 A B C Operate cleaner only at voltage specified on data plate on bottom of cleaner. Warning: Electrical shock could occur if used outdoors or on wet surfaces. Grounding instructions This appliance must be grounded. If it - Hoover C1660 | Manual - Page 3
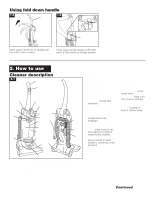
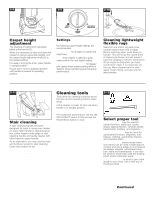
7. HEPA filter (inside filter chamber) 8. Dirt cup (Twin Chamber) 9. Dirt cup lid 10. Headlight 18. Extension wand 19. Crevice wand: stores inside wand 20. Cord hook: hang cord from hook for storage. 21. Cord 22. ON-OFF-HUSH™ switch: located on front of cleaner body 11. Stair cleaning handle - Hoover C1660 | Manual - Page 4
end slightly to tighten the connector. ON-OFF-HUSH™ switch Plug cord into electrical outlet. To turn cleaner ON, push switch (B) up. To turn cleaner OFF, push switch to middle position. For quieter vacuuming, push switch down (HUSH) position. Put Power Boost Switch in neutral when using ON or HUSH - Hoover C1660 | Manual - Page 5
strokes. 2-11 Stair cleaning A stair cleaning handle has been designed for ease in using your cleaner on stairs. With handle in operating position, place fingers under edge of stair cleaning handle and guide cleaner with other hand on upper handle. As an alternative, you may use the hose and - Hoover C1660 | Manual - Page 6
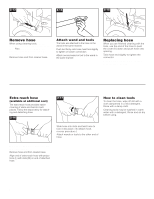
hose to push the cover (K) down and push hose onto opening. Twist hose end slightly to tighten the connector. Hose must be connected to cleaner base for floor cleaning. Extra reach hose (available at additional cost) The extra reach hose provides easier cleaning of stairs and hard to reach places - Hoover C1660 | Manual - Page 7
continued cleaning effectiveness. Dirt cup 3-1 A E D B C The dirt cup assembly consists of the following parts: Lid (A) Dirt cup (B) Pre-filter (C) HEPA cartridge filter (D) Dirt inlet opening (E) While the cleaner is in operation, the prefilter screen will stop larger debris from entering the HEPA - Hoover C1660 | Manual - Page 8
. Replace lens and screws. Should you want to replace this filter, ask for HOOVER part no. 38765024 (filter package part no. 40110004). Do not operate cleaner without any of the filters in place. Remove lens - Disconnect cleaner from electrical outlet. Using a screwdriver, remove the two screws as - Hoover C1660 | Manual - Page 9
replace Disconnect cleaner from electrical HOOVER belts with your cleaner. When purchasing a new belt, ask for HOOVER part No. 38528040 (belt package part no. 40201190). 3-16 How to replace Disconnect cleaner screws at rear of hood. Lift hood off cleaner. B Remove the 2 screws behind the agitator - Hoover C1660 | Manual - Page 10
cleaner body. The belt must rotate freely inside the belt guide. If the agitator does not turn, reposition belt in the belt guide for HOOVER part no. 48414130. 3-27 How to replace Disconnect cleaner from Hoover Factory Service Center or an Authorized Hoover Warranty Service Dealer (Depot). 10 - Hoover C1660 | Manual - Page 11
servicing (see"Service" section). Service To obtain approved HOOVER service and genuine HOOVER parts, locate the nearest Authorized Factory Service Center or Authorized Hoover Warranty Service Dealer (Depot) by: • checking the Yellow Pages under "Vacuum Cleaners - Household" OR - • checking the list - Hoover C1660 | Manual - Page 12
found: Turn cleaner OFF and disconnect from electrical outlet. 1. Check fullness of dirt cup and filter assembly; empty cup and clean filters if needed Turn cleaner OFF and unplug. 7. Remove hose end from cleaner. 8. Press hose inlet door open and clear any blockages. 12 8-04 C1660-900 HOOVER and - Hoover C1660 | Manual - Page 13
provistos. Los números se encuentran en la parte inferior de la aspiradora. Modelo Número de serie Consejo: Adjunte su recibo de compra a este manual del propietario. Aspiradora vertical Para obtener el servicio de garantía de su producto HOOVER puede requerirse la verificación de la fecha - Hoover C1660 | Manual - Page 14
manual de inglés. Si necesita asistencia: Visítenos en línea en www.hoover.com para encontrar el centro de servicio más cercano a usted (haga clic en el botón "Service al voltaje especificado en la plaquita de datos ubicada en la parte inferior de la aspiradora. ADVERTENCIA: Si se usa al aire libre - Hoover C1660 | Manual - Page 15
22. Interruptor de encender/apagar/HUSH™ (silencio): ubicado en la parte delantera del cuerpo de la aspiradora Haga funcionar la aspiradora solamente con voltaje especificado en la placa de datos que se encuentra en la parte inferior de la aspiradora. 2-2 Conexión para la manguera La manguera debe - Hoover C1660 | Manual - Page 16
del depósito para polvo. El filtro de cartucho HEPA recolectará las partículas finas que hayan pasado a través de la malla del antefiltro. antes que lo aspirado llegue a la abertura para que entre el polvo en la parte posterior del depósito para polvo (figura 3-1) o, si se prefiere, después - Hoover C1660 | Manual - Page 17
de Hoover. 3- HOOVER (paquete de correa con número de pieza 40201190). 3-16 Cómo reemplazarla Desconecte la aspiradora de la toma de corriente eléctrica. Con el mango en posición vertical, incline la aspiradora hacia atrás hasta que descanse en el piso. Saque los 2 tornillos cerca de la parte - Hoover C1660 | Manual - Page 18
21 Con las letras en la parte de afuera de la correa, Vacuum Cleaners - Household" ("Aspiradoras - Artículos del hogar") O - • revisando la lista de Centros de servicio de fábrica provista con esta aspiradora O - • revisando la sección "Service" (Servicio) de The Hoover Company en línea en www.hoover - Hoover C1660 | Manual - Page 19
4. Si tiene un problema Si ocurre un problema menor, generalmente puede resolverse con bastante facilidad cuando se halla la causa, usando esta lista de verificación. Problema: La aspiradora no funciona Causa posible Solución posible • No está bien enchufada en la pared y/o el cordón de extensión • - Hoover C1660 | Manual - Page 20
de service garanti autorisé Hoover (dépôt). • N'utiliser cet aspirateur que conformément à son usage prévu, tel que décrit dans le présent guide. N'utiliser que les accessoires recommandés par Hoover ; d'autres accessoires pourraient s'avérer dangereux. Ranger et conserver ces instructions ! - Hoover C1660 | Manual - Page 21
les instructions numérotées de cette section française avec les illustrations numérotées correspondantes de la section anglaise de ce guide. Si vous avez besoin d'aide : Visitez notre site Web au www.hoover.com. Cliquez sur le bouton « Service » pour connaître l'adresse du Centre de service le - Hoover C1660 | Manual - Page 22
N'utiliser l'aspirateur qu'à la tension spécifiée sur la plaque signalétique située au bas de l'appareil. 2-2 Connexion du tuyau Le tuyau doit être fixé à la base de l'aspirateur pour nettoyer les planchers. Pour fixer le tuyau, utiliser l'extrémité du tuyau pour enfoncer le couvercle (A) et l' - Hoover C1660 | Manual - Page 23
placer sur des meubles, des franges de tapis ou des escaliers recouverts de tapis. 2-12 Choix de l'accessoire approprié F. La brosse à épousseter peut être utilisée pour les boiseries sculptées, dessus de tables, livres, lampes, luminaires, stores vénitiens, plinthes, volets et grilles à registre. - Hoover C1660 | Manual - Page 24
. Si le remplacement du filtre s'avérait nécessaire, commander la pièce HOOVER no 38765024 (numéro de pièce du filtre no 40110004). Ne pas utiliser utilise une ampoule 12 volts de type 912 à culot poussoir, pièce Hoover no 27313107. Pour enlever la lentille Débrancher l'aspirateur de la prise de - Hoover C1660 | Manual - Page 25
guide-courroie. Si l'agitateur ne tourne pas, repositionner la courroie dans le guide filtre. 3. Suivre les instructions de la section « Dé Service », OU • vérifier la liste des Centres de service en usine fournie avec cet appareil OU • consulter la section Service de Hoover sur Internet à www.hoover - Hoover C1660 | Manual - Page 26
• Dégager l'obstruction • Le filtre HEPA est bloqué • Nettoyer le filtre HEPA, tel que décrit dans la section « Assemblage du filtre » • Vide-poussière mal fixé • Placer le vide-poussière correctement (figure 3-4) • Couvercle du vide-poussière mal placé ou manquant • S'assurer que le couvercle du - Hoover C1660 | Manual - Page 27
27 - Hoover C1660 | Manual - Page 28
HOOVER y ®son marcas registradas HOOVER et ®sont des marques déposées HOOVER and ® are registered trademarks 8-04 C1660-900 Printed in Mexico 56511-C31
-
 1
1 -
 2
2 -
 3
3 -
 4
4 -
 5
5 -
 6
6 -
 7
7 -
8
-
9
-
10
-
11
-
12
-
13
-
14
-
15
-
16
-
17
-
18
-
19
-
20
-
21
-
22
-
23
-
24
-
25
-
26
-
27
-
28
 |
 |

Please enter the COMPLETE model and serial numbers in the spaces provided.
The numbers are located on the bottom of your cleaner.
Model_________________________________________
Serial number_________________________________________
Hint:
Attach your sales receipt to this owner’s manual.
Verification of date of purchase may be required for warranty service
of your HOOVER product.
Contents
Getting Started
......................................
2
How to use
............................................
3
Cleaner Description
..........................
3
Cleaning Tools
..................................
5
If You Have a Problem
........................
11
Clearing Blockages
........................
12
Important Safeguards
..........................
1
Maintenance
Authorized Service
..........................
11
Cleaning Filters
..............................
7-8
Emptying Dirt Cup
............................
7
Lubrication
......................................
10
Replacing Agitator Brush Roll
......
10
Replacing Belt
..............................
9-10
Replacing Headlight
..........................
8
Thermal Protector
..............................
11
Important Safeguards
When using an electrical appliance, always follow
basic precautions, including the following:
READ ALL INSTRUCTIONS BEFORE USING THIS APPLIANCE
Warning:
To reduce the risk of fire, electric shock, or injury:
•
Do not use outdoors or on wet surfaces.
•
Connect to a suitable extension cord. See “Extension cord instructions”.
•
Connect to a properly grounded outlet only. See “Grounding Instructions”.
•
Close supervision is necessary when any appliance is used by or near children.
Do not allow vacuum cleaner to be used as a toy or to run unattended at any time.
•
Keep hair, loose clothing, fingers, feet and all parts of body away from openings,
rotating agitator and other moving parts. Do not operate cleaner in bare feet or
when wearing open toe shoes or sandals.
•
Do not pick up anything that is burning or smoking, such as cigarettes, matches, or
hot ashes.
•
Do not use to pick up flammable or combustible materials such as gasoline or fine
wood sandings or use in areas where they may be present.
•
Avoid picking up hard, sharp objects with the cleaner. They may damage the
cleaner.
•
Always turn off this appliance before connecting or disconnecting hose.
•
Do not use without dirt cup or filters in place. Empty dirt cup and clean filters fre-
quently when picking up very fine materials such as powder.
•
Use extra care when cleaning on stairs.
•
Do not put any object into openings. Do not use with any opening blocked; keep
free of dust, lint, hair, or anything that may reduce air flow.
•
Do not pull or carry by cord, use cord as a handle, close door on cord or pull cord
around sharp edges or corners. Do not run appliance over cord. Keep cord away
from heated surfaces.
•
Always disconnect cord from electrical outlet before servicing the cleaner.
•
Unplug cleaner when not in use. Turn off all controls before unplugging.
•
Do not unplug by pulling on cord. To unplug, grasp the plug, not the cord. Never
handle plug or appliance with wet hands.
•
Do not use with damaged cord or plug. If appliance is not working as it should, has
been dropped, damaged, left outdoors, or dropped into water, take it to a Hoover
Factory Service Center or Authorized Hoover Warranty Service Dealer (Depot).
•
Use vacuum cleaner only for its intended use as described in the instructions.
Use only attachments recommended by The Hoover Company; others may cause
hazards.
Save these instructions!
© 2004 The Hoover Company
www.hoover.com
®
ENGLISH
pp. 1-12
ESPAÑOL
pág. 13-19
FRANÇAIS
p. 20-26
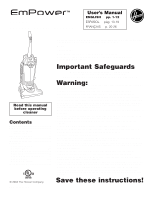
User’s Manual
Commercial
Upright Vacuum Cleaner
Read this manual
before operating
cleaner