Hoover UH20020RM Product Manual
Hoover UH20020RM Manual
 |
View all Hoover UH20020RM manuals
Add to My Manuals
Save this manual to your list of manuals |
Hoover UH20020RM manual content summary:
- Hoover UH20020RM | Product Manual - Page 1
Owner's Manual Operating and Servicing Instructions Español - página E1 hoover.com Remanufactured IMPORTANT: READ CAREFULLY BEFORE ASSEMBLY AND USE. Questions or concerns? For assistance, please call Customer Service at 1-800-944-9200 Mon-Fri 8am-7pm EST. PLEASE DO NOT RETURN THIS PRODUCT TO THE - Hoover UH20020RM | Product Manual - Page 2
How To Use...6 Cleaner Descriptions 6 Cord Release...6 On/Off Pedal...6 Handle Release 7 Floor/Carpet Cleaning 7 Suction Only Mode 7 Carry Handle ...7 Cleaning Tools...8 Maintenance...9 Dirt Cup...9 Filters...10 Umbrella Tube...10 Belt And Brushroll 11 Troubleshooting...12 Service...13 . If you - Hoover UH20020RM | Product Manual - Page 3
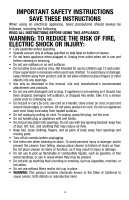
INSTRUCTIONS BEFORE USING THIS APPLIANCE. WARNING: TO REDUCE THE RISK OF FIRE, ELECTRIC SHOCK OR INJURY: • Fully assemble before operating. • Operate vacuum only at voltage specified on data label on bottom of cleaner in this manual. Use only , take it to a service center prior to continuing use - Hoover UH20020RM | Product Manual - Page 4
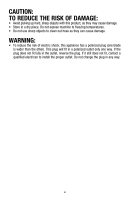
CAUTION: TO REDUCE THE RISK OF DAMAGE: • Avoid picking up hard, sharp objects with this product, as they may cause damage. • Store in a dry place. Do not expose machine to freezing temperatures. • Do not use sharp objects to clean out hose as they can cause damage. WARNING: • To reduce the risk of - Hoover UH20020RM | Product Manual - Page 5
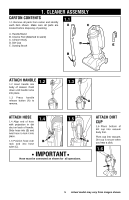
Attached to wand) C. Cleaner Body D. Dirt Cup E. Dusting Brush D E B Attach handle 1.2 Insert handle into body of cleaner. Push down until operations. Attach dirt cup 1.6 Place bottom of dirt cup into vacuum body first. Pivot cup into vacuum. Dirt cup is secure when you hear a click. 1.6 5 - Hoover UH20020RM | Product Manual - Page 6
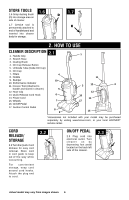
11. Crevice Tool (Attached to handle and stored in cleaner) 12. Hose Clip 13. Quick Release Cord Hook 14 hoover.com, or your local HOOVER® service center. CORD RELEASE/ STORAGE 2.2 Turn the Quick Cord Release for easy cord removal. Store cord in cord guide to keep out of the way while vacuuming - Hoover UH20020RM | Product Manual - Page 7
2.4 FLOOR/CARPET CLEANING 2.5 Move the handle and adjust it to the desired position for operating the cleaner, and lowering handle to clean under furniture. 2.5 SUCTION ONLY MODE 2.6 For optimal cleaning performance on bare floors, brushroll should be turned off. The vacuum - Hoover UH20020RM | Product Manual - Page 8
2.10 Remove the hose from hose caddy. Connect tools to end of hose or use hose alone. To use handle wand, first remove handle from cleaner body pressing the handle release button (see Fig. 1.3). Attach hose to top of handle. Use crevice tool attached or place Upholstery tool over crevice tool - Hoover UH20020RM | Product Manual - Page 9
. If the thermal protector continues to activate after following the above steps, your cleaner needs servicing. DIRT CUP ! CAUTION ! To reduce the risk of injury from moving parts, unplug vacuum before servicing. Do not operate cleaner without either the dirt cup or filters in place. How to Empty - Hoover UH20020RM | Product Manual - Page 10
FILTERS Primary HEPA and Foam Filter: How to Clean ! CAUTION ! To reduce the risk of personal injury, unplug vacuum before servicing. Do not operate cleaner without either the dirt cup or filters in place. Remove dirt cup as described in Figure 3.2. 3.4 Twist dirt cup lid counter clockwise and lift - Hoover UH20020RM | Product Manual - Page 11
To reduce the risk of injury from moving parts, unplug vacuum before servicing. 3.13 Lay the cleaner flat and flip it to expose the nozzle base. that the brushroll end caps are in the correct orientation. Rotate brushroll manually to make sure belt is properly aligned. 3.19 Reattach nozzle guard. - Hoover UH20020RM | Product Manual - Page 12
TROUBLESHOOTING If a minor problem occurs, it usually can be solved quite easily when the cause is found by using the checklist below. Any other servicing should be done by an authorized service representative. ! WARNING ! To reduce risk of personal injury - unplug cleaner before servicing. PROBLEM - Hoover UH20020RM | Product Manual - Page 13
To obtain approved Hoover® service and genuine Hoover® parts, locate the nearest Authorized Hoover® Warranty Service Dealer (Depot) by: • Checking the Yellow Pages under "Vacuum Cleaners" or "Household". • Visit our website at hoover.com (U.S. Customers) or hoover.ca (Canadian customers). Follow - Hoover UH20020RM | Product Manual - Page 14
MANUAL DEL PROPIETARIO Instrucciones de Funcionamiento y Servicio www.hoover.com Remanufacturado IMPORTANTE: LEA ATENTAMENTE ANTES DE ENSAMBLAR Y USAR. ¿Tiene alguna pregunta o inquietud? Para obtener asistencia, llame al Servicio de atención al cliente al 1-800 - Hoover UH20020RM | Product Manual - Page 15
de Código de fabricación en los espacios provistos. Modelo CÓDIGO DE FABRICACIÓN Consejo: Adjunte su recibo de compra a este Manual del propietario. Para obtener el servicio de garantía de su producto HOOVER® puede requerirse la verificación de la fecha de compra. Inscriba su producto en línea en - Hoover UH20020RM | Product Manual - Page 16
Del Producto Y No Permita Que Los Niños Coloquen Los Dedos U Otros Objetos En Ninguna Abertura. • Use El Producto Sólo Como Se Describe En Este Manual. Use Sólo Los Accesorios Y Productos Recomendados Por El Fabricante. • No Use Este Aparato Con Un Cordón O Enchufe Dañado. Si El Aparato No Est - Hoover UH20020RM | Product Manual - Page 17
ADVERTENCIA: PARA REDUCIR EL RIESGO DE DAÑOS: • Evite aspirar objetos duros y filosos con este producto, ya que pueden causar daños. • Guarde la máquina en un lugar seco. No la exponga a temperaturas de congelamiento. • No use objetos filosos para limpiar la manguera, ya que pueden causar daños. - Hoover UH20020RM | Product Manual - Page 18
1. Ensamblaje de la aspiradora Contenido de la caja 1.1 1.1 Retire todas las piezas de la caja e A identifique cada artículo que se muestra. C Asegúrese de contar con todas las piezas antes de desechar el embalaje. A. Mango/La Varilla B. Accesorio para Hendiduras de polvo (CONECTADOS A LA - Hoover UH20020RM | Product Manual - Page 19
alimentación 15. Ruedas 16. Pedal encendido/apagado 8 9 15 *Los accesorios no incluidos con su modelo pueden comprarse por separado, visitando www.hoover.com. 17. Suction Control Pedal DESENGANCHE/ ALMACENAJE DEL CABLE 2.2 Gire el gancho de liberación rápida del cordón eléctrico para retirarlo - Hoover UH20020RM | Product Manual - Page 20
Pedal para soltar el mango 2.4 Pise el pedal para bajar el asa a la posición de funcionamiento. El asa no queda trabada en una posición sola, sino que oscila para permitir un funcionamiento adecuado. 2.4 LIMPIEZA DE PISOS/ ALFOMBRAS 2.5 Mueva el asa y ajústela en la posición deseada para operar la - Hoover UH20020RM | Product Manual - Page 21
Conexión del tubo y de los accesorios 2.10 Retire la manguera del portamangueras. Conecte los accesorios al extremo de la manguera o utilice la manguera sola. Para utilizar la varilla del mango, retire primero el mango del cuerpo de la aspiradora oprimiendo el botón de desenganche del mango (vea Fig - Hoover UH20020RM | Product Manual - Page 22
3. Mantenimiento Familiarícese con estas tareas de mantenimiento en el hogar, ya que el uso y cuidado apropiados de su aspiradora asegurarán una limpieza continuamente eficaz. El indicador de verificación del sistema, que se encuentra en la parte (A), lo alerta sobre posibles problemas de - Hoover UH20020RM | Product Manual - Page 23
filtrOs Filtro hecho con medios filtrantes HEPA : Cómo limpiar ! PRECAUCIÓN ! Para reducir el riesgo de lesiones personales, desenchufe la aspiradora antes de realizar el servicio. No use la aspiradora sin el contenedor para polvo, o los filtros colocados en su lugar. Retire el contenedor para polvo - Hoover UH20020RM | Product Manual - Page 24
dentro de la boquilla asegurándose que las tapas finales estén en la orientación correcta (inserción 6a). Gire el cepillo giratorio de forma manual para asegurarse que la banda esté alineada apropiadamente. 3.19 Vuelva a colocar la protección de la boquilla. 3.20 Fíjela alineando las tres (3) leng - Hoover UH20020RM | Product Manual - Page 25
4. Solución de problemas Si ocurre un problema menor, generalmente puede resolverse con bastante facilidad cuando se halla la causa, usando esta lista de verificación. Cualquier otra tarea de mantenimiento debe ser realizada por un representante de mantenimiento autorizado. ! ADVERTENCIA ! Para - Hoover UH20020RM | Product Manual - Page 26
informen de manera automática la ubicación de los centros autorizados de servicio, llame al 1-800-944-9200. No envíe su aspiradora a Hoover®, Inc., Company en Glenwillow para realizar el servicio. Esto sólo provocará demoras. Si necesita recibir más ayuda: Para hablar con un representante de
-
 1
1 -
 2
2 -
 3
3 -
 4
4 -
 5
5 -
 6
6 -
 7
7 -
8
-
9
-
10
-
11
-
12
-
13
-
14
-
15
-
16
-
17
-
18
-
19
-
20
-
21
-
22
-
23
-
24
-
25
-
26
 |
 |
hoover.com
OWNER’S MANUAL
Operating and Servicing Instructions
©2010 Techtronic Floor Care Technology Limited. All rights reserved. #960009657 ID101237-R0
IMPORTANT: READ CAREFULLY BEFORE ASSEMBLY AND USE.
Questions or concerns? For assistance, please call Customer Service at 1-800-944-9200
Mon-Fri 8am-7pm EST.
PLEASE DO NOT RETURN THIS PRODUCT TO THE STORE.
THIS PRODUCT IS INTENDED FOR HOUSEHOLD USE ONLY.
IF USED COMMERCIALLY WARRANTY IS VOID.
Español - página E1
Remanufactured
Part # 59881333