Hoover UH20020RM Product Manual - Page 9
Caution, Notice
 |
View all Hoover UH20020RM manuals
Add to My Manuals
Save this manual to your list of manuals |
Page 9 highlights
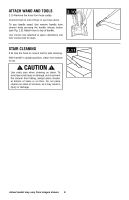
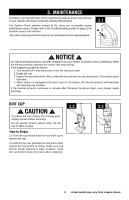
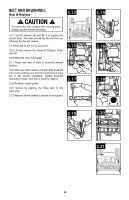
3. MAINTENANCE Familiarize yourself with these home maintenance tasks as proper use and care of your cleaner will ensure continued cleaning effectiveness. The System Check Indicator located at (A), alerts you to possible system performance issues. Please refer to the Troubleshooting section on page 12 for possible causes and solutions. Any other servicing should be done by an authorized service representative. 3.1 A ! NOTICE ! An internal thermal protector has been designed into your cleaner to protect it from overheating. When the thermal protector activates the cleaner witll stop running. If this happens proceed as follows: 1. Turn cleaner OFF and disconnect it from the electrical outlet. 2. Empty dirt cup. 3. Inspect the nozzle/brushroll, filters, umbrella tube and hose for any obstructions. Clear obstructions if present. 4. When cleaner is unplugged and motor cools for 30 minutes, the thermal protector will deactivate and cleaning may continue. If the thermal protector continues to activate after following the above steps, your cleaner needs servicing. DIRT CUP ! CAUTION ! To reduce the risk of injury from moving parts, unplug vacuum before servicing. Do not operate cleaner without either the dirt cup or filters in place. How to Empty 3.2 Push dirt cup release button on top of dirt cup to remove dirt cup. 3.3 Hold dirt cup over garbage can and press clean release dirt cup button to empty. Make sure cup bottom center opening is clear of debris. Snap dirt cup bottom back into place after emptying. 3.2 3.3 9 Actual model may vary from images shown.
-
 1
1 -
2
-
3
-
 4
4 -
 5
5 -
 6
6 -
 7
7 -
 8
8 -
 9
9 -
 10
10 -
 11
11 -
 12
12 -
 13
13 -
 14
14 -
15
-
16
-
17
-
18
-
19
-
20
-
21
-
22
-
23
-
24
-
25
-
26
 |
 |
