Hoover UH20020RM Product Manual - Page 10
Filters
 |
View all Hoover UH20020RM manuals
Add to My Manuals
Save this manual to your list of manuals |
Page 10 highlights
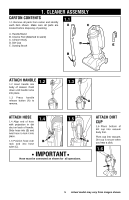
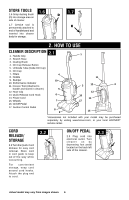
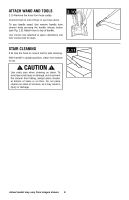
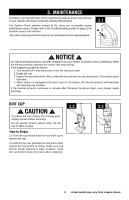
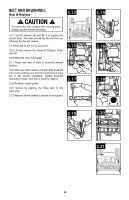
FILTERS Primary HEPA and Foam Filter: How to Clean ! CAUTION ! To reduce the risk of personal injury, unplug vacuum before servicing. Do not operate cleaner without either the dirt cup or filters in place. Remove dirt cup as described in Figure 3.2. 3.4 Twist dirt cup lid counter clockwise and lift up to remove. 3.5 Remove filter cartridge from dirt cup. 3.6 Separate foam filter from filter cartridge (A). Hold foam filter under running water to wash. Wring excess water out of filter (B). Allow filter to dry for at least 24 hours before replacing in filter cartridge. 3.7 Hold filter cartridge over trash can and tap off dirt and debris. Hepa filter can also be cleaned by running under water to wash (Fig. 3.6, B). Secondary Foam Filter: How to Clean 3.4 3.6 A B 3.8 ! CAUTION ! To reduce the risk of personal injury, unplug vacuum before servicing. Do not operate cleaner without either the dirt cup or filters in place. 3.8 Click the button on the base of the cleaner toward the outside edges to unlock the filter cartridge. 3.9 Remove the foam filter. 3.10 Hold foam filter under running water to wash. Wring excess water out of filter. Allow filter to dry for at least 24 hours before replacing. 3.10 Umbrella Tube: How to clean Remove dirt cup as described in Fig. 3.2. 3.11 3.11 Hold dirt cup by carry handle and press release button (A) to empty dirt cup. 3.12 Twist umbrella tube counter clockwise and pull out of dirt cup. Hold over trash can and shake free A of dirt and debris. To replace umbrella tube, insert back into dirt cup, align slots and twist clockwise until tube locks in place. Actual model may vary from images shown. 10 3.5 3.7 3.9 3.12
-
 1
1 -
2
-
3
-
4
-
 5
5 -
 6
6 -
 7
7 -
 8
8 -
 9
9 -
 10
10 -
 11
11 -
 12
12 -
 13
13 -
 14
14 -
 15
15 -
16
-
17
-
18
-
19
-
20
-
21
-
22
-
23
-
24
-
25
-
26
 |
 |
