Hoover UH70040W Product Manual
Hoover UH70040W Manual
 |
View all Hoover UH70040W manuals
Add to My Manuals
Save this manual to your list of manuals |
Hoover UH70040W manual content summary:
- Hoover UH70040W | Product Manual - Page 1
Hand Tool Agitator Brush Roll 12 Replacing Power Hand Tool Belt ..13 Replacing Headlight 10 Thermal Protector 14 Warranty 15 Parts & accessories mail reorder form 33 hoover.com hoover.ca Review this manual before operating the cleaner. Lire attentivement ces instructions avant d'utiliser - Hoover UH70040W | Product Manual - Page 2
manual before operating cleaner Thank you for choosing a HOOVER® product Please enter the COMPLETE model and serial numbers in the spaces provided. Model Serial number Hint: Attach your sales receipt to this owner's manual. Verification of date of purchase may be required for warranty service - Hoover UH70040W | Product Manual - Page 3
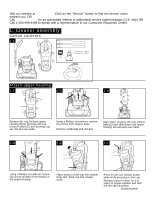
If you need any assistance: Visit our website at hoover.com. Click on the "Service" button to find the service outlet nearest you OR Call 1-800-944-9200 for an automated referral of authorized service outlet locations (U.S. only) OR Call 1-330-499-9499 to speak with a representative in our Consumer - Hoover UH70040W | Product Manual - Page 4
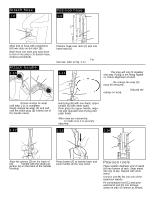
tube (D). NOTE: Hose must be connected at the hose tube (D) and at the dirt duct (B) on the back of the cleaner for carpet or floor cleaning. For tool use, refer to Fig. 2-11. 1-11 B C PUSH FIRMLY UNTIL YOU HEAR tool (C) and powered hand tool (D) into storage areas on side of cleaner as shown. - Hoover UH70040W | Product Manual - Page 5
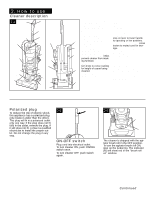
roll 18 shut-off indicator 11. Agitator brush roll shut-off pedal 19 12. Furniture guard: helps prevent cleaner from marking furniture. 13. Nozzle control knob: turn knob to correct setting for height of carpet being 20 cleaned. 14. Final filter access 15. Hose handle 21 16. Hose 17. Hose/tool - Hoover UH70040W | Product Manual - Page 6
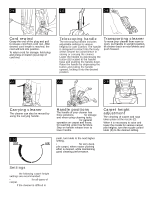
handle upward, locking it into the desired position. Transporting cleaner To move your cleaner from room to room, put handle in upright position, tilt cleaner back on rear wheels and push forward. 2-7 2-8 2-9 D Carrying cleaner The cleaner can also be moved by using the carrying handle. 2-10 - Hoover UH70040W | Product Manual - Page 7
shuts off automatically for tool use, when the cleaner is in the upright position. To manually shut off the agitator brush roll for cleaning hard floors, step on the pedal (E). The indicator (F) will show red in the "brush roll off" window. To turn the agitator brush roll on, step on the pedal again - Hoover UH70040W | Product Manual - Page 8
button (B) and pivot cup out. Disconnect cleaner from electrical outlet. Do not use cleaner without dirt cup or filters in place. CAUTION: Very fine materials, such as face powder or cornstarch, may seal the filter and cause loss of suction. When using the cleaner for this type of dust, empty the - Hoover UH70040W | Product Manual - Page 9
place. Cleaning filters Cyclonic filter assembly 3-7 How to clean Disconnect cleaner from electrical out- A let. Do not use cleaner without dirt cup B or filters in place. 3-6 A C T T T T Dirt and debris can be cleaned from the filter assembly by brushing with the cleaner's combination - Hoover UH70040W | Product Manual - Page 10
, ask for HOOVER part No. 93002360. Headlight replacement What to buy This cleaner uses a 13 volt, T-3 114 wedge base bulb, Hoover part No. 27313-107. 3-10 With fingers in slots, pull filter frame (A) straight out. Dirt and debris can be cleaned from the filter cartridge by brushing with the - Hoover UH70040W | Product Manual - Page 11
When to replace When agitator brush roll brushes are worn, the agitator brush roll should be replaced. Disconnect cleaner from electrical outlet. WARNING: Agitator brush roll can start suddenly. Unplug cleaner before turning it over. What to buy When purchasing a new agitator, ask for HOOVER part No - Hoover UH70040W | Product Manual - Page 12
used belt. Replace with HOOVER part No. 40201-200. To install new belt (with lettering on outside of belt), slide back of belt over pulley and pull front of belt toward groove (C) next to pulley. Belt will "pop" into place. D F Positioning belt on agitator brush roll Before positioning belt onto - Hoover UH70040W | Product Manual - Page 13
closed. Powered hand tool Belt replacement Inspect the belt The powered hand tool belt is designed to last a long time and is not normally replaced. However, if the belt is cracked, gouged or broken, it should be replaced. 3-30 Replace belt When replacing belt, ask for HOOVER part No. 38528-037 - Hoover UH70040W | Product Manual - Page 14
to cool for 30 minutes (this will reset the thermal protector) Problem: Cleaner/tools won't pick up Problem: Smoky Possible Cause Possible Solution • Broken or worn belt • Replace belt • Agitator brush roll worn • Replace agitator brush roll • Dirt cup full • Empty dirt cup • Incorrect carpet - Hoover UH70040W | Product Manual - Page 15
Remove any blockage from turbine channel (G). Replace belt turbine, brush roll, belt guard and bottom plate. Full One Year Warranty (Domestic Use) Your HOOVER® appliance is warranted in normal household use, in accordance with the Owner's Manual against original defects in material and workmanship
-
 1
1 -
 2
2 -
 3
3 -
 4
4 -
 5
5 -
 6
6 -
 7
7 -
8
-
9
-
10
-
11
-
12
-
13
-
14
-
15
 |
 |

®
®
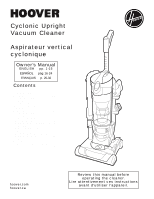
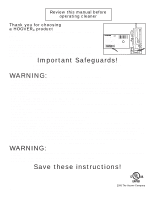
Review this manual before
operating the cleaner.
Lire attentivement ces instructions
avant d’utiliser l’appareil.
hoover.com
hoover.ca
Owner’s Manual
ENGLISH
pp. 1-15
ESPAÑOL
pág 16-24
FRANÇAIS
p. 25-32
Cyclonic Upright
Vacuum Cleaner
Aspirateur vertical
cyclonique
Contents
Assembling Cleaner
..........................
3-4
Carton Contents
................................
3
How To Use
........................................
5-8
Cleaner Descriptions
........................
5
Cleaning Tools
................................
7-8
If You Have a Problem
........................
14
Important Safeguards
..........................
2
Lubrication
..........................................
14
Maintenance
....................................
8-13
Authorized Service
..........................
14
Cleaning Filters
............................
9-10
Clearing Blockages
........................
15
Emptying Dirt Cup
..........................
8-9
Replacing Agitator Brush Roll ..11-12
Replacing Belt
............................
10-11
Replacing Powered Hand Tool
Agitator Brush Roll
......................
12
Replacing Power Hand Tool Belt ..13
Replacing Headlight
........................
10
Thermal Protector
..............................
14
Warranty
..............................................
15
Parts & accessories mail reorder
form
..................................................
33