Hoover UH70040W Product Manual - Page 9
Cleaning filters - filter parts
 |
View all Hoover UH70040W manuals
Add to My Manuals
Save this manual to your list of manuals |
Page 9 highlights
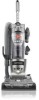
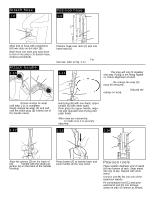
3-3 3-4 3-5 C D Holding dirt cup over trash receptacle, press dirt cup door release button (C) to open dirt cup door (D). Close door and press dirt cup door release button to latch dirt cup door closed. Place bottom of dirt cup into cleaner body first. Pivot cup into cleaner body. Press on dirt cup release button while firmly pressing on dirt cup. Release button in order for it to return to proper position and lock the dirt cup into place. Cleaning filters Cyclonic filter assembly 3-7 How to clean Disconnect cleaner from electrical out- A let. Do not use cleaner without dirt cup B or filters in place. 3-6 A C T T T T Dirt and debris can be cleaned from the filter assembly by brushing with the cleaner's combination tool. Place the filter assembly on the dirt Remove dirt cup as described in Fig. 3-2. cup, aligning (3) tabs (A) on filter with (3) slots on dirt cup (B) and Twist filter assembly (A) counterclock- twist it clockwise to secure into wise. Remove assembly from dirt cup. position. Press dirt cup door release button (C) to latch dirt cup door closed. Replace dirt cup as described in Figs. 3-4 & 3-5. Secondary filter How to clean Disconnect cleaner from electrical outlet. Do not operate cleaner without dirt cup or filters in place. 3-8 A B B Remove dirt cup as described in Fig. 3-2. With thumb, slide latch (A) located at the top of the housing to the right and pull down to remove gray filter frame. Remove black foam filter. Rinse filter frame cartridge and foam filter under cold water. Allow both filter frame and filter to air dry for 24 hours before replacing filter into filter frame. Reposition filter frame cartridge by inserting tabs (B) into slots on back of housing. Rotate filter cartridge frame up toward top of housing and snap closed. What to buy When purchasing a new secondary filter cartridge, ask for HOOVER part No. 93002517. To purchase a new black foam filter, ask for HOOVER part No. 93002518. Continued § 9
-
 1
1 -
2
-
3
-
 4
4 -
 5
5 -
 6
6 -
 7
7 -
 8
8 -
 9
9 -
 10
10 -
 11
11 -
 12
12 -
 13
13 -
 14
14 -
15
 |
 |
