Hoover UH70070 Manual - Page 9
The agitator brush roll, Lubrication - belt
 |
View all Hoover UH70070 manuals
Add to My Manuals
Save this manual to your list of manuals |
Page 9 highlights
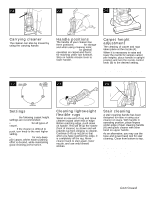
3-14 3-15 3-16 B Rotate hood toward front of cleaner and remove the hood. Removing agitator brush roll Remove agitator brush roll and used belt. Discard used belt. Installing new belt With lettering on outside of belt, slide new belt over motor pulley (B). 3-17 3-18 3-19 E D F C Replacing agitator brush roll Insert agitator through belt and place belt in belt guide (C) on agitator. Securing agitator Grasp agitator firmly and fit it into position by first sliding end opposite the belt into the rectangular slot (D) on side of cleaner. Pull other side of agitator (E) into place. Turn agitator making sure belt turns freely and is not pinched between agitator and bottom of cleaner. G Replacing hood Align tabs (F) on hood with slots (G) on base of cleaner. Pivot hood into position. Secure hood into position by turning the coin slots (Fig. 3-13). The agitator brush roll When to replace When agitator brushes are worn, the agitator should be replaced. To check condition of brushes, disconnect cleaner from electrical outlet. 3-20 What to buy When purchasing a new agitator, ask for HOOVER part No. 48414115. How to replace Disconnect cleaner from electrical outlet. Remove hood, belt and agitator following directions in "The belt" section beginning with Fig. 3-13. Discard old agitator. Continue following the directions in "The belt" section to reposition belt, new agitator and hood. Lubrication The motor is equipped with bearings that contain sufficient lubrication for the life of the motor. The addition of lubricant could cause damage. Therefore, do not add lubricant to motor bearings. Move edge of a card across bottom plate while turning agitator. To maintain cleaning effectiveness, replace agitator if brushes do not touch card. Continued 9
-
 1
1 -
2
-
3
-
 4
4 -
 5
5 -
 6
6 -
 7
7 -
 8
8 -
 9
9 -
 10
10 -
 11
11 -
 12
12
 |
 |
