Hunter 44905 Owner's Manual - Page 16
any time will return you to the home screen without saving changes.
 |
View all Hunter 44905 manuals
Add to My Manuals
Save this manual to your list of manuals |
Page 16 highlights
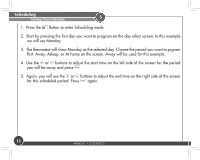
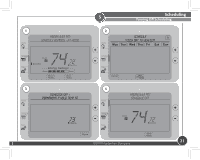
Scheduling Setting Your Schedule 5 10. When you have completed scheduling your day, you will be returned to the copy day screen. The copy day screen will now show Copy day to... and ask you if you wish to copy the day you just scheduled to any other days. Select Copy day to... and choose the days you wish to add the schedule too. Press the Cancel button to ignore changes and return to the home screen, or Done to save changes and select a new day individually. 11. Select each day you wish to copy the schedule to by touching it on the screen directly. The arrow indicators beside each day you select will show to indicate the day has been selected. In figure 12 you will see Tue - Fri have been selected. Note: The original day scheduled will not show on the screen as it is the one being copied. You may use a pen or other small instrument to select the days if necessary. 12. Press Done on the screen and it will flash "Mon coppied to (days selected)" and return you to the day select screen to program another day if any are left unprogrammed. Repeat steps 3-12 until all days are scheduled. Pressing Cancel at any time will return you to the home screen without saving changes. Note: You can press the Turn Schedule On Off at anytime while in Scheduling Mode to turn on or off the scheduling. 13. Once all days are programmed, you will be taken back to the Home Screen. If you need to make any changes, press the Schedule button to reenter schedule edit mode. 16 44040-01 • 03/24/2010
-
 1
1 -
2
-
3
-
4
-
5
-
6
-
7
-
8
-
9
-
10
-
 11
11 -
 12
12 -
 13
13 -
 14
14 -
 15
15 -
 16
16 -
 17
17 -
 18
18 -
 19
19 -
 20
20 -
 21
21 -
22
-
23
-
24
-
25
-
26
-
27
-
28
-
29
-
30
-
31
-
32
-
33
-
34
-
35
-
36
-
37
-
38
-
39
-
40
-
41
-
42
-
43
-
44
-
45
-
46
-
47
-
48
-
49
-
50
-
51
-
52
-
53
-
54
 |
 |
