Hunter 81001 Owner's Manual - Page 8
Existing Fan
 |
View all Hunter 81001 manuals
Add to My Manuals
Save this manual to your list of manuals |
Page 8 highlights
Existing Construction B11 EXISTING FAN B12 E Remove an existing fan and check to make sure the opening is large enough to accommodate the new motor hous- ing (7 1/4"x 7 3/4"). Move the housing into position above the ceiling. B13 B14 2 1 Route wires through the strain relief. For supply connection, use wires suitable for at least 90º C (194º F). B15 Attach existing ducting to duct connector. Tape joints. If ducting does not fit securely, an adapter may need to be purchased. E Install the housing flush with the sheetrock and secure by tightening the pre-loaded screws into the joist. 8 05-HF-025_EngS_3.29.06.indd 8 41937-01 3/29/2006 3/29/06 7:34:06 PM
-
 1
1 -
2
-
 3
3 -
 4
4 -
 5
5 -
 6
6 -
 7
7 -
 8
8 -
 9
9 -
 10
10 -
 11
11 -
 12
12 -
 13
13 -
14
-
15
-
16
-
17
-
18
-
19
-
20
-
21
-
22
-
23
-
24
-
25
-
26
-
27
-
28
 |
 |

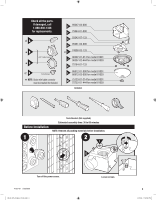
EXISTING FAN
B11
E
B12
8
Existing Construction
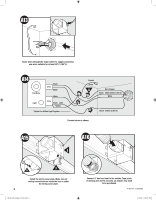
B13
2
1
B14
Route wires through the strain relief. For supply connection,
use wires suitable for at least 90º C (194º F).
Remove an existing fan and check to make sure the open-
ing is large enough to accommodate the new motor hous-
ing (7 1/4”x 7 3/4”).
Move the housing into position above the ceiling.
Attach existing ducting to duct connector. Tape joints.
If ducting does not fit securely,
an adapter may need to be purchased.
E
B15
Install the housing flush with the sheetrock and secure by
tightening the pre-loaded screws into the joist.
41937-01
3/29/2006
05-HF-025_EngS_3.29.06.indd
8
3/29/06
7:34:06 PM