Husqvarna 536LiHD60X Owners Manual - Page 11
Control Panel, Power trigger lockout, Hand guard, faulty safety equipment. The machine's
 |
View all Husqvarna 536LiHD60X manuals
Add to My Manuals
Save this manual to your list of manuals |
Page 11 highlights
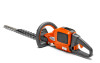
GENERAL SAFETY PRECAUTIONS IMPORTANT! All servicing and repair work on the machine requires special training. This is especially true of the machine′s safety equipment. If your machine fails any of the checks described below you must contact your service agent. When you buy any of our products we guarantee the availability of professional repairs and service. If the retailer who sells your machine is not a servicing dealer, ask him for the address of your nearest service agent. trigger lockout both move back to their original positions. This movement is operated by independent springs. This arrangement means that the power trigger is automatically locked at no operation state. Turn on the machine. Press the power trigger lockout on the front handle. WARNING! Never use a machine with ! faulty safety equipment. The machine's safety equipment must be checked and maintained as described in this section. If your machine fails any of these checks contact your service agent to get it repaired. Control Panel Make sure the machine is switched on or off when the activate/deactivate button (1) is pressed and held (>1 sec.). The green LED (2) is lit or turned off. • Then press the power trigger up to apply full power. (3) (2) (1) Flashing warning indicator (3) and green LED (2) is lit could indicate that: • it is not possible to apply full power and, at the same time, activate the machine. Release the power trigger and the machine is active. • the machine is blocked. Deactivate the machine. Disconnect the battery. Remove the twigs, branches or other materials that are jammed in the blades. • the machine is overloaded due to heavy trimming. Release the power trigger and the machine is active. If the warning symbol (3) flashes, it indicates that the machine is too hot and the machine deactivates. When the machine is restored to normal temperature it is again ready to run. Solid light indicates service. Power trigger lockout The power trigger is designed to prevent accidental operation. It is necessary to press both the power trigger lockout and the power trigger. The order actuation power trigger lockout and power trigger doesn't matter. When you release the handle, the power trigger and the power Release the power trigger and check thereby the free back movement of the power trigger. The cutting unit must stop within 1 second. Restart the machine and release the power trigger lockout on the front handle. Check that the power trigger lockout returns to its original position when you release it. The cutting unit must stop within 1 second. Hand guard Li-ion The hand guard prevents hands from coming into contact with the moving blades, for example, if the operator loses grip on the front handle. Check that the hand guard is fitted correctly. Check that the hand guard is undamaged. English - 11
-
 1
1 -
2
-
3
-
4
-
5
-
 6
6 -
 7
7 -
 8
8 -
 9
9 -
 10
10 -
 11
11 -
 12
12 -
 13
13 -
 14
14 -
 15
15 -
 16
16 -
17
-
18
-
19
-
20
-
21
-
22
-
23
-
24
-
25
-
26
-
27
-
28
-
29
-
30
-
31
-
32
-
33
-
34
-
35
-
36
-
37
-
38
-
39
-
40
-
41
-
42
-
43
-
44
-
45
-
46
-
47
-
48
-
49
-
50
-
51
-
52
-
53
-
54
-
55
-
56
-
57
-
58
-
59
-
60
-
61
-
62
-
63
-
64
-
65
-
66
-
67
-
68
 |
 |
