Husqvarna K 760 Owners Manual - Page 11
Assembling And Adjustments - oil guard
 |
View all Husqvarna K 760 manuals
Add to My Manuals
Save this manual to your list of manuals |
Page 11 highlights
ASSEMBLING AND ADJUSTMENTS General • Lock the shaft. WARNING! The engine should be switched ! off, and the stop switch in STOP position. Checking the drive shaft and flange washers When the blade is replaced with a new one, check the flange washers and the drive shaft. • Check that the threads on the drive shaft are undamaged. • Check that the contact surfaces on the blade and the flange washers are undamaged, of the correct dimension, clean, and that they run properly on the drive axle. • Tightening torque for the bolt holding the blade is: 15-25 Nm (130-215 in.lb). Guard for the blade • The guard for the cutting equipment should be adjusted so that the rear section is flush with the work piece. Spatter and sparks from the material being cut are then collected up by the guard and led away from the user. The guard must always be fitted on the machine. • Do not use warped, notched, indented or dirty flange washers. Do not use different dimensions of flange washers. Fitting the cutting blade • Husqvarna's blades are approved for hand-held power cutters. • Bushings can be fitted on the machine axle to adjust the machine to the centre hole of the blade. Use a bushing with the correct diameter! The blades are marked with the diameter of the centre hole. • When a diamond blade is mounted on the power cutter make sure that the diamond blade will rotate in the direction indicated by the arrow on the blade. • The blade is placed on the bushing (A) between the inner flange washer (B) and the flange washer (C). The flange washer is turned so that it fits on the axle. Disengaging OilGuard (K760 OilGuard) • When the machine is delivered, the OilGuard plug (A) and the blue indicator pin (B) are fitted in the tank. • If you are in a situation where you do not have access to Husqvarna OilGuard oil, but you have oil of a similar quality, you can deactivate the OilGuard system using the disconnection function. • To deactivate the function, pry off the OilGuard plug using a screwdriver and then break off the indicator pin. Now fit the disconnector plug (C) in the tank to complete deactivation and to cover the hole. • If you want to reactivate the OilGuard system, press the OilGuard plug again. The system is then reactivated, but note that the broken indicator pin cannot be refitted. • A broken indicator pin indicates that the OilGuard system has been disconnected. • You can purchase a new indicator pin as a spare, but this is only sold in grey which indicates that the OilGuard system has been deactivated since the machine left the factory. English - 11
-
 1
1 -
2
-
3
-
4
-
5
-
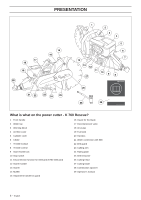 6
6 -
 7
7 -
 8
8 -
 9
9 -
 10
10 -
 11
11 -
 12
12 -
 13
13 -
 14
14 -
 15
15 -
 16
16 -
17
-
18
-
19
-
20
-
21
-
22
-
23
-
24
-
25
-
26
-
27
-
28
 |
 |
