Husqvarna PW3300 Operation Manual - Page 7
Assembly - owners manual
 |
View all Husqvarna PW3300 manuals
Add to My Manuals
Save this manual to your list of manuals |
Page 7 highlights
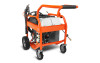
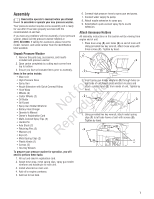
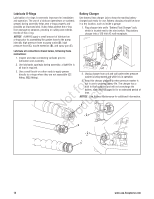
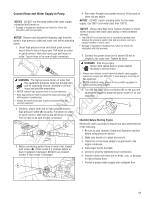
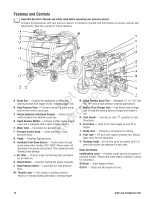
Assembly Read entire operator's manual before you attempt to assemble or operate your new pressure washer. Your pressure washer requires some assembly and is ready for use after it has been properly serviced with the recommended oil and fuel. If you have any problems with the assembly of your pressure washer, please call the pressure washer helpline at (877) 224-0458. If calling for assistance, please have the model, revision, and serial number from the identification label available. 6. Connect high pressure hose to spray gun and pump. 7. Connect water supply to pump. 8. Attach nozzle extension to spray gun. 9. Select/attach quick connect spray tip to nozzle extension. Attach Accessory Holders All assembly instructions in this section will be viewing from engine end of unit. 1. Place hose wrap (A) over holes (B) on end of main unit. Using provided hex key wrench, attach hose wrap with three screws (C). Tighten by hand. Unpack Pressure Washer 1. Remove the parts bag, accessories, and inserts A included with pressure washer. B 2. Open carton completely by cutting each corner from top to bottom. 3. Ensure you have all included items prior to assembly. C Items in the carton include: • Main Unit • High Pressure Hose • Spray Gun r n • Nozzle Extension with Quick Connect Fitting fo tio • Hose Wrap • Wheels (2) • Caster Wheels (2) t c • Oil Bottle o • Oil Funnel u • Spray Gun Holder Wireform N d • Battery Float Charger • Operator's Manual o • Owner's Registration Card r • Multi-Colored Spray Tips (5) • Handle Pin p • Axle Studs (2) e • Retaining Pins (2) • Washers (4) R • Keys (2) 2. Insert spray gun holder wireform (D) through holes on right side of unit frame. Hold wireform in place and attach a plastic knob (E) from inside of unit. Tighten by hand. E D 3. Using provided hex key wrench, attach metal spring clips (F) to left side frame of unit with screws (G). Tighten by hand. G • Metal Spring Clips (2) • Plastic Knobs (1) F • Screws (5) • Hex Key Wrench To prepare your pressure washer for operation, you will need to perform these tasks: 1. Fill out and send in registration card. 2. Attach hose wrap, metal spring clips, spray gun holder wireform and handle pin to main unit. 3. Install wheel kit on main unit. 4. Add oil to engine crankcase. 5. Add fuel to fuel tank. 7
-
 1
1 -
 2
2 -
 3
3 -
 4
4 -
 5
5 -
 6
6 -
 7
7 -
 8
8 -
 9
9 -
 10
10 -
 11
11 -
 12
12 -
13
-
14
-
15
-
16
-
17
-
18
-
19
-
20
-
21
-
22
-
23
-
24
-
25
-
26
-
27
-
28
-
29
-
30
-
31
-
32
-
33
-
34
-
35
-
36
-
37
-
38
-
39
-
40
-
41
-
42
-
43
-
44
-
45
-
46
-
47
-
48
-
49
-
50
-
51
-
52
-
53
-
54
-
55
-
56
-
57
-
58
-
59
-
60
 |
 |
