IBM 849130u User Guide - Page 39
Replacing
 |
UPC - 000435947147
View all IBM 849130u manuals
Add to My Manuals
Save this manual to your list of manuals |
Page 39 highlights
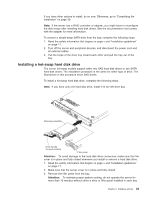
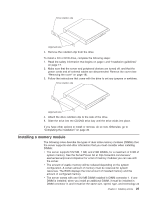
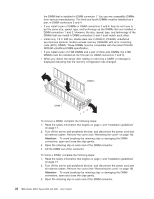
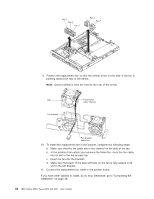
4. Touch the static-protective package that contains the DIMM to any unpainted metal surface on the server. Then, remove the DIMM from the package. 5. Turn the DIMM so that the DIMM keys align correctly with the slot. 6. Insert the DIMM into the connector by aligning the edges of the DIMM with the slots at the ends of the DIMM connector. Firmly press the DIMM straight down into the connector by applying pressure on both ends of the DIMM simultaneously. The retaining clips snap into the locked position when the DIMM is firmly seated in the connector. If there is a gap between the DIMM and the retaining clips, the DIMM has not been correctly inserted; open the retaining clips, remove the DIMM, and then reinsert it. If you have other options to install or remove, do so now. Otherwise, go to "Completing the installation" on page 30. Replacing a fan The server comes with five replaceable fans. To replace any of the five replaceable fans, complete the following steps: 1. Read the safety information that begins on page v and "Installation guidelines" on page 17. 2. Turn off the server and peripheral devices, and disconnect the power cord and all external cables. 3. Remove the server from the rack and place it on a flat, non-conductive surface. 4. Remove the cover (see "Removing the cover" on page 18). 5. Reconnect all external cables and the power cord; then, turn on the server. Attention: For proper cooling and airflow, replace the cover before turning on the server. Operating the server for extended periods of time (more than 30 minutes) with the cover removed open might damage server components. 6. Determine which fan to replace by checking the LEDs on the system board (to determine which LED represents which fan, see "System-board LEDs" on page 15); a lit LED indicates the fan to replace. Note: For more information about the LEDs, see the Problem Determination and Service Guide on the IBM xSeries Documentation CD. 7. Turn off the server; then, disconnect the power cord and all external cables again. 8. Remove the failed fan from the server: a. Disconnect the fan cable from the system board. b. Grasp the top of the fan with your index finger and thumb and lift the fan out of the server. Chapter 2. Installing options 27
-
 1
1 -
2
-
3
-
4
-
5
-
6
-
7
-
8
-
9
-
10
-
11
-
12
-
13
-
14
-
15
-
16
-
17
-
18
-
19
-
20
-
21
-
22
-
23
-
24
-
25
-
26
-
27
-
28
-
29
-
30
-
31
-
32
-
33
-
 34
34 -
 35
35 -
 36
36 -
 37
37 -
 38
38 -
 39
39 -
 40
40 -
 41
41 -
 42
42 -
 43
43 -
 44
44 -
45
-
46
-
47
-
48
-
49
-
50
-
51
-
52
-
53
-
54
-
55
-
56
-
57
-
58
-
59
-
60
-
61
-
62
-
63
-
64
-
65
-
66
-
67
-
68
-
69
-
70
-
71
-
72
-
73
-
74
 |
 |