Insignia NS-C6500 User Manual (English) - Page 2
Painting the speakers and grills, Specifications, Outils requis, Contenu de l'emballage, Installation
 |
UPC - 600603110535
View all Insignia NS-C6500 manuals
Add to My Manuals
Save this manual to your list of manuals |
Page 2 highlights
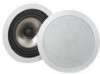
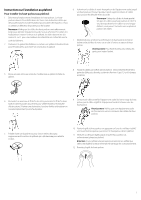
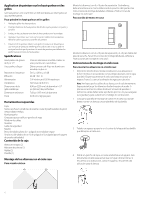
8 Pull the wires through the hole in the ceiling. Strip off the end of the outer wire jacket, then strip about ½ inch of the insulation from the ends of the wires. Impedance Grill metal dimensions Cut-out dimension Weight 8 ohms nominal 8.98" (228 mm) diameter × 3.70" (94 mm) depth 7.68" (195 mm) diameter 6.9 lbs (3.12 kg) per pair 9 Connect the positive wire on your audio equipment to the red terminal on the speaker, then connect the negative wire on your audio equipment to the black terminal on the speaker. Warning: Make sure that your audio equipment is turned off before you connect the speaker wires. 10 Remove the speaker grill by pushing one of the Roto-Lock™ screws towards the front of the speaker, then insert the speaker into the hole in the ceiling. 11 Tighten the screws evenly until the speaker is flat against the ceiling. Caution: If you use a drill to tighten the screws, make sure that you set the drill to its lowest torque speed. Do not overtighten screws. 12 Reinstall the speaker grill. Outils requis Crayon Scie à guichet ou pour cloison sèche Tournevis cruciforme Petit niveau Câble de suspension ou cintre Outil à dénuder Gants Lunettes étanches Perceuse Mèche plate de 1 po (si des poutres doivent être percées) Mèche de ¼ à ½ po (pour percer des trous d'essai) Contenu de l'emballage 2 haut-parleurs Insignia 2 cache-peinture 2 grilles 1 gabarit Installation des haut-parleurs au plafond Pour un son stéréo Painting the speakers and grills The speakers have a weather resistant, ABS finish that you can paint. To paint the speakers and grills: 1 Remove the grills from the speakers. 2 Make sure that the interior of the speaker is covered so no paint will get inside. 3 Insert one of the supplied paint plugs into the speaker to protect the speaker. 4 Carefully paint the exposed part of the speaker. Remove the plug when you have finished painting. 5 Spray the grill with thin paint (5 parts thinning agent to 1 part paint). Make sure that you do not plug the screw holes on the grill with paint. Too much paint may adversely affect the speaker sound. Specifications Woofer 6 1/2" Tweeter Gold aluminum cone with a rubber surrounding ¾" pivoting gold aluminum dome Frequency response Efficiency Power 2 50 Hz to 20 kHz ± 3dB 90 dB 1w 1m 5 watts minimum to 100 watts maximum Installez les haut-parleurs avec un écartement de 6 à 10 pieds (1,8 à 3 m). Chaque haut-parleur doit être à la même distance de la zone d'écoute. Pour toutes instructions détaillées sur l'installation, voir « Instructions sur l'installation au plafond ». Pour un son de cinéma maison Installez les haut-parleurs avec un écartement de 6 à 10 pieds (1,8 à 3 m) et en arrière de 3 à 6 pieds (0,9 à 1,8 m) par rapport à la zone d'écoute. Pour toutes instructions détaillées sur l'installation, voire « Instructions sur l'installation au plafond ».
-
 1
1 -
 2
2 -
 3
3 -
 4
4 -
 5
5 -
 6
6 -
 7
7 -
 8
8
 |
 |
