Insignia NS-DSC10SL User Manual (English) - Page 7
SET button/navigation control, Bottom - usb cable
 |
View all Insignia NS-DSC10SL manuals
Add to My Manuals
Save this manual to your list of manuals |
Page 7 highlights
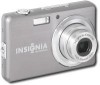
Insignia 10 Megapixel Camera # Item 4 SET button/four-way navigation control 5 (Mode slider) 6 LCD screen Description See "SET button/navigation control" on page 3. Slide to change the mode. You can select Photo mode, Video mode, or Playback mode. Displays the image being recorded and icons that indicate camera status. SET button/navigation control 1 2 34 5 # Item 5 (Flash/ ) Description • In Photo mode, press to toggle between flash modes (Auto, Red-eye Reduction, Forced On, Slow Sync, or Off ). Note: Flash modes are only available for still images. • In Playback mode, press to select the next image or video. • During video playback, press to fast-forward through the video. • In Menu mode, press to enter sub-menus or navigate through menu selections. Top 1 23 4 5 SET DISP # Item Description 1 (Macro/ ) • In Photo or Video mode, press to turn Macro mode on or off. • In Playback mode, press to select the previous image or video. • During video playback, press to fast-reverse the video. • In Menu mode, press to exit a sub-menu. 2 DISP ( ) • In Photo or Video mode, press to show or hide OSD icons. • In Video playback mode, press to stop playback. • In Menu mode, press to navigate through menu and sub-menu selections. • In Photo mode, press to turn face tracking on or off. Note: Face tracking is only available for still 3 (Face tracking/ ) images. • In Video playback mode, press to start or pause playback. • In Menu mode, press to navigate through menus and sub-menu selections. 4 SET • In Menu mode, press to confirm selections. • When playing a video, press to show or hide the volume and playback bars. • When viewing thumbnails, press to show the selected image or video full screen. • During a slideshow, press to exit. Note: SET toggles the volume and playback bars on or off during video playback. # Item 1 Strap ring 2 Shutter button 3 Zoom control 4 POWER button 5 Stabilizer button Description Attach the wrist strap to this ring. See "Attaching the wrist strap" on page 6. Press half way (half-press) to let your camera automatically adjust the focus and exposure. When the focus and exposure are set the focus the bracket turns green. Fully press to capture the image. Turn right or left to zoom in or out. Press to turn your camera on or off. Press to turn the image stabilizer feature on or off. Bottom 1 2 3 # Item Description 1 Battery/SD /SDHC card compartment Holds the battery and an SD or SDHC memory card. 2 USB port Connect the included USB cable to this port and to a USB port on a computer to transfer images from your camera to the computer. See "Connecting your camera to a computer" on page 20. 3 Tripod screw hole Screw a tripod into this hole to provide stability when capturing images or videos. www.insigniaproducts.com 3
-
 1
1 -
 2
2 -
 3
3 -
 4
4 -
 5
5 -
 6
6 -
 7
7 -
 8
8 -
 9
9 -
 10
10 -
 11
11 -
 12
12 -
13
-
14
-
15
-
16
-
17
-
18
-
19
-
20
-
21
-
22
-
23
-
24
-
25
-
26
-
27
-
28
 |
 |
