Insignia NS-LCD19-09CA User Manual (English) - Page 6
Features, Front, Remote control
 |
View all Insignia NS-LCD19-09CA manuals
Add to My Manuals
Save this manual to your list of manuals |
Page 6 highlights
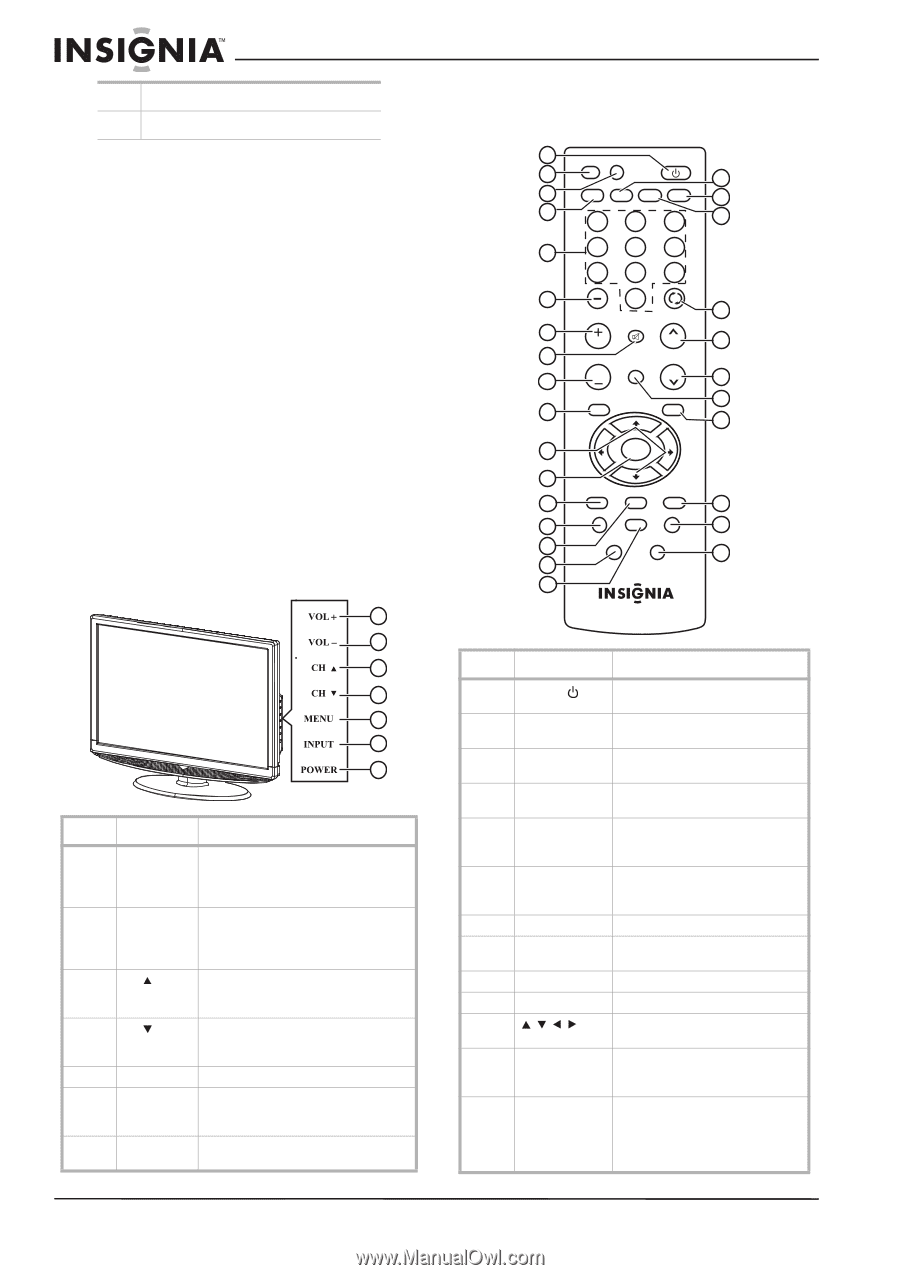
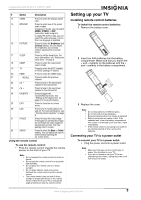
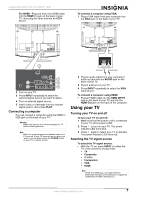
Insignia NS-LCD19-09 19" LCDTV 720P 6 Grounding clamp 7 Antenna lead-in wire Note to CATV system installer This reminder is provided to call the CATV system installer's attention to Article 820-40 of the NEC that provides guidelines for correct grounding and in particular, specifies that the cable ground must be connected to the grounding system of the building as close to the point of cable entry as practical. Mobile telephone warning To avoid interference with your TV picture and sound, operating problems, or even damage, keep your cordless or cellular telephones away from the TV. Non-active pixels The LCD panel contains almost 3 million thin film transistors, which provide exceptionally sharp video quality. Occasionally, a few nonactive pixels may appear on the screen as a fixed blue, green, or red point. These non-active pixels do not adversely affect the performance of your TV, and are not considered defects. Features Front 1 2 3 4 5 6 7 # Button Description 1 VOL+ Press to increase the volume. In Menu mode, functions as the right arrow to go to the next menu or increase a setting. 2 VOL- Press to decrease the volume. In Menu mode, functions as the left arrow to go to a previous menu or decrease a setting. 3 CH Press to go to the next higher channel. In Menu mode, functions as the up arrow. 4 CH Press to go to the next lower channel. In Menu mode, functions as the down arrow. 5 MENU Press to show the on-screen menu. 6 INPUT Press to cycle through the available input sources. In Menu mode, functions as the ENTER button. 7 POWER Press to turn on your TV or put it into Standby mode. Remote control 1 INPUT DISPLAY POWER 2 18 3 VIDEO COMP HDMI TV 19 4 123 20 5 456 789 RECALL 6 0 21 7 MUTE VOL CH 22 8 FAVORITE 9 VOL CH 23 10 MENU 24 EXIT 25 11 ENTER 12 P-LOCK MTS/SAP CCD 13 26 ZOOM SLEEP FREEZE 14 27 15 PICTURE AUDIO 28 16 17 ZRC-101 # Button Description 1 POWER Press to turn on your TV or put it into Standby mode. 2 INPUT Press to select the video input signal source. 3 DISPLAY Press to display status information. 4 VIDEO Press to toggle between S-Video and composite source modes. 5 Number buttons Press to enter channel numbers. In the on-screen menu, press to enter your parental control password. 6 - Use with the 0-9 number buttons and ENTER button to select digital channels. 7 VOL + Press to increase the volume. 8 MUTE Press to mute the sound. Press again to restore the sound. 9 VOL - Press to decrease the volume. 10 MENU Press to open the on-screen menu. 11 Press to move down, up, left, or right in the on-screen menu. 12 ENTER Press to confirm changes or to turn options on and off in the on-screen menu. 13 P.LOCK Press to activate or deactivate parental controls. See "Setting parental controls" on page 9 for information on setting up parental controls. 4 www.insignia-products.com
-
 1
1 -
 2
2 -
 3
3 -
 4
4 -
 5
5 -
 6
6 -
 7
7 -
 8
8 -
 9
9 -
 10
10 -
 11
11 -
 12
12 -
13
-
14
-
15
-
16
-
17
-
18
-
19
-
20
-
21
-
22
-
23
-
24
-
25
-
26
-
27
-
28
-
29
-
30
-
31
-
32
-
33
-
34
-
35
-
36
-
37
-
38
-
39
-
40
 |
 |