Intel SC5275-E User Guide - Page 36
Connect the data and power cables to the drive., The connectors are keyed and can be inserted - bay
 |
UPC - 735858171168
View all Intel SC5275-E manuals
Add to My Manuals
Save this manual to your list of manuals |
Page 36 highlights
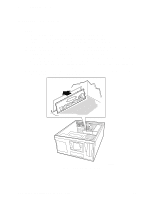
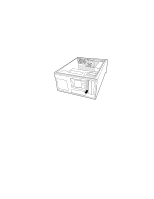
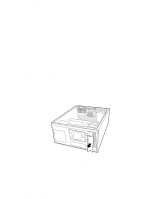
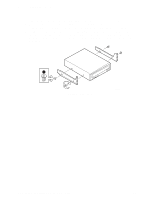
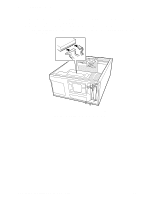
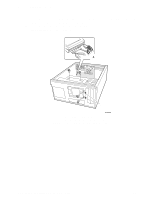
2 Setting Up the Chassis 7. Position the drive so the slide rails engage in the chassis bay guide rails. Push the drive into the bay until the slide rails are flush with the chassis. 8. Use two screws for each slide rail to attach the device at the front of the chassis. 9. Connect the data and power cables to the drive. The connectors are keyed and can be inserted in only one way. TP00065 Figure 10. Installing a Removable Media Device Intel® Entry Server Chassis SC5275-E User Guide 18
-
 1
1 -
2
-
3
-
4
-
5
-
6
-
7
-
8
-
9
-
10
-
11
-
12
-
13
-
14
-
15
-
16
-
17
-
18
-
19
-
20
-
21
-
22
-
23
-
24
-
25
-
26
-
27
-
28
-
29
-
30
-
 31
31 -
 32
32 -
 33
33 -
 34
34 -
 35
35 -
 36
36 -
 37
37 -
 38
38 -
 39
39 -
 40
40 -
 41
41 -
42
-
43
-
44
-
45
-
46
-
47
-
48
-
49
-
50
-
51
-
52
-
53
-
54
-
55
-
56
-
57
-
58
-
59
-
60
-
61
-
62
-
63
-
64
-
65
-
66
-
67
-
68
-
69
-
70
-
71
-
72
-
73
 |
 |

2
Setting Up the Chassis
Intel® Entry Server Chassis SC5275-E User Guide
18
7.
Position the drive so the slide rails engage in the chassis bay guide rails.
Push the drive into the
bay until the slide rails are flush with the chassis.
8.
Use two screws for each slide rail to attach the device at the front of the chassis.
9.
Connect the data and power cables to the drive.
The connectors are keyed and can be inserted
in only one way.
TP00065
Figure 10.
Installing a Removable Media Device