Iomega 33610 Quick Start Guide - Page 2
Quick Install, Installation rapide, Schnellinstallation, Installazione rapida, Instalación rápida
 |
UPC - 742709336102
View all Iomega 33610 manuals
Add to My Manuals
Save this manual to your list of manuals |
Page 2 highlights
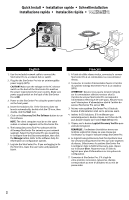
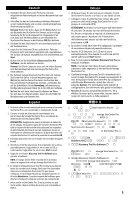
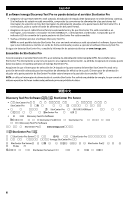
Quick Install • Installation rapide • Schnellinstallation Installazione rapida • Instalación rápida � � 1. Use the included network cable to connect the StorCenter Pro to a network hub or switch. 2. Plug the the StorCenter Pro into an uninterruptible power supply (UPS). CAUTION! Make sure the voltage on the AC selector switch on the back of the StorCenter Pro matches the power requirements for your country. Make sure power supply switch on the back of the StorCenter Pro is ON. 3. Power on the StorCenter Pro using the power button on the front panel. 4. Insert the Solutions CD. If the CD menu does not launch automatically, double click the CD icon, then double click the Start icon. 5. Click on the Discovery Tool Pro Software button to run the software. NOTE: The client computer must be on the same subnet or network segment as the StorCenter Pro. 6. The Iomega Discovery Tool Pro software will list all Iomega StorCenter Pro servers on your network segment. Select the StorCenter Pro you would like to configure from the Discovery window, then click the Manage button. Refer to the software help for information on configuration options. 7. Log into the StorCenter Pro. If you are logging in for the first time, leave the user name and password blank. 1. A l'aide du câble réseau inclus, connectez le serveur StorCenter Pro à un commutateur ou concentrateur réseau. 2. Connectez le cordon d'alimentation fourni à l'arrière du système Iomega StorCenter Pro et à un onduleur (UPS). ATTENTION ! Assurez-vous que la tension indiquée sur le commutateur sélecteur secteur situé à l'arrière du serveur StorCenter Pro correspond à l'alimentation électrique de votre pays. Assurez-vous que l'interrupteur d'alimentation situé à l'arrière du serveur StorCenter Pro est sur ON. 3. Activez votre système StorCenter Pro à l'aide du bouton d'alimentation situé sur le panneau avant. 4. Insérez le CD Solutions. S'il ne démarre pas automatiquement, double-cliquez sur l'icône du CD, puis double-cliquez sur l'icône Start (Démarrer). 5. Cliquez sur le bouton Logiciel Discovery Tool Pro pour exécuter le logiciel. REMARQUE : l'ordinateur client doit se trouver sur le même segment de réseau ou sous-réseau que l'ordinateur sur lequel s'exécute Iomega StorCenter Pro. 6. Le logiciel Iomega Discovery Tool Pro répertorie tous les serveurs Iomega StorCenter Pro sur votre segment de réseau. Sélectionnez le système StorCenter Pro à configurer dans la fenêtre Discovery, puis cliquez sur le bouton Gérer. Reportez-vous à l'aide du logiciel pour plus d'informations sur les options de configuration. 7. Connexion à StorCenter Pro. S'il s'agit de votre première connexion, laissez les champs correspondant au nom d'utilisateur et au mot de passe vides. 2
-
 1
1 -
 2
2 -
 3
3 -
 4
4 -
 5
5 -
 6
6 -
 7
7 -
 8
8
 |
 |
