JVC DLA-NX7 Operation Manual 1 - Page 12
Main Unit - Input Terminals, 3D SYNCHRO] terminal, HDMI 1] input terminal
 |
View all JVC DLA-NX7 manuals
Add to My Manuals
Save this manual to your list of manuals |
Page 12 highlights
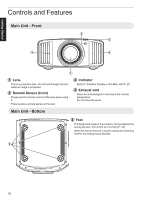
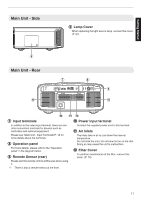
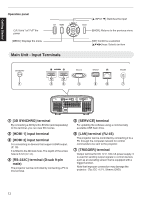
Getting Started Operation panel A: Turns "on"/"off" the power [MENU]: Displays the menu Main Unit - Input Terminals [J INPUT K]: Switches the input [BACK]: Returns to the previous menu [OK]: Confirms a selection [JKH I] keys: Selects an item A B C D E F G A [3D SYNCHRO] terminal By connecting a 3D Synchro Emitter (sold separately) to this terminal, you can view 3D movies. B [HDMI 1] input terminal C [HDMI 2] input terminal For connecting to devices that support HDMI output. (P. 19) It is fitted to the M3 lock hole. The depth of the screw hole is 3 mm (0.1 in). D [RS-232C] terminal (D-sub 9-pin male) The projector can be controlled by connecting a PC to this terminal. E [SERVICE] terminal For updating the software using a commercially available USB flash drive. F [LAN] terminal (RJ-45) The projector can be controlled by connecting it to a PC through the computer network for control commands to be sent to the projector. G [TRIGGER] terminal Output terminal for DC 12 V, 100 mA power supply. It is used for sending output signals to control devices such as an elevating screen that is equipped with a trigger function. Note that improper connection may damage the projector. (Tip=DC +12 V, Sleeve=GND) 12
-
 1
1 -
2
-
3
-
4
-
5
-
6
-
 7
7 -
 8
8 -
 9
9 -
 10
10 -
 11
11 -
 12
12 -
 13
13 -
 14
14 -
 15
15 -
 16
16 -
 17
17 -
18
-
19
-
20
-
21
-
22
-
23
-
24
-
25
-
26
-
27
-
28
-
29
-
30
-
31
-
32
-
33
-
34
-
35
-
36
-
37
-
38
-
39
-
40
-
41
-
42
-
43
-
44
-
45
-
46
-
47
-
48
-
49
-
50
-
51
-
52
-
53
-
54
-
55
-
56
-
57
-
58
-
59
-
60
-
61
-
62
-
63
-
64
-
65
-
66
-
67
-
68
-
69
-
70
-
71
-
72
-
73
-
74
-
75
-
76
-
77
-
78
-
79
-
80
-
81
-
82
-
83
-
84
-
85
-
86
-
87
-
88
-
89
-
90
-
91
-
92
-
93
-
94
 |
 |
