JVC DLA-NX7 Operation Manual 1 - Page 62
Anamorphic, Screen Adjust, Installation Style, Adjust/Set, Top / Bottom / Left / Right
 |
View all JVC DLA-NX7 manuals
Add to My Manuals
Save this manual to your list of manuals |
Page 62 highlights
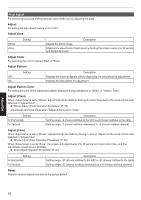
Mask For hiding the peripheral area of the image with a mask (black strip). Setting Off On Description Not masked. Hides the ranges specified in "Top", "Bottom", "Left" and "Right" by masking (with black strips). Off On Adjust/Set Mask: black strip around the periphery "Top" / "Bottom" / "Left" / "Right" For specifying the ranges to hide by masking (with black strips). 0 Setting range: 0 to 220 Anamorphic Configure this setting when an anamorphic lens is used. Setting Description Off Projects the 2.35:1 image without any changes. A Projects the 2.35:1 image with it stretched in the vertical direction only using a 3840 pixel width. B Projects the 16:9 image with it compressed in the horizontal direction only. C This is a mode used exclusively for the DCR lens of Panamorph. Projects the image by stretching 2.35:1 video images in the vertical direction and enlarging them in the horizontal direction to the maximum panel width of 4096 pixels. This is configured to "Off" in the 3D mode. Switches to "A" for software version v3.10 or later versions. D* This is a mode used exclusively for the DCR lens of Panamorph. Projects the 16:9 image with it compressed in the horizontal direction only. * Supports software version v3.10 and later versions. Screen Adjust By selecting the optimal correction mode according to the characteristics of the screen in use, corrections can be performed to reproduce natural images with balanced colors. Æ "Setting Screen Correction" (P. 25) Installation Style For setting to "Front", "Ceiling Mount (F)", "Rear", or "Ceiling Mount (R)" according to the installation status of the projector. 0 "Front" or "Ceiling Mount (F)" is set when projector is installed in the front with respect to the screen. 0 "Rear" or "Ceiling Mount (R)" is set when projector is installed in the rear with respect to the screen. 62
-
 1
1 -
2
-
3
-
4
-
5
-
6
-
7
-
8
-
9
-
10
-
11
-
12
-
13
-
14
-
15
-
16
-
17
-
18
-
19
-
20
-
21
-
22
-
23
-
24
-
25
-
26
-
27
-
28
-
29
-
30
-
31
-
32
-
33
-
34
-
35
-
36
-
37
-
38
-
39
-
40
-
41
-
42
-
43
-
44
-
45
-
46
-
47
-
48
-
49
-
50
-
51
-
52
-
53
-
54
-
55
-
56
-
 57
57 -
 58
58 -
 59
59 -
 60
60 -
 61
61 -
 62
62 -
 63
63 -
 64
64 -
 65
65 -
 66
66 -
 67
67 -
68
-
69
-
70
-
71
-
72
-
73
-
74
-
75
-
76
-
77
-
78
-
79
-
80
-
81
-
82
-
83
-
84
-
85
-
86
-
87
-
88
-
89
-
90
-
91
-
92
-
93
-
94
 |
 |
