JVC FS-H30 Instruction Manual
JVC FS-H30 Manual
 |
View all JVC FS-H30 manuals
Add to My Manuals
Save this manual to your list of manuals |
JVC FS-H30 manual content summary:
- JVC FS-H30 | Instruction Manual - Page 1
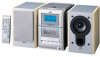
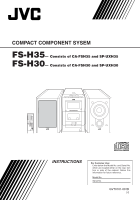
COMPACT COMPONENT SYSEM FS-H35- Consists of CA-FSH35 and SP-UXH35 FS-H30- Consists of CA-FSH30 and SP-UXH30 COMPACT COMPONENT SYSTEM INSTRUCTIONS For Customer Use: Enter below the Model No. and Serial No. which are located either on the rear, bottom or side of the cabinet. Retain - JVC FS-H30 | Instruction Manual - Page 2
point within an equilateral triangle is intended to alert the user to the presence of important operating and maintenance (servicing) instructions in the literature accompanying the appliance. ATTENTION-Touche (attente/sous tension) Déconnectez la fiche secteur pour mettre l'appareil compl - JVC FS-H30 | Instruction Manual - Page 3
Note to CATV system installer: This reminder is provided to call the CATV system installer's attention to Section 820-40 of the NEC which provides guidelines for proper grounding and, in particular, specifies that the cable ground shall be connected to the grounding system of the building, as close - JVC FS-H30 | Instruction Manual - Page 4
JVC products. Before operating this unit, read this manual carefully and thoroughly to obtain the best possible performance from your unit, and retain this manual for future reference. About This Manual This manual is organized as follows: • The manual there are no user serviceable parts inside. If - JVC FS-H30 | Instruction Manual - Page 5
One Track Recording 19 Using the Timers 20 Using Daily Timer and Recording Timer 20 Using Snooze Timer 22 Using Sleep Timer 22 Maintenance 23 Troubleshooting 25 Specifications 26 2 - JVC FS-H30 | Instruction Manual - Page 6
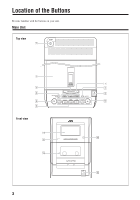
Location of the Buttons Become familiar with the buttons on your unit. Main Unit Top view PHONES 1 2 3 4 5 6 Front view COMPACT DIGITAL AUDIO ONE TOUCH REC AUX TIMER/SNOOZE MULTI CONTROL 4 7 ¢ BAND TAPE TUNER CD AHB PRO VOLUME OPEN 7 8 9 p q w e STANDBY COMPACT COMPONENT SYSTEM r - JVC FS-H30 | Instruction Manual - Page 7
Continued Display window 1 2 3 456 7 8 REC ON BASS SLEEP SNOOZE OFF CLOCK MONO STEREO 9 REC p 1 2 3 4 5 6 7 8 9 10 11 12 13 14 15 q PROGRAM RANDOM ALL OVER w e r t See the pages in parentheses for details. Main unit 1 PHONES jack (11) 2 Disc cover 3 TIMER/SNOOZE button (10, 20 - - JVC FS-H30 | Instruction Manual - Page 8
Remote Control STANDBY/ON 1 2 3 8 4 5 6 DISPLAY 1 9 7 8 9 CLOCK /TIMER p 10 10 SLEEP q BASS 2 UP TREBLE w 3 SET DOWN CANCEL 4 e 5 CD TAPE TUNER AUX AUTO REV.MODE FM MODE PRESET 6 r t PRGM RANDOM REPEAT 7 y AHB PRO u i See the pages in parentheses for - JVC FS-H30 | Instruction Manual - Page 9
Getting Started Supplied Accessories Make sure that you have all the following items. The number in parentheses indicates the quantity of each piece supplied. • AM loop antenna (1) • FM antenna (1) • AC power cord (1) • Remote control (1) • Batteries (2) If anything is missing, consult your dealer - JVC FS-H30 | Instruction Manual - Page 10
AM antenna 1 Connecting Speakers 1 2 Vinyl-covered wire (not supplied) Speaker cord Speaker cord 2 AM loop antenna (supplied) Right speaker Left speaker 1 Connect the AM loop antenna to the AM LOOP terminals as illustrated. 2 Turn the AM loop antenna until you have the best reception. To - JVC FS-H30 | Instruction Manual - Page 11
Continued To remove the speaker grilles The speaker grilles are removable. Projections Holes NOW you are ready to plug in the unit and any other connected equipment. IMPORTANT: Be sure to check all connections to be done before plugging the power cord. This unit can be supplied with power through - JVC FS-H30 | Instruction Manual - Page 12
compartment. When the remote control can no longer operate the unit, replace both batteries at the same time. 1 12V 4A DC IN Car adapter (JVC model: CA-R120) 2 Connect a car adapter to the DC IN (12 V, 4 A) connector and the cigarette lighter socket. • DO NOT connect the car adapter to the - JVC FS-H30 | Instruction Manual - Page 13
Common Operations Continued Setting the Clock Before operating the unit any further, first set the unit's clock. When you plug in the power cord, the CLOCK indicator and "AM 12:00" start flashing on the display. You can set the clock whether the unit is on or off. • There is a time limit in doing - JVC FS-H30 | Instruction Manual - Page 14
Turning On the Power To turn on the unit, press STANDBY/ON STANDBY/ON (or on the unit). The STANDBY lamp on the unit goes off. • When you press the source button -3/8 CD, 2 3 TAPE, TUNER (or BAND TUNER on the unit) and AUX, the unit automatically turns on and starts playback if the source - JVC FS-H30 | Instruction Manual - Page 15
stereo sound when a stereo program is broadcast. Presetting Stations You can preset 30 FM and 15 AM stations-using either automatic presetting or manual presetting. In some cases, test frequencies have been already memorized for the tuner since the factory examined the tuner preset function before - JVC FS-H30 | Instruction Manual - Page 16
To preset stations manually-Manual presetting You need to preset stations separately for the FM and AM bands. • There is a time limit in doing the following steps. If the setting - JVC FS-H30 | Instruction Manual - Page 17
CD format. However, sometimes they may not play depending on their characteristics or recording conditions. • Before playing CD-Rs or CD-RWs, read their instructions or cautions carefully. • Some CD-Rs or CD-RWs may not play on this unit because of their disc characteristics, damage or stain on them - JVC FS-H30 | Instruction Manual - Page 18
Basic Disc Operations While playing a disc, you can do the following operations. To stop playing for a moment During play, press 3/8 CD. CD While pausing, the elapsed playing time flashes on the display. To resume playing, press 3/8 CD again. To go to another track Before or during play, - JVC FS-H30 | Instruction Manual - Page 19
To check the program contents You can check the program contents by pressing ¢ or 4 before or after playback. • ¢ : To check the contents in the programmed order. • 4 : To check the contents in the reverse order. To modify the program On the remote control ONLY: Before or after playing, you can - JVC FS-H30 | Instruction Manual - Page 20
Playing Back Tapes You can play back type I tapes. Playing Back a Tape 1 Press ) for cassette deck on the unit. The cassette holder opens. If no cassette is inserted when you press 2 3 TAPE "NO TAPE" appears on the display. To stop playing, press 7. To fast-wind to the left or to the right, press - JVC FS-H30 | Instruction Manual - Page 21
Recording Continued IMPORTANT: • It should be noted that it may be unlawful to re- record pre-recorded tapes, records, or discs without the consent of the owner of copyright in the sound or video recording, broadcast or cable program and in any literary, dramatic, musical, or artistic embodied - JVC FS-H30 | Instruction Manual - Page 22
Disc Direct Recording Everything on the disc goes onto the tape in the order it is on the disc, or according to the order you have set in Program Play. On the unit ONLY: 1 Put a recordable cassette in with the exposed part of the tape down. 2 Load a disc. • If the current playing source is not - JVC FS-H30 | Instruction Manual - Page 23
Using the Timers Continued There are four timers available-Daily Timer, Recording Timer, Snooze Timer, and Sleep Timer. Before using the timers, you need to set the unit's clock (see page 10). Using Daily Timer and Recording Timer You can set the timer whether the unit is on or off. How the - JVC FS-H30 | Instruction Manual - Page 24
4 Select the timer (Daily UP Timer or Recording Timer) with the source to play. DOWN On the remote control: Press UP or DOWN to CLOCK select the timer, then press / TIMER CLOCK/TIMER. On the unit: Press ¢ or 4 to select the timer, then press TIMER/SNOOZE. • Each time you press UP (¢) or - JVC FS-H30 | Instruction Manual - Page 25
Using Snooze Timer The Snooze Timer turns off the unit (standby) only for 5 minutes while the Daily Timer is in operation. • You can set the Snooze Timer only while the Daily Timer is in operation. Press TIMER/SNOOZE on TIMER/SNOOZE the unit (or CLOCK/TIMER on the remote control) while the - JVC FS-H30 | Instruction Manual - Page 26
Maintenance To get the best performance from the unit, keep your discs, tapes, and mechanism clean. Cleaning the unit Handling discs • Stains on the unit Should be wiped off with a soft cloth. If the unit is heavily stained, wipe it with a cloth soaked in waterdiluted neutral detergent and wrung - JVC FS-H30 | Instruction Manual - Page 27
Handling cassette tapes • If the tape is loose in its cassette, take up the slack by inserting a pencil in one of the reels and rotating. • If the tape is loose, it may get stretched, cut, or caught in the cassette. • Be careful not to touch the tape surface. • Avoid storing tapes in the following - JVC FS-H30 | Instruction Manual - Page 28
Troubleshooting If you are having a problem with your unit, check this list for a possible solution before calling for service. If you cannot solve the problem from the hints given here, or the unit has been physically damaged, call a qualified person, such as your dealer, for service. Symptom No - JVC FS-H30 | Instruction Manual - Page 29
Specifications Amplifier Output Power: 20 W (10 W + 10 W) at 4 Ω (10% THD) 12 W per channel, min. RMS, driven into 4 Ω at from 80 Hz to 15 kHz with no more than 10% total harmonic distortion. Audio input sensitivity/Impedance (at 1 kHz) AUX: 500 mV/48.75 kΩ Speakers/Impedance: 4 Ω Tuner FM - JVC FS-H30 | Instruction Manual - Page 30
bill of sale plus a letter of explanation of the problem to the nearest JVC Factory Service Center, the name and location of which will be Manual, normal maintenance, video and audio head cleaning; 4. Damage that occurs in shipment, due to act of God, and cosmetic damage; 5. Signal reception problems - JVC FS-H30 | Instruction Manual - Page 31
the most satisfaction from your purchase,please read the instruction booklet before operating the unit.In the event that repairs are necessary, please call 1 (800)537-5722 for your nearest authorized servicer or visit our website at www.JVC.com Remember to retain your Bill of Sale for Warranty - JVC FS-H30 | Instruction Manual - Page 32
VICTOR COMPANY OF JAPAN, LIMITED EN © 2003 VICTOR COMPANY OF JAPAN, LIMITED 0303MWMMDWJEM
-
 1
1 -
 2
2 -
 3
3 -
 4
4 -
 5
5 -
 6
6 -
 7
7 -
8
-
9
-
10
-
11
-
12
-
13
-
14
-
15
-
16
-
17
-
18
-
19
-
20
-
21
-
22
-
23
-
24
-
25
-
26
-
27
-
28
-
29
-
30
-
31
-
32
 |
 |

For Customer Use:
Enter below the Model No. and Serial No.
which are located either on the rear, bot-
tom or side of the cabinet. Retain this
information for future reference.
Model No.
Serial No.
FS-H35
—
Consists of CA-FSH35 and SP-UXH35
FS-H30
—
Consists of CA-FSH30 and SP-UXH30
COMPACT COMPONENT SYSEM
INSTRUCTIONS
GVT0101-001B
[J]
COMPACT COMPONENT SYSTEM