JVC GY-DV5000U Using Streamproducer with a Microsoft® Media Server - Page 3
Viewing the video stream fro the Internet - video camera
 |
View all JVC GY-DV5000U manuals
Add to My Manuals
Save this manual to your list of manuals |
Page 3 highlights
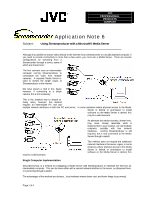
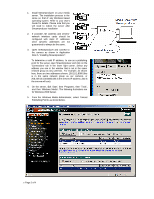
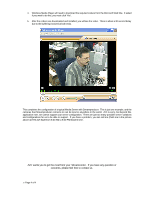
6. In the 'Broadcast Unicast Publishing Points' dialog box, select 'Use wizard...' as shown above. 7. Click on the 'Broadcast' bar and select 'New'. The wizard will make it easy to configure the server for this application. 8. When asked, select 'Create a broadcasting publishing point' and click 'Next'. 9. Select 'Remote Publishing Point' and click 'Next'. 10. Assign an alias to the publishing point. In this example, an alias of 'test1' has been used. 11. Enter a full path pointing to the remote publishing point as shownhere. The full path includes the port number shown after the IP address in Step 3 above. The full path includes 'http://'. The IP address, the port number and the alias. In this example, the full path is http://206.229.18.130:8080/sp20test 12. Click 'Next' to open the "Select publishing method" window. Accept all defaults and click 'Next'. 13. On the next page, click 'Finish'. In the 'Save .asx file' window that opens, save the asx file in a location of your choice. Here I have saved this file in the 'My Documents' folder. 14. In the last window that opens, you will be offered buttons for testing the URL and the .asx. You should test both. 15. With Streamproducer running, connected to the camera and casting, click on either of these buttons. Windows Media Player opens, and you should see the streamed video. If you do, click 'Close'. Your server is now configured for streaming. Viewing the video stream fro the Internet If the server is connected to the Internet with a global IP address (an address reachable from outside the LAN) anyone, from anywhere in the world with broadband Internet access can view the video using Windows Media Player 7.1 or later (WMP). WMP is now available for all platforms, including MAC, Linux and UNIX. 1. Open Windows Media Player. 2. Click on 'File' then'Open URL'. 3. In the window that opens, enter the address of th e server and the alias, as shown here. Click 'OK'. ? Page 3 of 4
-
 1
1 -
 2
2 -
 3
3 -
 4
4
 |
 |
