JVC GZ-EX355B User Guide - Page 146
Easy Storage
 |
View all JVC GZ-EX355B manuals
Add to My Manuals
Save this manual to your list of manuals |
Page 146 highlights
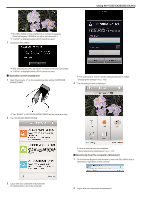
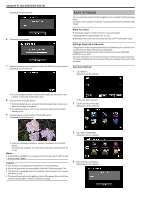
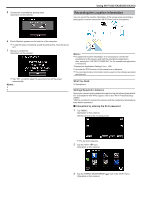
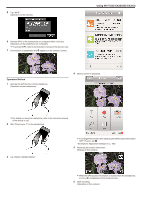
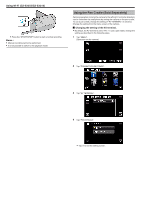
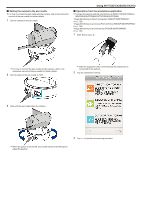
Using Wi-Fi (GZ-EX355/GZ-EX310) (Operation on this camera) 6 Connection in progress 7 After the connection is completed, wait for the DLNA device to start up. (Operation on this camera) EASY STORAGE You can save the videos and still images to your computer by following easy steps. Connect to the computer wirelessly via access point at home (wireless LAN router). What You Need 0 Computer (install LoiLoFit for Everio in your computer) "Installing the Provided Software" (A p. 115) 0 Wireless LAN router (use a product that has a Wi-Fi certification logo) Settings Required in Advance 1 Registration of the required information for connecting the camera to the access point (wireless LAN router) is necessary. "Registering the Access Points of the Camera to Connect (ACCESS POINTS)" (A p. 164) 2 It is also necessary to connect the computer to the access point in advance. *The above settings are not necessary if they have already been set for other functions. Operation Method 1 Tap "MENU". (Operation on this camera) 0 If a considerable number of videos/still images are recorded in the camera, it may take some time to start. 8 Operate from the DLNA device 0 From the DLNA device, access to the still image folder on Everio to select the images to playback. 0 For operation details, refer to the instruction manual of the DLNA device in use. 9 Images appear on the monitor of the DLNA device (Operation on DLNA device) 0 The top menu appears. 2 Tap the shortcut menu (F). (Operation on this camera) 3 Tap "EASY STORAGE". (Operation on this camera) 0 From the following instructions, perform operations on the DLNA device. For details on using the TV, refer to the instruction manual of the TV in use. Memo : 0 If the DLNA compatible TV in use cannot detect Everio, tap "STOP" to start from the step 1 again. Caution : 0 This function is not designed for disaster or crime prevention. 0 We do not guarantee the compatibility of all the DLNA compatible TVs. 0 This function is available when a connection to the access point is made with wires as well. 0 To prevent the situation of forgetting to turn off the power, this unit will turn off automatically after 10 days of continuous usage. 4 Start making a connection. (Operation on this camera) 146
-
 1
1 -
2
-
3
-
4
-
5
-
6
-
7
-
8
-
9
-
10
-
11
-
12
-
13
-
14
-
15
-
16
-
17
-
18
-
19
-
20
-
21
-
22
-
23
-
24
-
25
-
26
-
27
-
28
-
29
-
30
-
31
-
32
-
33
-
34
-
35
-
36
-
37
-
38
-
39
-
40
-
41
-
42
-
43
-
44
-
45
-
46
-
47
-
48
-
49
-
50
-
51
-
52
-
53
-
54
-
55
-
56
-
57
-
58
-
59
-
60
-
61
-
62
-
63
-
64
-
65
-
66
-
67
-
68
-
69
-
70
-
71
-
72
-
73
-
74
-
75
-
76
-
77
-
78
-
79
-
80
-
81
-
82
-
83
-
84
-
85
-
86
-
87
-
88
-
89
-
90
-
91
-
92
-
93
-
94
-
95
-
96
-
97
-
98
-
99
-
100
-
101
-
102
-
103
-
104
-
105
-
106
-
107
-
108
-
109
-
110
-
111
-
112
-
113
-
114
-
115
-
116
-
117
-
118
-
119
-
120
-
121
-
122
-
123
-
124
-
125
-
126
-
127
-
128
-
129
-
130
-
131
-
132
-
133
-
134
-
135
-
136
-
137
-
138
-
139
-
140
-
 141
141 -
 142
142 -
 143
143 -
 144
144 -
 145
145 -
 146
146 -
 147
147 -
 148
148 -
 149
149 -
 150
150 -
 151
151 -
152
-
153
-
154
-
155
-
156
-
157
-
158
-
159
-
160
-
161
-
162
-
163
-
164
-
165
-
166
-
167
-
168
-
169
-
170
-
171
-
172
-
173
-
174
-
175
-
176
-
177
-
178
-
179
-
180
-
181
-
182
-
183
-
184
-
185
-
186
-
187
-
188
-
189
-
190
-
191
-
192
-
193
-
194
-
195
-
196
-
197
-
198
-
199
-
200
-
201
-
202
-
203
-
204
-
205
-
206
-
207
-
208
-
209
-
210
-
211
-
212
-
213
-
214
-
215
-
216
-
217
-
218
-
219
-
220
-
221
-
222
-
223
-
224
-
225
-
226
-
227
-
228
-
229
-
230
-
231
-
232
-
233
-
234
-
235
-
236
-
237
-
238
-
239
-
240
-
241
-
242
-
243
-
244
-
245
-
246
-
247
-
248
-
249
-
250
-
251
-
252
-
253
-
254
-
255
-
256
-
257
-
258
-
259
-
260
-
261
 |
 |
