JVC GZ MG37u Instructions - Page 32
Watching Images on TV/Remote Control - usb cable
 |
UPC - 492410838180
View all JVC GZ MG37u manuals
Add to My Manuals
Save this manual to your list of manuals |
Page 32 highlights
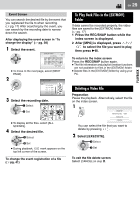
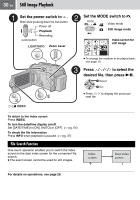
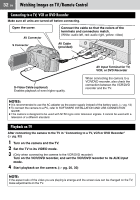
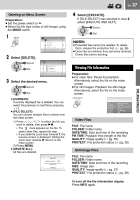
32 EN Watching Images on TV/Remote Control Connecting to a TV, VCR or DVD Recorder Make sure all units are turned off before connecting. Open the cover. AV Connector S Connector Connect the cable so that the colors of the terminals and connectors match. (White: audio left, red: audio right, yellow: video) AV Cable (provided) S-Video Cable (optional) Enables playback of even higher quality. AV Input Terminal for TV, VCR, or DVD Recorder When connecting the camera to a VCR/DVD recorder, also check the connection between the VCR/DVD recorder and the TV. NOTES: ● It is recommended to use the AC adapter as the power supply instead of the battery pack. (੬ pg. 12) ● To connect the camera to a PC, refer to SOFTWARE INSTALLATION AND USB CONNECTION GUIDE. ● This camera is designed to be used with NTSC-type color television signals. It cannot be used with a television of a different standard. Playback on TV After connecting the camera to the TV in "Connecting to a TV, VCR or DVD Recorder" (੬ pg. 32) 1 Turn on the camera and the TV. 2 Set the TV to its VIDEO mode. 3 (Only when connecting the camera to the VCR/DVD recorder) Turn on the VCR/DVD recorder, and set the VCR/DVD recorder to its AUX input mode. 4 Start playback on the camera. (੬ pg. 26, 30) NOTE: If the aspect ratio of the video you are playing is strange and the screen size can be changed on the TV, make adjustments on the TV.
-
 1
1 -
2
-
3
-
4
-
5
-
6
-
7
-
8
-
9
-
10
-
11
-
12
-
13
-
14
-
15
-
16
-
17
-
18
-
19
-
20
-
21
-
22
-
23
-
24
-
25
-
26
-
 27
27 -
 28
28 -
 29
29 -
 30
30 -
 31
31 -
 32
32 -
 33
33 -
 34
34 -
 35
35 -
 36
36 -
 37
37 -
38
-
39
-
40
-
41
-
42
-
43
-
44
-
45
-
46
-
47
-
48
-
49
-
50
-
51
-
52
-
53
-
54
-
55
-
56
-
57
-
58
-
59
-
60
-
61
-
62
-
63
-
64
-
65
-
66
-
67
-
68
-
69
-
70
-
71
-
72
 |
 |
