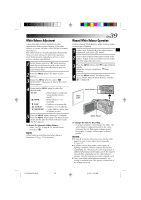
JVC JY-VS200U JY-VS200U User Manual -- Pages 36-65 (1302KB)
JVC JY-VS200U - Professional Dv 1-ccd Camcorder Manual
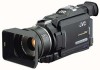 |
View all JVC JY-VS200U manuals
Add to My Manuals
Save this manual to your list of manuals |
JVC JY-VS200U manual content summary:
- JVC JY-VS200U | JY-VS200U User Manual -- Pages 36-65 (1302KB) - Page 1
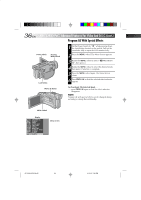
or during Record-Standby. MENU Wheel Display SHUT TER1/100 S POR T S SNOW SPOT L I GHT TW I L I GHT SEP I A MONOTONE CLASS I C F I LM S T ROBE SLOW 1 SLOW 2 Menu Screen JY-VS200U EN 36-65 36 01.3.12, 7:06 PM - JVC JY-VS200U | JY-VS200U User Manual -- Pages 36-65 (1302KB) - Page 2
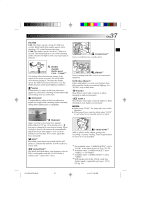
" in the Menu Screen ( ੬ pg. 28, 29). *2 Available when "CAMERA MODE" is set to "VIDEO" or "PS-VIDEO". *3 Available when "CAMERA MODE" is set to "VIDEO". *4 With images shot in the UXGA mode, the shutter speed is applicable only up to 1/500 (੬ pg. 16). JY-VS200U EN 36-65 37 01.3.12, 7:06 PM - JVC JY-VS200U | JY-VS200U User Manual -- Pages 36-65 (1302KB) - Page 3
Power Switch is set to " ". • Pressing the BACKLIGHT button has no effect when the manual Exposure Control mode is engaged. Iris lock indicator 3 BACKLIGHT Button (5) EXPOSURE Button (2) MENU Wheel , and dilates in dim environments to allow in more light. JY-VS200U EN 36-65 38 01.3.12, 7:06 PM - JVC JY-VS200U | JY-VS200U User Manual -- Pages 36-65 (1302KB) - Page 4
usually adjusted automatically . However, more advanced camcorder operators control this function manually to achieve a more precise color/tint you adjust white balance manually , the setting is retained even if the power is turned off or the battery removed. JY-VS200U EN 36-65 39 01.3.12 - JVC JY-VS200U | JY-VS200U User Manual -- Pages 36-65 (1302KB) - Page 5
Stop mode continues for 5 minutes when power is supplied from a battery, the camcorder shuts off automatically. To turn on again, set the Power Switch camera body. ● LCD monitor/viewfinder indications: • When power is supplied from a battery: the " " battery JY-VS200U EN 36-65 40 01.3.12, 7:06 PM - JVC JY-VS200U | JY-VS200U User Manual -- Pages 36-65 (1302KB) - Page 6
appear/disappear on the camcorder . Makes the time code appear/disappear on the camcorder. * Each setting is linked with " DISPLAY" or " SYSTEM", which appears when the Power Switch is set to " " (੬ pg. 30, 31). The parameters are the same as in the description on pg. 30, 31. JY-VS200U EN 36-65 - JVC JY-VS200U | JY-VS200U User Manual -- Pages 36-65 (1302KB) - Page 7
"12-bit" is called "32 kHz" and "16-bit" is called "48 kHz".) ● The camcorder cannot detect the sound mode in which the recording was made during fast-forward or rewind. During playback the : 30 PM 12 : 34 : 24 Frames* Seconds Minutes *30 frames = 1 second JY-VS200U EN 36-65 42 01.3.12, 7:06 PM - JVC JY-VS200U | JY-VS200U User Manual -- Pages 36-65 (1302KB) - Page 8
Search, the camcorder stops automatically. ● A blank portion which is shorter than 5 seconds of tape cannot be detected. ● The detected blank portion may be located between recorded scenes. Before you start recording, make sure there is no recorded scene after the blank portion. JY-VS200U EN 36-65 - JVC JY-VS200U | JY-VS200U User Manual -- Pages 36-65 (1302KB) - Page 9
-Forward Button (3) Power Switch PLAYBACK Basic Playback For D.S.C. Normal Playback Images shot with the camcorder are automatically numbered, then stored in numerical order in the memory card. You can view the index number of the image file ( ੬ pg. 45). JY-VS200U EN 36-65 44 01.3.12, 7:06 PM - JVC JY-VS200U | JY-VS200U User Manual -- Pages 36-65 (1302KB) - Page 10
. 3 Rotate the MENU wheel to move the green frame to the desired image and press it. The image selected in the INDEX Screen is displayed. JY-VS200U EN 36-65 45 01.3.12, 7:06 PM - JVC JY-VS200U | JY-VS200U User Manual -- Pages 36-65 (1302KB) - Page 11
from which you wish to remove protection. 6 Rotate the MENU wheel upward to select "EXIT" and press it. The normal playback screen appears. Normal playback JY-VS200U EN 36-65 46 01.3.12, 7:06 PM - JVC JY-VS200U | JY-VS200U User Manual -- Pages 36-65 (1302KB) - Page 12
such as turning off the camcorder) during deletion. Also, be sure to use the provided AC Power Adapter/Charger, as the memory card may be corrupted if the battery becomes exhausted during deletion. , rotate the MENU wheel to select "CANCEL" and press it. JY-VS200U EN 36-65 47 01.3.12, 7:06 PM - JVC JY-VS200U | JY-VS200U User Manual -- Pages 36-65 (1302KB) - Page 13
they can be used together with the print frames in the camcorder 's memory. For details on creating/transferring print frames, refer to the software instructions. ● Depending on the images you play back, the print frame outline may become grainy or vague. JY-VS200U EN 36-65 48 01.3.12, 7:06 PM - JVC JY-VS200U | JY-VS200U User Manual -- Pages 36-65 (1302KB) - Page 14
(such as turning off the camcorder) during initialization. Also, be sure to use the providedAC Power Adapter/Charger, as the memory card may be corrupted if the battery becomes exhausted during initialization. If the memory card becomes corrupted initialize it. JY-VS200U EN 36-65 49 01.3.12 - JVC JY-VS200U | JY-VS200U User Manual -- Pages 36-65 (1302KB) - Page 15
turning off the camcorder) during deletion. Also, be sure to use the provided AC Power Adapter/Charger, as the memory card may be corrupted if the battery becomes exhausted during these steps. ● The print frames in the camcorder 's memory cannot be deleted. JY-VS200U EN 36-65 50 01.3.12, 7:06 PM - JVC JY-VS200U | JY-VS200U User Manual -- Pages 36-65 (1302KB) - Page 16
print frames are deleted. •To cancel deletion, rotate the MENU wheel to select "CANCEL" and press it. FRAME DEL . ALL - CANCEL EXECUTE Deletion Confirmation Screen JY-VS200U EN 36-65 51 01.3.12, 7:06 PM - JVC JY-VS200U | JY-VS200U User Manual -- Pages 36-65 (1302KB) - Page 17
Setting Print Information (DPOF Setting) This camcorder is compatible with the DPOF (Digital Print Order Format) standard in order to support future systems such as automatic printing, select "RESET" in step 6. The setting is reset to 0 for all still images. JY-VS200U EN 36-65 52 01.3.12, 7:06 PM - JVC JY-VS200U | JY-VS200U User Manual -- Pages 36-65 (1302KB) - Page 18
DPOF, it will make prints of the selected still images automatically. ● To print images recorded on a tape, first dub them to a memory card ( ੬ pg. 60). JY-VS200U EN 36-65 53 01.3.12, 7:06 PM - JVC JY-VS200U | JY-VS200U User Manual -- Pages 36-65 (1302KB) - Page 19
making the connections, refer also to your VCR and TV instruction manuals. AA. C.onnCecotnionn etoctaioTVn otroVaCRTeVquoiprpeVdCwRitheaqnuSi-pVpIDeEdO wINiathndaAn/VSi-nVpuIDt EO cover. ** The Audio cable is not required for watching still images only . JY-VS200U EN 36-65 54 01.3.12, 7:06 PM - JVC JY-VS200U | JY-VS200U User Manual -- Pages 36-65 (1302KB) - Page 20
to the TV input, referring to your VCR's instruction manual. 4 Turn on the camcorder, the VCR and the TV. 5 Set the VCR Charger as the power supply instead of the battery pack (੬ pg. 9). ● To monitor the picture and sound from the camcorder without inserting a tape or memory card, set the camcorder - JVC JY-VS200U | JY-VS200U User Manual -- Pages 36-65 (1302KB) - Page 21
/ Charger as the power supply instead of the battery pack (੬ pg. 9). ● Never connect the USB cable and the DV cable simultaneously to the camcorder. Connect only the cable you wish to use to the camcorder. ● The date/time information cannot be captured into the PC. ● Refer to the instruction manuals - JVC JY-VS200U | JY-VS200U User Manual -- Pages 36-65 (1302KB) - Page 22
a colored mosaic pattern or it will become black. ● Also refer to the instruction manuals of the connected units. ● When using a DV cable, be sure to use the optional JVC VC-VDV204U DV cable. Digital Printer Core filter PC connection cable To RS-232C PC JY-VS200U EN 36-65 57 01.3.12, 7:06 PM - JVC JY-VS200U | JY-VS200U User Manual -- Pages 36-65 (1302KB) - Page 23
or "LCD/TV" in the Menu Screen (੬ pg. 41). Or, press DISPLAY on the remote control. To Use This Camcorder As A Recorder . . . 1. Set the Power Switch to " " while pressing down the Lock Button located on the It is also possible to dub from another camcorder. JY-VS200U EN 36-65 58 01.3.12, 7:06 PM - JVC JY-VS200U | JY-VS200U User Manual -- Pages 36-65 (1302KB) - Page 24
/Charger as the power supply instead of the battery pack ( ੬ pg. 9). ● If the remote control is used when both the player and recorder are JVC output from the DV IN/OUT connector. ● When using a DV cable, be sure to use the optional JVC VC-VDV204U DV cable. To Use This Camcorder As A Recorder - JVC JY-VS200U | JY-VS200U User Manual -- Pages 36-65 (1302KB) - Page 25
with a video image you wish to dub, perform up to step 7 using the remote control (provided) ( ੬ pg. 64). ● Images are dubbed in VGA file size. JY-VS200U EN 36-65 60 01.3.12, 7:06 PM - JVC JY-VS200U | JY-VS200U User Manual -- Pages 36-65 (1302KB) - Page 26
this camcorder from a distance as well as the basic operations (Playback, Stop, Pause, Fast-Forward and Rewind) of your VCR. It also makes additional playback functions possible. Installing The Batteries is directly exposed to sunlight or powerful lighting. JY-VS200U EN 36-65 61 01.3.12, 7:06 PM - JVC JY-VS200U | JY-VS200U User Manual -- Pages 36-65 (1302KB) - Page 27
STOP Button ( PAUSE Button ) R.A.EDIT Buttons Functions With the camcorder's Power Switch set to the camera position (" " or ") . With the camcorder's Power Switch set to " ". Transmits the beam signal. - Pauses the tape (੬ pg. 63) - ੬ pg. 65 - 70 JY-VS200U EN 36-65 62 01.3.12, 7:06 PM - JVC JY-VS200U | JY-VS200U User Manual -- Pages 36-65 (1302KB) - Page 28
Zoom Buttons (T/W) on the remote control. Make sure the remote control is pointed at the camcorder's remote sensor. Pressing T zooms in. 3) You can move the image on screen on images that were recorded when "CAMERA MODE" is set to " PS-VIDEO" (੬ pg. 28, 29). JY-VS200U EN 36-65 63 01.3.12, 7:06 PM - JVC JY-VS200U | JY-VS200U User Manual -- Pages 36-65 (1302KB) - Page 29
image. OPERATION: 1) To start playback, press PLAY (4). 2) Point the remote control at the camcorder's remote sensor and press EFFECT. The PLAYBACK EFFECT Select Menu appears. 3) Move the highlight bar did in recording. Refer to page 37 for more information. JY-VS200U EN 36-65 64 01.3.12, 7:07 PM - JVC JY-VS200U | JY-VS200U User Manual -- Pages 36-65 (1302KB) - Page 30
camcorder JVC manually and try step 2. ● If the remote control is not able to control the VCR, use the controls on the VCR. ● When the remote control's batteries run out, the VCR brand you have set will be erased. In that case, replace the old battery with a new one to reset the VCR brand. JY-VS200U
-
 1
1 -
 2
2 -
 3
3 -
 4
4 -
 5
5 -
 6
6 -
 7
7 -
8
-
9
-
10
-
11
-
12
-
13
-
14
-
15
-
16
-
17
-
18
-
19
-
20
-
21
-
22
-
23
-
24
-
25
-
26
-
27
-
28
-
29
-
30
 |
 |
36
EN
IC
F I LM
CLASS
SEPIA
GHT
T
W
ILI
ONE
MONOT
SNO
W
S
SPORT
G
I
HT
SPOTL
E
STROB
1
SLO
W
2
SLO
W
ER
SHUTT
1/100
RECORDING
Advanced Features For Video And D.S.C. (cont.)
Program AE With Special Effects
1
Set the Power Switch to “
” while pressing down
the Lock Button located on the switch. Pull out the
viewfinder fully or open the LCD monitor fully .
2
Press the
MENU
wheel. The Menu Screen appears.
3
Rotate the
MENU
wheel
to select “
PROGRAM
AE”, then press it.
4
Rotate the
MENU
wheel to select the desired mode,
then press it. Selection is complete.
5
Press the
MENU
wheel again. The Menu Screen
closes.
6
Press
PROG.AE
so that the selected effect indicator
appears.
To Deactivate The Selected Mode . . .
....
press
PROG.AE
again so that the effect indicator
disappears.
NOTE:
Program AE with special effects can be changed during
recording or during Record-Standby.
MENU Wheel
Power Switch
Lock Button
Shooting
Mode Switch
Display
Menu Screen
PROG.AE Button
JY-VS200U EN 36-65
01.3.12, 7:06 PM
36