JVC KD-X220 Instruction Manual
JVC KD-X220 Manual
 |
View all JVC KD-X220 manuals
Add to My Manuals
Save this manual to your list of manuals |
JVC KD-X220 manual content summary:
- JVC KD-X220 | Instruction Manual - Page 1
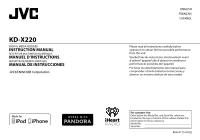
KD-X220 DIGITAL MEDIA RECEIVER INSTRUCTION MANUAL RÉCEPTEUR MULTIMÉDIA NUMÉRIQUE MANUEL D'INSTRUCTIONS RECEPTOR DE MEDIOS DIGITALES MANUAL DE INSTRUCCIONES ENGLISH FRANÇAIS ESPAÑOL Please read all instructions carefully before operation to obtain the best possible performance from the unit. - JVC KD-X220 | Instruction Manual - Page 2
CONTENTS BEFORE USE BASICS GETTING STARTED USB / iPod / ANDROID RADIO AUX Pandora® iHeartRadio® AUDIO SETTINGS DISPLAY SETTINGS MORE INFORMATION TROUBLESHOOTING SPECIFICATIONS INSTALLATION / CONNECTION BEFORE USE 2 Warning 3 Do not operate any function that takes your attention away from safe - JVC KD-X220 | Instruction Manual - Page 3
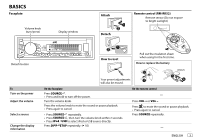
Volume knob (turn/press) Display window Attach Detach Remote control (RM-RK52) Remote sensor (Do not expose to bright sunlight.) Detach button How to reset Pull out the insulation sheet when using for the first time. How to replace the battery To Turn on the power Adjust the volume Select - JVC KD-X220 | Instruction Manual - Page 4
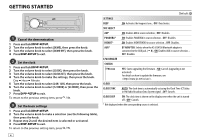
Bluetooth adapter is connected to the AUX jack. ( 8) ; ON: Enables AUX in source selection. ; OFF: Disables. F/W UPDATE SYSTEM F/W xxxx YES: Starts upgrading the firmware. ; NO: Cancels (upgrading is not activated). For details on how to update the firmware, see: - JVC KD-X220 | Instruction Manual - Page 5
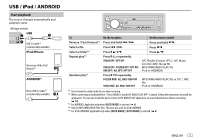
install the latest version of JVC MUSIC PLAY application on your Android device before connecting. ( 14) *3 For ANDROID: Applicable only when [AUTO MODE] is selected. ( 6) *4 Only for MP3/WMA/WAV/FLAC files. This does not work for iPod/ ANDROID. *5 For iPod/ ANDROID: Applicable only when [HEAD MODE - JVC KD-X220 | Instruction Manual - Page 6
. HEAD MODE: Control from the unit. IPHONE MODE: Control from the iPod/iPhone. However, you can still play/pause or file skip from the unit. While in ANDROID source, press repeatedly. AUTO MODE: Control from the unit (using JVC MUSIC PLAY application). AUDIO MODE: Control other media player - JVC KD-X220 | Instruction Manual - Page 7
receiving an FM stereo repeatedly to search for a station manually. Settings in memory You can hold the volume knob until "PRESET MODE" flashes. 2 Turn the volume activated or follow the instructions stated on the selected item activate for the following cases. • The unit is turned off. • [OFF] is - JVC KD-X220 | Instruction Manual - Page 8
audio player and start playback. Use a 3-core plug head stereo mini plug for optimum audio output. Use a Bluetooth® device 1 Connect the Bluetooth adapter, KS-BTA100 (separately purchased). Blue/white Black Brown Wiring harness of the unit ( 19) Blue/white: Remote Black: Ground Brown: Tel - JVC KD-X220 | Instruction Manual - Page 9
Pandora® Preparation: Install the latest version of the Pandora application on track Press T. Thumbs up or Press . thumbs down*2 *1 Do not leave the cable inside the car when not using. *2 If thumbs down is selected, the current track is skipped. On the account but not on this unit. ENGLISH 9 - JVC KD-X220 | Instruction Manual - Page 10
iHeartRadio® Preparation: Install the latest version of iHeart Link for JVC application on your device (iPhone/ iPod touch), then and hold the volume knob. Press 1. Press 4. *1 Do not leave the cable inside the car when not using. *2 If thumbs down is selected, the current track is skipped. On the - JVC KD-X220 | Instruction Manual - Page 11
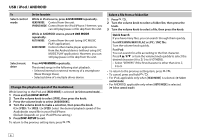
to make a selection (see the following table), then press the knob. 3 Repeat step 2 until the desired item is selected/activated or follow the instructions stated on the selected item. 4 Press to exit. To return to the previous setting item, press . Default: XX EQ SETTING EQ PRESET FLAT - JVC KD-X220 | Instruction Manual - Page 12
maximum power of each speaker is less than 50 W to prevent damaging the speakers.) ; HIGH POWER: The maximum volume level is 50. D.T.EXP (Digital Track Expander) ON: Creates realistic sound by compensating the high-frequency components and restoring the rise-time of the waveform that are lost in - JVC KD-X220 | Instruction Manual - Page 13
Repeat step 2 until the desired item is selected/activated or follow the instructions stated on the selected item. 4 Press to exit. To return to DAY COLOR] is changed by turning on or off your car's headlight. *1 The illumination control wire connection is required. ( 19) *2 Some characters or - JVC KD-X220 | Instruction Manual - Page 14
" menu in [HEAD MODE]. • The song order displayed on the selection menu of this unit may differ from that of the iPod/ iPhone. • If some operations are not performed correctly or as intended, visit: . About Android device • This unit supports Android OS 4.1 and above - JVC KD-X220 | Instruction Manual - Page 15
Turn the power off, then check to be sure the terminals of the speaker wires are insulated properly. Turn the power on again. "PROTECTING SEND SERVICE" appears. Send the unit to the nearest service center. Source cannot be selected. Check the [SRC SELECT] setting. ( 4) Radio • Radio reception - JVC KD-X220 | Instruction Manual - Page 16
unit. ( 14) ANDROID Cannot playback at [AUTO MODE]. • Make sure JVC MUSIC PLAY APP is installed on the Android device. ( 5) • Reconnect the Android device and select the appropriate control mode. ( 6) • If this does not solve the problem, the connected Android device does not support [AUTO MODE - JVC KD-X220 | Instruction Manual - Page 17
Ratio (MONO) Stereo Separation (1 kHz) USB 1.1, USB 2.0 (Full speed) Mass storage class FAT12/ 16 Audio Layer-3 Compliant with Windows Media Audio RIFF waveform Audio Format allowable) Maximum Current Consumption Operating Temperature Range Installation Size (W × H × D) Weight 14.4 V 10 A 0°C to + - JVC KD-X220 | Instruction Manual - Page 18
of the car battery. 2 Connect the wires properly. See Wiring connection. ( 19) 3 Install the unit to your car. See Installing the unit (in-dash mounting). 4 Connect the terminal of the car battery. 5 Reset the unit. ( 3) Installing the unit (in-dash mounting) Hook on the top side Orientate - JVC KD-X220 | Instruction Manual - Page 19
Wiring connection JVC Amplifier*1 Signal cord (not supplied) *1 Firmly connect the ground wire of the amplifier to the car's chassis to avoid damaging the unit. Part list for installation (A) Faceplate Fuse (10 A) Rear/subwoofer output Antenna terminal Vehicle dashboard Remote wire (not - JVC KD-X220 | Instruction Manual - Page 20
BASE 3 PRISE EN MAIN 4 USB / iPod / ANDROID 5 RADIO 7 AUX 8 Pandora® 9 iHeartRadio® 10 RÉGLAGES AUDIO 11 RÉGLAGES D'AFFICHAGE 13 PLUS D'INFORMATIONS 14 GUIDE DE DÉPANNAGE 15 SPÉCIFICATIONS 17 INSTALLATION / RACCORDEMENT 18 AVANT L'UTILISATION Avertissement N'utilisez aucune - JVC KD-X220 | Instruction Manual - Page 21
FONCTIONNEMENT DE BASE Façade Bouton de volume (tournez/appuyez) Fenêtre d'affichage Attachez Détachez Télécommande (RM-RK52) Capteur de télécommande (Ne l'exposez Pas à la lumière directe du soleil.) Touche de détachement Comment réinitialiser Retirez la feuille d'isolant lors de la première - JVC KD-X220 | Instruction Manual - Page 22
de la source. ; OFF: Hors service. F/W UPDATE SYSTEM F/W xxxx YES: Démarrer la mise à niveau du micrologiciel. ; NO: Annulation (la mise à niveau n'est pas activée). Pour en savoir plus sur la mise à niveau du micrologiciel, référez-vous à: . CLOCK CLOCK SYNC AUTO - JVC KD-X220 | Instruction Manual - Page 23
[VIEW] to install JVC MUSIC PLAY APP"apparaît. Suivez les instructions pour installer l'application. Vous pouvez aussi intaller la dernière version de l'application JVC MUSIC PLAY sur votre périphérique Android avant la connexion. ( 14) *3 Pour ANDROID: Fonctionne uniquement quand [AUTO MODE] est - JVC KD-X220 | Instruction Manual - Page 24
utiliser la lecture/pause ou le saut de fichier de l'appareil. Quand la source est ANDROID, appuyez répétitivement sur . AUTO MODE: Commande à partir de l'appareil (en utilisant l'application JVC MUSIC PLAY). AUDIO MODE: Commande d'autres applications de lecture multimédia à partir du périphérique - JVC KD-X220 | Instruction Manual - Page 25
le bouton de volume jusqu'à ce que "PRESET MODE" clignote. 2 Tournez le bouton de volume pour soit sélectionné/activé ou suivez les instructions données pour l'élément sélectionné. DAILY/ WEEKLY/ OFF: Sélectionnez la fréquence de mise en service de la minuterie. 2 FM/ AM: Sélectionner la source. 3 - JVC KD-X220 | Instruction Manual - Page 26
RCK (rock soft), TOP 40, COUNTRY, Bluetooth avec le KS-BTA100. 3 Sélectionnez [BT ADAPTER] pour [AUX] dans [SRC SELECT]. ( 4) 4 Appuyez répétitivement sur pour sélectionner BT AUDIO. 5 Commencez à utiliser le périphérique Bluetooth. Pour plus de détails, se reporter au manuel d'instructions - JVC KD-X220 | Instruction Manual - Page 27
Pandora® Préparation: Installez la dernière version de l'application Pandora sur votre appareil (iPhone/ iPod touch), puis créez un compte et connectez-vous sur Pandora. • Sélectionnez [ON] pour [PANDORA] dans [SRC SELECT]. ( 4) Démarrez l'écoute 1 Ouvrez l'application Pandora sur votre appareil. 2 - JVC KD-X220 | Instruction Manual - Page 28
iHeartRadio® Préparation: Installez la dernière version de l'application iHeart Link for JVC sur votre appareil (iPhone/ iPod touch), puis créez un compte et connectez-vous sur iHeartRadio. • Sélectionnez [ON] pour [IHEART] dans [SRC SELECT]. ( 4) Démarrez l'écoute 1 - JVC KD-X220 | Instruction Manual - Page 29
le tableau suivant), puis appuyez sur le bouton. 3 Répétez l'étape 2 jusqu'à ce que l'élément souhaité soit sélectionné/ activé ou suivez les instructions données pour l'élément sélectionné. 4 Appuyez sur pour quitter. Pour retourner à l'option de réglage précédente, appuyez sur . Défaut: XX - JVC KD-X220 | Instruction Manual - Page 30
RÉGLAGES AUDIO AUDIO BASS BOOST LOUD SUB.W LEVEL*4 SUB.W *6 SUB.W LPF*4 SUB.W PHASE*4 FADER BALANCE *7 VOL ADJUST AMP GAIN +01 / +02: Choisit votre niveau préféré d'accentuation des graves. ; OFF: Annulation. 01 / 02: Accentue les basses ou hautes fréquences pour produire un son plus équilibré aux - JVC KD-X220 | Instruction Manual - Page 31
ce que l'élément souhaité soit sélectionné/ activé ou suivez les instructions données pour l'élément sélectionné. 4 Appuyez sur pour quitter. Ajuste l'heure de mise en et hors service du gradateur. Tournez le bouton de volume pour régler l'heure de mise en service [ON], puis appuyez sur le bouton - JVC KD-X220 | Instruction Manual - Page 32
mode [HEAD MODE]. • L'ordre des morceaux affichés sur le menu de sélection de cet appareil peut être différent de celui de iPod/iPhone. • Si certaines opération ne sont pas effectuées correctement ou comme vous le souhaitez, consultez: . À propos du périphérique Android - JVC KD-X220 | Instruction Manual - Page 33
" apparaît. USB-IPOD USB-ANDROID Durée de lecture Jour/Horloge BT AUDIO BT AUDIO Jour/Horloge GUIDE DE DÉPANNAGE Symptôme Remè ralités "MISWIRING CHECK WIRING THEN PWR ON" SERVICE" apparaît. Envoyez l'appareil au centre de service d'enregistrement utilisé. "NOT SUPPORT"apparaît et la fichier - JVC KD-X220 | Instruction Manual - Page 34
JVC MUSIC PLAY APP est installé sur le périphérique Android. ( 5) • Reconnectez le périphérique Android et sélectionnez le mode NO SKIPS" "NO STATIONS" "NOT CONNCTD" "UPDATE APP" "PLS LOGIN" "STATION NOT AVAILABLE" suit: 1 Vérifiez la section GUIDE DE DÉPANNAGE 2 Réinitialisez l'appareil ( 3) 3 - JVC KD-X220 | Instruction Manual - Page 35
dB Compatible avec le format MPEG-1/2 Audio Layer-3 Compatible Windows Media Audio Format audio de forme d'onde RIFF (PCM linéaire ) Consommation de courant maximale Gamme de température de fonctionnement Dimensions d'installation (L × H × P) Poids Sujet à changement sans notification. 20 - JVC KD-X220 | Instruction Manual - Page 36
de votre véhicule qui offre une alimentation de 12 V CC et qui se met en et hors service avec la clé de contact. • Gardez tous les câbles à l'écart des dissipateurs thermiques. • Après avoir installé l'appareil, vérifiez si les lampes de frein, les indicateurs, les clignotants, etc. de la voiture - JVC KD-X220 | Instruction Manual - Page 37
Connexions JVC Amplificateur*1 Cordon de signal (non fournie) *1 Connectez solidement le câble de masse de l'amplificateur au châssis de la voiture pour éviter d'endommager l'appareil. Liste des pièces pour l'installation (A) Façade Fusible (10 A) Sortie arrière/caisson de grave Borne de l' - JVC KD-X220 | Instruction Manual - Page 38
PUNTOS BÁSICOS 3 PROCEDIMIENTOS INICIALES 4 USB / iPod / ANDROID 5 RADIO 7 AUX 8 Pandora® 9 iHeartRadio® 10 AJUSTES En caso de tragarse, póngase con un médico inmediatamente. Cómo leer este manual • Las operaciones se explican utilizando principalmente los botones de la placa frontal. - JVC KD-X220 | Instruction Manual - Page 39
PUNTOS BÁSICOS Placa frontal Rueda de volumen (girar/pulsar) Ventanilla de visualización Fijar Desmontar Mando a distancia (RM-RK52) Sensor remoto (DO lo exponga a la luz solar brillante.) Botón de liberación Cómo reinicializar Retire la hoja aislante cuando se utilice por primera vez. Cómo - JVC KD-X220 | Instruction Manual - Page 40
[DEMO] y luego púlsela. 3 Gire la rueda de volumen para seleccionar [DEMO OFF UPDATE SYSTEM F/W xxxx YES: Se empieza a actualizar el firmware. ; NO: Se cancela (la actualización no se activa). Para obtener información sobre cómo actualizar el firmware, consulte: - JVC KD-X220 | Instruction Manual - Page 41
] to install JVC MUSIC PLAY APP". Siga las instrucciones para instalar la aplicación. Antes de la conexión, también puede instalar la versión más reciente de la aplicación JVC MUSIC PLAY en su dispositivo Android. ( 14) *3 Para ANDROID: Aplicable sólo cuando se selecciona [AUTO MODE]. ( 6) *4 Sólo - JVC KD-X220 | Instruction Manual - Page 42
SPEED / 1× SPEED / 2× SPEED: carácter no es una letra (A a Z) ni un número (0 a 9). • Para volver al elemento de ajuste anterior, pulse . • Para cancelar, pulse y mantenga pulsado . • Para iPod, aplicable solo cuando se selecciona [HEAD MODE]. ( Seleccionar modo de control) • Para ANDROID - JVC KD-X220 | Instruction Manual - Page 43
que parpadee "M" y, a continuación, pulse repetidamente para la búsqueda manual de emisoras. Ajustes en la memoria Puede almacenar hasta 18 emisoras de (o) 1 Pulse y mantenga pulsada la rueda de volumen hasta que "PRESET MODE" parpadee. 2 Gire la rueda de volumen para seleccionar un número de - JVC KD-X220 | Instruction Manual - Page 44
ásico), ADLT HIT (éxitos antiguos), SOFT RCK (rock suave), TOP 40, COUNTRY, OLDIES, SOFT, NOSTALGA (nostalgia), JAZZ, CLASSICL Uso de un dispositivo Bluetooth® 1 Conecte el adaptador Bluetooth, KS-BTA100 (vendido auxiliar 2 Registre (empareje) un dispositivo Bluetooth con el KS-BTA100. 3 Seleccione - JVC KD-X220 | Instruction Manual - Page 45
Pandora® Preparativos: Instale la última versión de la aplicación Pandora en su dispositivo (iPhone/ iPod touch) y, a continuación, cree una cuenta e inicie sesión en Pandora. • Seleccione [ON] para [PANDORA] - JVC KD-X220 | Instruction Manual - Page 46
iHeartRadio® Preparativos: Instale la última versión de la aplicación iHeart Link for JVC en su dispositivo (iPhone/ iPod touch) y, a continuación, cree squeda rápida en la lista por carácter inicial (A a Z). 2 Gire la rueda de volumen o pulse para seleccionar el carácter que desee buscar. 3 - JVC KD-X220 | Instruction Manual - Page 47
AJUSTES DE AUDIO Para Seleccionar un ecualizador preajustado Almacenar sus propios ajustes de sonido En la placa frontal Pulse repetidamente. Pulse y, a continuación, gire la rueda de volumen antes de que transcurran 2 segundos. Ecualizador preajustado: FLAT (predeterminado), HARD ROCK, - JVC KD-X220 | Instruction Manual - Page 48
en los altavoces.) ; HIGH POWER: El nivel máximo de volumen es 50. D.T.EXP ON: Crea un sonido real compensando los componentes de alta frecuencia y (Expansor digital de restableciendo el tiempo de subida de la forma de onda que se pierde en la compresión de pistas) los datos de audio. ; OFF: Se - JVC KD-X220 | Instruction Manual - Page 49
AJUSTES DE VISUALIZACIÓN 1 Pulse y mantenga pulsado . 2 Gire la rueda de volumen para seleccionar (consulte la siguiente tabla) y luego púlsela. 3 Repita el paso step 2 hasta que se seleccione o active el elemento que desee o siga las instrucciones indicadas en el elemento seleccionado. 4 - JVC KD-X220 | Instruction Manual - Page 50
Android es compatible con dispositivos de clase de almacenamiento masivo y con AOA 2.0, esta unidad siempre reproducirá con prioridad a través de AOA 2.0. • Para obtener más información y la lista de compatibilidad más reciente, consulte: - JVC KD-X220 | Instruction Manual - Page 51
PTY"/"NO TEXT". USB USB-IPOD USB-ANDROID PANDORA IHEART AUX BT AUDIO Tiempo de . General Aparece "MISWIRING CHECK WIRING THEN PWR ON". Apague la unidad. Aparece "PROTECTING SEND SERVICE". Lleve la unidad al centro de grabación anterior. Aparece"NOT SUPPORT"y se omiten Compruebe que la - JVC KD-X220 | Instruction Manual - Page 52
por el dispositivo Android. No se puede reproducir en [AUTO MODE]. El mensaje"NO que JVC MUSIC PLAY APP esté instalado en el dispositivo Android. ( 5) • Vuelva a conectar el dispositivo Android y " "NO SKIPS" "NO STATIONS" "NOT CONNCTD" "UPDATE APP" "PLS LOGIN" "STATION NOT AVAILABLE" "STATION NOT - JVC KD-X220 | Instruction Manual - Page 53
FAT12/ 16/ 32 5 V CC 1 A 24 Bit 20 Hz - 20 kHz 105 dB 88 dB 90 dB Compatible con MPEG-1/2 Audio Layer-3 Compatible con Windows Media Audio Formato de audio de formas de onda RIFF (PCM lineal solamente) Archivos FLAC Auxiliar Respuesta de frecuencia (±3 dB) Voltaje de entrada máximo Impedancia de - JVC KD-X220 | Instruction Manual - Page 54
fines de seguridad, deje que un profesional realice el cableado y el montaje. Consulte con un distribuidor de productos de audio para automóviles. • Instale esta unidad en la consola de su vehículo. No toque las partes metálicas de la unidad durante o un poco después del uso de la unidad. Las - JVC KD-X220 | Instruction Manual - Page 55
Conexión del cableado Amplificador de JVC*1 Cable de señal (no suministrado) *1 Para evitar daños a la unidad, conecte firmemente el cable de conexión a masa del amplificador al chasis del vehí - JVC KD-X220 | Instruction Manual - Page 56
and found to comply with the limits for a Class B digital device, pursuant to Part 15 of the FCC Rules. These limits are designed to provide reasonable protection against harmful interference in a residential installation. This equipment may cause harmful interference to radio communications, if
-
 1
1 -
 2
2 -
 3
3 -
 4
4 -
 5
5 -
 6
6 -
 7
7 -
8
-
9
-
10
-
11
-
12
-
13
-
14
-
15
-
16
-
17
-
18
-
19
-
20
-
21
-
22
-
23
-
24
-
25
-
26
-
27
-
28
-
29
-
30
-
31
-
32
-
33
-
34
-
35
-
36
-
37
-
38
-
39
-
40
-
41
-
42
-
43
-
44
-
45
-
46
-
47
-
48
-
49
-
50
-
51
-
52
-
53
-
54
-
55
-
56
 |
 |

ENGLISH
FRANÇAIS
ESPAÑOL
B5A-0115-00 [J]
KD-X220
DIGITAL MEDIA RECEIVER
INSTRUCTION MANUAL
RÉCEPTEUR MULTIMÉDIA NUMÉRIQUE
MANUEL D’INSTRUCTIONS
RECEPTOR DE MEDIOS DIGITALES
MANUAL DE INSTRUCCIONES
Please read all instructions carefully before
operation to obtain the best possible performance
from the unit.
Veuillez lires les instructions attentivement avant
d’utiliser l’appareil afin d’obtenir les meilleures
performances possibles de l’appareil.
Por favor lea detenidamente este manual para
comprender a fondo todas las instrucciones y
obtener un máximo disfrute de esta unidad.
For customer Use:
Enter below the Model No. and Serial No. which are
located on the top or bottom of the cabinet. Retain this
information for future reference.
Model No.
Serial No.