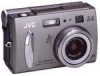
JVC QX5HD Instruction Manual
JVC QX5HD - 3MP Digital Still Camera Manual
 |
UPC - 046838158735
View all JVC QX5HD manuals
Add to My Manuals
Save this manual to your list of manuals |
JVC QX5HD manual content summary:
- JVC QX5HD | Instruction Manual - Page 1
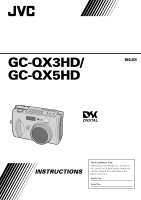
DIGITAL STILL CAMERA GC-QX3HD/ ENGLISH GC-QX5HD STILL CAMERA INSTRUCTIONS For Customer Use: Enter below the Model No. and Serial No. which is located on the bottom of cabinet. Retain this information for future reference. Model No. Serial No. LYT0668-001B - JVC QX5HD | Instruction Manual - Page 2
following pages to ensure safe use of your new Digital Still Camera. Using This Instruction Manual • All major sections and subsections are listed in user to the presence of important operating and maintenance (servicing) instructions in the literature accompanying the appliance. WARNING: TO PREVENT - JVC QX5HD | Instruction Manual - Page 3
servicing. ATTENTION: Follow and obey all warnings and instructions marked on your product and its operating instructions. For your safety, please read all the safety and operating instructions before you operate this product and keep this manual If the plug should still fail to fit, supporting - JVC QX5HD | Instruction Manual - Page 4
correctly or exhibits a marked change in performance and you are unable to restore normal operation by following the detailed procedure in its operating instructions, do not attempt to service it yourself as opening or removing covers may expose you to dangerous voltage or other hazards. Refer all - JVC QX5HD | Instruction Manual - Page 5
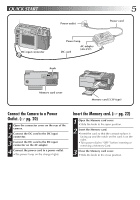
the rear of the camera. 2 Connect the DC cord to the DC input connector. 3 Connect the DC cord to the DC input connector on the AC adapter. 4 Connect the power cord to a power outlet. •The power lamp on the charger lights. Insert the Memory card. (੬ pg. 22) 1 Open the Memory card cover. •Slide the - JVC QX5HD | Instruction Manual - Page 6
all of the way to take the picture. •The picture image is stored in the Memory card. Play back a Picture. (੬ pg. 31) 1 Turn the Power dial to "B". •Hold the Lock button down while turning the Power dial. 2 Select "STILL PB" with the MODE switch. 3 Press the w e button to select the picture that you - JVC QX5HD | Instruction Manual - Page 7
million pixels, or twice as many in normal mode. 2. DR Pro-Still (Wide Range Mode) (GC-QX5HD only) (੬ pg. 47) This mode uses two exposures, one with the , or playback material normally in the event of a problem with a digital video camera, Memory card, etc. ● Store backups of important photos on a - JVC QX5HD | Instruction Manual - Page 8
38 Manual White Balance Adjustment 39 Sensitivity Setting ...40 Changing the Zoom Power While Shooting 41 Shooting Continuous Photos (GC-QX5HD only 42 Changing the AF/AE Area 43 Restoring the Default Settings 44 Collage Mode (GC-QX5HD only 45 6M Pro-Still (Pixel Shift Mode) (GC-QX5HD only - JVC QX5HD | Instruction Manual - Page 9
SERVICING (Only in U.S.A.) 102 WARRANTY (Only in U.S.A.) 103 PROVIDED ACCESSORIES Battery BN-V37 HD video cable Film holder/Film copying adapter (GC-QX5HD only) AC power adapter/ charger (AA-V37) DC cable USB cable Video cable DC OUT CD-ROM Memory card (3.3V type) (GC-QX5HD: 16 MB, GC - JVC QX5HD | Instruction Manual - Page 10
10 EN CONTROLS, CONNECTORS AND INDICATORS Front View 1 23 4 Top View 123 4 5 6789 0 ! @ # - JVC QX5HD | Instruction Manual - Page 11
self timer. 8 DISPLAY button pg. 31, 38 Press this button to turn the LCD screen on and off, and to select the menu display in camera mode and the index display in playback mode. 9 Macro button pg. 36 Press this button to set macro mode. 0 EXE (execute) button pg. 23, 53 - JVC QX5HD | Instruction Manual - Page 12
12 EN CONTROLS, CONNECTORS AND INDICATORS (cont.) Rear View 1 23 45 6 78 9 Bottom View 1 0 2 3 - JVC QX5HD | Instruction Manual - Page 13
mount hole pg. 25 Use this hole to mount the camera on a tripod. Use a tripod that does not have a rotation stopper. 3 Memory card cover pg. 22 Open this cover to install/remove a Memory card. Connectors VIDEO/HD PRINTER DIGITAL DC 1 2 3 4 Pull the cover to open. 1 VIDEO/HD output connector - JVC QX5HD | Instruction Manual - Page 14
set to "A", "M" or "V". Hold the Lock button down while turning the Power dial. Power dial position SET B OFF A M V LCD panel SET UP STILL PB - CAM AUTO MANUAL VIDEO On-screen display Displays the SET UP menu Displays the playback image - Displays the image Displays the image Displays the image - JVC QX5HD | Instruction Manual - Page 15
indicator pg. 29 : standard quality : fine quality : uncompressed quality 3 Image position indicator Indicates the current position of the displayed image in the memory. 4 indicator pg. 65 Appears for a picture for which DPOF was set. 5 indicator pg. 56 Appears for a picture selected for deletion - JVC QX5HD | Instruction Manual - Page 16
Screen Turn the Power dial to "M", then press the DISPLAY button until the CAMERA SETTING screen appears. To turn off the menu screen, press the DISPLAY button. CAMERA SETTING FRAME QUALITY 1024X768 FINE Q. REVIEW W.BALANCE ON AUTO SENS. 80 TELEPHOTO 1X M. DRIVE OFF AF/AE CLEAR MULTI - JVC QX5HD | Instruction Manual - Page 17
the MODE switch. The selected mode appears on the LCD screen. EN 17 STILL PLAYBACK 100-0003 STILL DELETE STILL DELETE STILL PROTECT STILL PROTECT 2000. 12. 24 (੬ pg. 31) VIDEO DELETE VIDEO DELETE THIS EXE REVISE EXE FOR ALL EXE (੬ pg. 65) HDTV MODE (GC-QX5HD only) HDTV MODE (੬ pg. 61) - JVC QX5HD | Instruction Manual - Page 18
battery fully charged. Replace the battery with a new one. ● The Power dial can be turned to "ON" accidentally, when you put the camera in a bag, etc. If the camera is left turned on, the battery will be used up and you will not be able to shoot a photo. It is recommended to - JVC QX5HD | Instruction Manual - Page 19
EN 19 Installing a Charged Battery The battery (provided) is not charged when the camera is purchased. Be sure to charge the battery with the AC adapter before using the camera. 1 Slide the battery cover slightly to open. 2 Insert a charged battery, making sure that it is oriented correctly. 3 Close - JVC QX5HD | Instruction Manual - Page 20
adapter (AAV37). ● Do not attempt to use an AC adapter for a video camera or other electronic device with this camera. Differences in voltage levels can damage the camera. ● Use the AC adapter in order to safely format Memory cards, delete pictures or send pictures to a connected personal computer. - JVC QX5HD | Instruction Manual - Page 21
of the lens cover to the hand strap. NOTES: ● Do not turn on the camera when the lens cover is attached. Doing so could result in the damage to the lens part. ● Make sure to attache the lens cover when the camera is not in use. ● Make sure to use the optional lens cleaning paper - JVC QX5HD | Instruction Manual - Page 22
sure to turn the Power dial to "OFF", when inserting a Memory card. Memory card is not loaded in the camera, when purchasing the camera. 1 Open the Memory card cover. •Slide the knob towards "OPEN". 2 Insert the Memory card. •Insert the card so that the contact surface is facing up and the notch on - JVC QX5HD | Instruction Manual - Page 23
DATE/TIME EXE FORMAT YES EXE NO EXE Make sure to use the provided AC adapter (AAV37) to power the camera, when formatting a Memory card. (੬ pg. 20) 1 When the message "FORMAT MEMORY CARD" appears, turn the Power dial to "SET". •Hold the Lock button down while turning the Power dial. •The SET - JVC QX5HD | Instruction Manual - Page 24
the half-press position to the full-press position when taking pictures. ● If you have pressed the Shutter button halfway and then release it, the camera will perform the autofocus operation again the next time that you press the Shutter button halfway. ● If you press the Shutter button all the way - JVC QX5HD | Instruction Manual - Page 25
supporting the camera to the left of and below the lens, support the camera body with your right hand. Next, look for your subject and determine the camera the camera from rotating. Using a Tripod We recommend use of a tripod in the circumstances described below in order to avoid problems caused by - JVC QX5HD | Instruction Manual - Page 26
, depending on your needs: "A": To shoot photos in full auto mode In this mode, the camera automatically sets the brightness, the shutter speed, the focus, and the white balance. "M": To shoot photos in manual mode In this mode, you can set the brightness, the shutter speed, the focus, and the - JVC QX5HD | Instruction Manual - Page 27
to a 37 mm to 86 mm lens of a 35 mm camera. Zooming allows you to shoot wide areas, as well as close- lever to "T" (telephoto). You can shoot a distant subject in closeup. NOTE: ● With this camera, you can set the "AF" (autofocus)/"AE" (auto exposure) sensor point to either "SPOT" or "MULTI - JVC QX5HD | Instruction Manual - Page 28
x 1536 (QXGA) 1024 x 768 (XGA) 640 x 480 (VGA) Select the resolution that best fits your needs. 2,5 3,4 SET 4 1 OFF M V CAMERA SETTING FRAME 2032X1536 QUALITY FINE Q. REVIEW ON W. BALANCE AUTO SENS. 80 TELEPHOTO 1X M. DRIVE OFF AF/AE MULTI CLEAR EXE 1 Turn the Power dial to - JVC QX5HD | Instruction Manual - Page 29
that can be stored will vary according to the images that are shot, the conditions under which the camera was used, the temperature when used, and the batteries that were used. Q. REVIEW Set "Q. REVIEW" to "ON" to check the quality of the picture automatically for 2 seconds as soon as you take - JVC QX5HD | Instruction Manual - Page 30
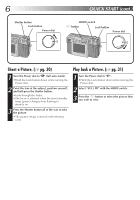
to "A". •Hold the Lock button down while turning the Power dial. •The camera turns on in full auto mode. 2 Point the lens at the subject, in the Memory card. •The shoot standby lamp (green) goes off when the recording has finished. NOTES: ● The image on the LCD screen becomes still while the - JVC QX5HD | Instruction Manual - Page 31
image on the LCD screen if a lot of images are recorded on the Memory card. Auto Playback 1 Turn the Power dial to "B". •Hold the Lock button down while turning the Power dial. 2 Select "STILL PB" with the MODE switch. •"STILL PB" appears on the LCD panel. 3 Press the DISPLAY button to select the - JVC QX5HD | Instruction Manual - Page 32
your own picture, or if you are worried that you will shake the camera too much when you press the Shutter button. Turn the Power dial lens at the subject, position yourself, and half-press the Shutter button. •The camera will continue to focus on the subject while the button is half-pressed. The - JVC QX5HD | Instruction Manual - Page 33
effect. The second flash is when the picture is actually taken. NOTES: ● Though the image on the LCD screen may appear dark, there is no problem with the recorded image. ● When the flash is turned on, the iris value is set to F2.8/3.8 automatically. ● When shooting with the flash, it is - JVC QX5HD | Instruction Manual - Page 34
manually. Press the r t button to focus. Press the r button to lengthen the focal distance. Press the t button to reduce the focal distance. 2.4m/8ft: Sets the focus to this distance. ∞: Sets the focus to infinity. AF-C (Auto Focus-Continuous): While the Shutter button is half-pressed, the camera - JVC QX5HD | Instruction Manual - Page 35
the depth of field and the shutter speed by setting the F value manually. 32 3,4 1 SET OFF4 M V EN 35 1 Turn the •The F value is the iris value, which controls the amount of light that reaches the camera's image sensor. •Smaller the F value is, faster the shutter speed becomes. Larger the F - JVC QX5HD | Instruction Manual - Page 36
36 EN MANUAL SHOOTING (cont.) Macro Shooting Use Macro mode to shoot a subject at a subject. 4 Point the lens at the subject, position yourself, and half-press the Shutter button. •The camera will continue to focus on the subject while the button is half-pressed. The shoot standby lamp (green) - JVC QX5HD | Instruction Manual - Page 37
to cycle through the modes in the opposite direction. 3 Point the lens at the subject, position yourself, and half-press the Shutter button. •The camera will continue to focus on the subject while the button is half-pressed. The shoot standby lamp (green) flashes. •To display the image on the - JVC QX5HD | Instruction Manual - Page 38
are no problems with the colors in a picture, select "AUTO". 3,6 4,5 21 M V SET OFF4 CAMERA SETTING FRAME 1024X768 QUALITY FINE Q. REVIEW ON W. : ● When shooting a night scene with " " mode, focus to the subject manually. It may not be able to attain focus in the auto focus mode. ● If - JVC QX5HD | Instruction Manual - Page 39
follow the procedure described below to adjust the white balance manually. 43 CAMERA SETTING FRAME 1024X768 QUALITY FINE Q. REVIEW ON W. BALANCE MWB SENS. 80 TELEPHOTO 1X M. DRIVE balance that you set is retained in memory until you set a different white balance under the "MWB" setting. - JVC QX5HD | Instruction Manual - Page 40
40 EN MANUAL SHOOTING (cont.) Sensitivity Setting You can change the camera's sensitivity setting when shooting at dark place or where you can not use the flash. 3,6 4,5 21 M V SET OFF4 CAMERA SETTING FRAME QUALITY Q. REVIEW W. BALANCE SENS. TELEPHOTO M. DRIVE AF/AE CLEAR 1024X768 FINE ON - JVC QX5HD | Instruction Manual - Page 41
3,6 4,5 7,8 1 M V SET OFF4 7 2 CAMERA SETTING FRAME 1024X768 QUALITY FINE Q. REVIEW ON W. BALANCE AUTO SENS. 80 TELEPHOTO 2X M. DRIVE dial. 2 Select "MANUAL" with the MODE switch. •"MANUAL" appears on the LCD panel. 3 Press the DISPLAY button until the CAMERA SETTING screen appears. - JVC QX5HD | Instruction Manual - Page 42
42 EN MANUAL SHOOTING (cont.) Shooting Continuous Photos (GC-QX5HD only) With this mode you can shoot 3 continuous photos. 3,6 4,5 7,8 1 M V 2 SET OFF4 CAMERA SETTING FRAME 1024X768 QUALITY FINE Q. REVIEW ON W. BALANCE AUTO SENS. 80 TELEPHOTO 1X M. DRIVE ON AF/AE MULTI CLEAR - JVC QX5HD | Instruction Manual - Page 43
REVIEW W. BALANCE ON AUTO SENS. 80 TELEPHOTO 1X M. DRIVE AF/AE OFF SPOT CLEAR EXE 1 Turn the Power dial to "M". •Hold the Lock button down while turning the Power dial. 2 Select "MANUAL" with the MODE switch. •"MANUAL" appears on the LCD panel. 3 Press the DISPLAY button until the CAMERA - JVC QX5HD | Instruction Manual - Page 44
the MODE switch. •"MANUAL" appears on the LCD panel. 3 Press the DISPLAY button until the CAMERA SETTING screen appears. 4 Press the r t button to select "CLEAR". 5 Press the EXE button. •The camera settings return to the default settings. •The settings for "FRAME", "QUALITY" and "Q. REVIEW" do not - JVC QX5HD | Instruction Manual - Page 45
EN 45 Collage Mode (GC-QX5HD only) This camera is able to combine images. For example, you can image is stored in the Memory card. NOTES: ● Due to large memory files created when shooting a picture of uncompressed quality in this mode, it is recommended that a Memory Card greater than 16MB be used. - JVC QX5HD | Instruction Manual - Page 46
Mode) (GC-QX5HD only) The camera can achieve double its normal resolution by taking two pictures consecutively, shifting the CCD pixels one pixel row in the vertical direction between the two shots. This mode uses the self timer to shoot a still picture. Use a tripod to prevent problems caused by - JVC QX5HD | Instruction Manual - Page 47
EN 47 DR Pro-Still (Wide Range Mode) (GC-QX5HD only) The camera can expand its apparent dynamic range by combining different exposures of an extremely high contrast subject. This mode uses the self timer to shoot a still picture. Use a tripod to prevent problems caused by shaky hands. 4 3 2 4,5 1 - JVC QX5HD | Instruction Manual - Page 48
This mode uses the self timer to shoot a still picture. Use a tripod to prevent problems caused by shaky hands. 4 3 2 4,5 1 Memory Card greater than 16MB be used. ● It takes a few seconds until the shooting finishes because this mode uses the exposure 8 times. Do not move the object and the camera - JVC QX5HD | Instruction Manual - Page 49
EN 49 Installing the Film Copying Adapter (GC-QX5HD only) By installing the provided film copying adapter, you can take photos of images from developed 35mm film (negatives or positives; only those with sleeves). Turn off the camera before installing the film copying adapter. For details on shooting - JVC QX5HD | Instruction Manual - Page 50
MANUAL SHOOTING (cont.) Shooting Film (Film Copy Mode) (GC-QX5HD only) You can use the film copying adapter (provided; see page 49) to take photos of images already on film. 4 532 1 M V SET OFF4 FILM COPY SETTING FRAME QUALITY Q. REVIEW FILM PRO STILL subject. •The camera automatically enters - JVC QX5HD | Instruction Manual - Page 51
EN 51 8 7 10,11 FILM COPY SETTING FRAME QUALITY Q. REVIEW FILM PRO STILL W. BALANCE SENS. CLEAR 2032x1536 FINE ON NEGA FILM 6M PRO halfway down, the brightness of the image will change, therefore do not move the camera or light source once set in position and ready to shoot. ● Brightness will - JVC QX5HD | Instruction Manual - Page 52
has finished. Do not operate the camera while the light flashes. NOTES: ● Sound is also recorded. ● It is not possible to use the flash for video shooting. ● It will take awhile to store a video file on a Memory card. ● You can change the settings of "Manual Focus" (੬ pg. 34), "Iris Setting" (੬ pg - JVC QX5HD | Instruction Manual - Page 53
models of camera. ● The camera expands and plays back data that was compressed and stored in a memory card. The data format is our own proprietary format. ● The image may have a mosaic appearance. ● When playing back a video that is shorter than 2 seconds, the video is displayed as a still image - JVC QX5HD | Instruction Manual - Page 54
during Video Playback. Brightness Adjustment of LCD Screen 23 PLAYBACK (cont.) Image number 100-0003 2000. 12. 24 STILL PLAYBACK screen 1 SET OF4F M V 1 Turn the Power dial to "A", "M", "V" or "B". •Hold the Lock does not influence the image files which is to be recorded on the Memory card. - JVC QX5HD | Instruction Manual - Page 55
and video files. EN 55 3,4 2 1,5 SET OF4F M V STILL PROTECT STILL PROTECT THIS PICT. EXE ALL EXE SELECT EXE ON/OFF EXE protection indicator) appears. NOTES: ● Protected picture will be deleted if the Memory card on which it is stored is reformatted. ● Important pictures that must be - JVC QX5HD | Instruction Manual - Page 56
be deleted in the same way. 3,4 2,5 1 SET OF4F M V STILL DELETE STILL DELETE THIS PICT. EXE ALL EXE SELECT EXE DELETE EXE RETURN EXE , unlock the protection and delete the picture. ● Do not remove the memory card or turn off the power while the delete operation is in progress. Doing - JVC QX5HD | Instruction Manual - Page 57
EN 57 Adding Special Effects You can add digital special effects to playback pictures. You can make pictures black and white or sepia tone, or you can use the camera as a simple film scanner. 34 2 1 SET OF4F M V EDIT THIS PICT. EXE EDIT EFFECT OFF DATE OFF NEXT EXE RETURN EXE 1 Turn - JVC QX5HD | Instruction Manual - Page 58
the r t button to select "OVERWRITE" or "SAVE", and then press the EXE button. •It is not possible to overwrite the file when the remaining memory of the Memory card is not enough. •You can also add date or calendar information to a file. (੬ pg. 59, 60) •You can print the file that you have - JVC QX5HD | Instruction Manual - Page 59
EXE button. •"NOW RECORDING" appears on the LCD screen. •You can also print the file to which you have added special effects. (੬ pg. 63) 7 Select "STILL PB" with the MODE switch, and then confirm that the file has been saved. (੬ pg. 31) ← (left) ↓ (down) - JVC QX5HD | Instruction Manual - Page 60
EXE button. •"NOW RECORDING" appears on the LCD screen. •You can also print the file to which you have added special effects. (੬ pg. 63) 8 Select "STILL PB" with the MODE switch, and then confirm that the file has been saved. (੬ pg. 31) NOTE: ● Even if a part of the calendar cannot be - JVC QX5HD | Instruction Manual - Page 61
or HDTV. HDTV TV VIDEO/HD EN 61 Digital Still Camera Green To video input connector Red Blue To operations of the camera. Select "HDTV" to view pictures on HDTV. (੬ pg. 31) ● Refer to the TV's instruction manual for connections and operations of your TV. ● When viewing a still picture on - JVC QX5HD | Instruction Manual - Page 62
print a picture taken by this camera. Printer (GV-SP2) Printer connector PRINTER Digital Still Camera To input connector Optional printer cable for GV-SP2 Power outlet Power lamp AC adapter (AA-V37) NOTES: ● Refer to the printer's instruction manual for connections and operations of your - JVC QX5HD | Instruction Manual - Page 63
EN 63 Printing a Picture If you have a JVC printer (GV-SP2), you can print a picture with (or without) a white frame. It is also possible to print multiple copies of the same photo. You - JVC QX5HD | Instruction Manual - Page 64
, we recommend setting the picture size to 2032 x 1536. (੬ pg. 28) ● If an "out of paper" or other error occurs in the printer, correct the problem and then press the EXE button again to resume printing. - JVC QX5HD | Instruction Manual - Page 65
of all pictures. ● You can set and print the different number of copies for each picture. * "DPOF" stands for "Digital Print Order Format". Data which has been written in a Memory card with the DPOF setting conforms with this standard. 3 2 1 SET OF4F M V DPOF SET UP NEW/RESET EXE REVISE EXE - JVC QX5HD | Instruction Manual - Page 66
. 5 Press the r t button to select "FRAME OFF" or "FRAME ON", and then press the EXE button. •After the DPOF file is saved on the Memory card, the printing starts as set in step 4. •"NOW PRINTING" appears. •Pressing the EXE button during printing cancels the printing and goes back to step 4. •The - JVC QX5HD | Instruction Manual - Page 67
SUBSIDIARY SETTINGS EN 67 Changing Settings in the SET UP Menu You can change the system settings according to your photography needs. For example, you can turn the beep sound off, or you can change the frame size for better picture quality. 2,3 1 SET 4 SET UP POWER SAVE 1min. BEEP HIGH - JVC QX5HD | Instruction Manual - Page 68
LCD panel and LCD screen are turned off during the power save mode. To reactivate the camera, press the DISPLAY button. 1 min.: Enters the power save mode after 1 minute of you take will be numbered "1". EXE: Formats a Memory card. (੬ pg. 23) EXE: Sets the camera's internal clock. (੬ pg. 69) - JVC QX5HD | Instruction Manual - Page 69
the EXE button. •The SET UP screen returns. NOTES: ● The date and time that are set are stored in memory powered by the backup battery. The backup battery is recharged when the camera is connected to a power source, such as the AC adapter, for at least 24 hours. ● The clock will not - JVC QX5HD | Instruction Manual - Page 70
70 EN SOFTWARE SECTION You can find the latest information (in English) on the provided software program at our World Wide Web Server. http://www.jvc-victor.co.jp/english/index-e.html USB Driver (for Windows®/Macintosh®) Video Player (for Windows®) JVC Video Decoder (for Macintosh®) - JVC QX5HD | Instruction Manual - Page 71
and information not contained in the instruction manual can be found in the file readme.txt. Please read this file before installing the accompanying software. NOTES: ● Make sure to use the provided AC adapter (AAV37) to power the camera, when using camera connected to a personal computer. ● When - JVC QX5HD | Instruction Manual - Page 72
the basic operation of Windows®, refer to the instruction manual provided with your computer or Windows®. Windows displayed on the right are examples of Windows® 98. Preparation Start Windows®. ● If you are running other software, close that software. (Make sure that there are no other application - JVC QX5HD | Instruction Manual - Page 73
the Video Player For details on the basic operation of Windows®, refer to the instruction manual provided with your computer or Windows®. Preparation Start Windows®. ● If you are running other software, close that software. (Make sure that there are no other application icons open on the task bar - JVC QX5HD | Instruction Manual - Page 74
SOFTWARE SECTION FOR Windows® (cont.) Sending Image File to Computer For details on the basic operation of Windows®, refer to the instruction manual provided with your computer or Windows®. Preparation Start Windows®. ● Insert a Memory card Connect the camera to the "DCIM (still picture)" folder - JVC QX5HD | Instruction Manual - Page 75
Basic Playback There are several different methods for playing back a video on the Video Player, depending on how you load the file. Preparation Start Windows®. ● Send the video file that you want to play back to the computer. (੬ pg. 74) 1 Click the "Start" button. •The Start Menu bar appears. 2 - JVC QX5HD | Instruction Manual - Page 76
76 EN SOFTWARE SECTION FOR Windows® (cont.) Easy Playback You can start playback easily by double clicking on the icon of a video file. Preparation Start Windows®. ● Send the - JVC QX5HD | Instruction Manual - Page 77
When you don't need to use the Video Player, uninstall the program. Preparation Start Windows®. ● If you are running other software, close that software. (Make sure that there are no other application icons open on the task bar.) 1 Click the "Start" button. •The Start Menu bar appears. 2 Point - JVC QX5HD | Instruction Manual - Page 78
instruction manual can be found in the file readme.txt. Please read this file before installing the accompanying software. USB Connection USB cable (provided) DIGITAL Digital confirm the shape of the plug. ● When connecting the camera to a personal computer via a USB cable, the personal computer - JVC QX5HD | Instruction Manual - Page 79
the USB Driver For details on the basic operation of Mac OS, refer to the instruction manual provided with your Macintosh® or Mac OS. Preparation Start Macintosh®. ● If you are running other software, close that software. 1 Load the provided CD-ROM to the CD-ROM drive. 2 Double click on the loaded - JVC QX5HD | Instruction Manual - Page 80
FOR Macintosh® (cont.) Installing the JVC Video Decoder For details on the basic operation of Mac OS, refer to the instruction manual provided with your Macintosh® or Mac OS. Preparation Start Macintosh®. ● If you are running other software, close that software. 1 Load the provided CD-ROM - JVC QX5HD | Instruction Manual - Page 81
instruction manual provided with your Macintosh® or Mac OS. Preparation Start Macintosh®. ● Insert a Memory card still picture)" folder. 6 Copy the necessary files from the "DCVI (video)" or "DCIM (still the camera with the JVC Video Decoder to expand the compressed file. You can also download the - JVC QX5HD | Instruction Manual - Page 82
"Convert" button. 5 Click the "4" button. •Playback of the video starts. •For details on the basic operation of QuickTime Player (or Movie Player), refer to the instruction manual provided with your Macintosh® or visit the website of Apple Computer. Play button - JVC QX5HD | Instruction Manual - Page 83
a video file. Preparation Start Macintosh®. ● Make sure that you installed the JVC Video Decoder in advance. (੬ pg. 80) ● Send the video file basic operation of QuickTime Player (or Movie Player), refer to the instruction manual provided with your Macintosh® or visit the website of Apple Computer - JVC QX5HD | Instruction Manual - Page 84
. Preparation Start Macintosh®. ● If you are running other software, close that software. 1 Double click the "System Folder" icon. •The System Folder opens. 2 Double click the "Extensions" folder icon. •The Extensions folder opens. 3 Drag the "JVC Video Decoder" icon to "Trash", then drop the icon - JVC QX5HD | Instruction Manual - Page 85
Mr. Photo Gold: Presto! Mr. Photo For Windows and Macintosh Presto! PhotoAlbum For Windows and Macintosh Presto! ImageFolio For Windows * Please consult your nearest NewSoft service center for technical support. (see next page) Copyright © 1997-1999, NewSoft Technology Corp. All Rights Reserved. - JVC QX5HD | Instruction Manual - Page 86
service centre: U.S.A: 4113 Clipper Court, Fremont, CA 94538, USA Tel: 1-510-445-8600 Fax: 1-510-445-8601 Technical Support Hot Line: 1-510-445-8616 E-mail: [email protected] http://www.newsoftinc.com Technical Support : [email protected] http://www.newsoft.co.jp U.K.: The Software Centre - JVC QX5HD | Instruction Manual - Page 87
supported digital cameras, scanners, floppy disks, PhotoCDs, and the Internet. (For Macintosh: Macintosh also supports supported.) ● Print stickers, labels, and photo catalogues. System Requirements For Windows ● Digital Camera plus digital camera software . ● Super VGA display card. ● MS Windows 95, - JVC QX5HD | Instruction Manual - Page 88
digital cameras Independent album playback support. ● Supports popular file formats software, and a minimum of 60 MB to be used as virtual memory for efficient use of the program.) ● At least 16 MB of RAM (preferably 48 MB). ● System 7.5 or later. Recommended System Requirements ● A sound card - JVC QX5HD | Instruction Manual - Page 89
, a digital camera, a video capture box, etc. You can create new images by using the powerful tools included in the software. Its Flash Pix format support. Image Output ● Print color-adjustment variations for examining the printing effect before actual printing. ● OLE 2.0 support for stand-alone - JVC QX5HD | Instruction Manual - Page 90
of RAM (preferably 16 MB). ● MS Windows 95, 98 or Windows NT. To make fully efficient use of the program, the following additional hardware and software elements are highly recommended: ● 50 MB or more of virtual memory. ● A color printer supported by MS Windows 95. - JVC QX5HD | Instruction Manual - Page 91
.exe and choose OK. The installation program will automati- cally detect the language being used in the version of Windows you are running. 4. Follow the instructions on your screen as they appear. For Macintosh: To install Mr. Photo and PhotoAlbum: 1. Insert the program CD into your CD-ROM drive - JVC QX5HD | Instruction Manual - Page 92
take any more pictures. Either use a Memory card that has some free space in it, or create some free space in - memory by saving pictures to a personal computer and then deleting those pictures from the camera's memory. ● This is not a malfunction. There is no problem with the recorded images - JVC QX5HD | Instruction Manual - Page 93
protect seal may be placed on the Memory card. If the data on the Memory card has been backed up on a personal computer, remove the 23 seal and format the card. ● This is not a malfunction. There is no problem with the recorded images. - ● Make sure that the camera is not in HDTV MODE while - JVC QX5HD | Instruction Manual - Page 94
94 EN Error Messages (for the camera) Error messages appear on the LCD screen. TROUBLE SHOOTING (cont.) Messages Contents Page MEMORY FULL The storage capacity of the Memory card has been reached. You can store additional photos either by replacing the memory card 22 with a new one, or by - JVC QX5HD | Instruction Manual - Page 95
on the LCD screen. For details, refer to the printer's instruction manual. EN 95 Messages Contents CHECK INK CASSETTE No ink cassette the "no frame" specification. TRANSMISSION ERROR Communications error occurred between the camera and the printer. SET PAPER TRAY The paper tray has not been - JVC QX5HD | Instruction Manual - Page 96
protruding parts) Weight : Approx. 290 g (0.64 lbs) (without a Memory card and battery) Operating temperature : 0°C to 40°C (32°F to 104°F) 35 mm still camera) Lens : 2.3X optical zoom lens Video : 160 pixels x 120 pixels, 20 seconds, JVC original : Auto/Manual ( , , , MWB, ) Focus : Auto - JVC QX5HD | Instruction Manual - Page 97
Memory card, STANDARD/FINE/NO COMP.) Battery Printer connector VIDEO output connector Digital Mini-USB connector EN 97 AC Power Adapter/Charger AA-V37 Power requirement U.S.A. and Canada : 14 W Output Charge : DC 3.6 V , 0.77 A Camera : DC 5.0 V , 1.5 A Operating temperature : 0°C to 40 - JVC QX5HD | Instruction Manual - Page 98
Manual Focus 34 Memory card 22 INDEX N Noise Reduction Mode 48 P Pixel Shift Mode 46 Playing Back Still Pictures 31 Power dial 14 Presto! Mr. Photo Gold 85 Printing a Picture 63 Printing by DPOF Setting 65 Protecting Pictures 55 Q Q. REVIEW 24 Software Section for Macintosh 78 Software - JVC QX5HD | Instruction Manual - Page 99
voltage not supported. .... DO nearest JVC dealer digital still camera. If the AC adapter's performance or design is different than what the digital camera is designed for, fire, malfunction or electric shocks may result. Before using, thoroughly read the instructions of the digital still camera - JVC QX5HD | Instruction Manual - Page 100
memory, a rechargeable battery is integrated in the camera. As long as the camera is connected to an AC outlet using the AC power adapter, or the batteries installed in the camera continue to supply power to the camera place the camera with the LCD monitor on the bottom. 2. To prolong service life . - JVC QX5HD | Instruction Manual - Page 101
same phenomenon occurs on the lens of the camera when it is moved from a cool place JVC dealer. Declaration of Conformity Model Number Trade Name Responsible party Address Telephone Number : GC-QX3HDU/ GC-QX5HDU : JVC : JVC for a Class B digital device, pursuant to Part with the instructions, may - JVC QX5HD | Instruction Manual - Page 102
JVC SERVICE CENTER TOLL FREE: 1-800-252-5722 Dear customer: In order to receive the most satisfaction from your purchase, read the instruction letter stating the problem or symptom that exists and also a copy of the receipt or bill of sale you received when you purchased your JVC unit. Print your - JVC QX5HD | Instruction Manual - Page 103
bill of sale plus a letter of explanation of the problem to the nearest JVC Factory Service Center, the name and location of which will be Manual, normal maintenance, video and audio head cleaning; 4. Damage that occurs in shipment, due to act of God, and cosmetic damage; 5. Signal reception problems - JVC QX5HD | Instruction Manual - Page 104
GC-QX3HD/ GC-QX5HD VICTOR COMPANY OF JAPAN, LIMITED COPYRIGHT 2000 VICTOR COMPANY OF JAPAN, LTD. U Printed in Japan * * 0900MNV ID SW
-
 1
1 -
 2
2 -
 3
3 -
 4
4 -
 5
5 -
 6
6 -
 7
7 -
8
-
9
-
10
-
11
-
12
-
13
-
14
-
15
-
16
-
17
-
18
-
19
-
20
-
21
-
22
-
23
-
24
-
25
-
26
-
27
-
28
-
29
-
30
-
31
-
32
-
33
-
34
-
35
-
36
-
37
-
38
-
39
-
40
-
41
-
42
-
43
-
44
-
45
-
46
-
47
-
48
-
49
-
50
-
51
-
52
-
53
-
54
-
55
-
56
-
57
-
58
-
59
-
60
-
61
-
62
-
63
-
64
-
65
-
66
-
67
-
68
-
69
-
70
-
71
-
72
-
73
-
74
-
75
-
76
-
77
-
78
-
79
-
80
-
81
-
82
-
83
-
84
-
85
-
86
-
87
-
88
-
89
-
90
-
91
-
92
-
93
-
94
-
95
-
96
-
97
-
98
-
99
-
100
-
101
-
102
-
103
-
104
 |
 |
GC-QX3HD/
GC-QX5HD
DIGITAL STILL CAMERA
LYT0668-001B
INSTRUCTIONS
ENGLISH
STILL CAMERA
For Customer Use:
Enter below the Model No. and Serial
No. which is located on the bottom of
cabinet. Retain this information for
future reference.
Model No.
Serial No.