Jensen MXA6BA Instruction Manual - Page 3
Mxa6ba, Wiring, Instructions
 |
UPC - 681787013010
View all Jensen MXA6BA manuals
Add to My Manuals
Save this manual to your list of manuals |
Page 3 highlights
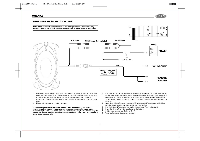
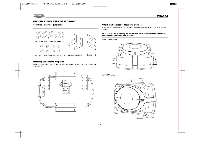
Size: 216 X 279.5mm Model No. MAX6BA_Manual_P 2 Date. 05 DEC 2008 BLACK MXA6BA WIRING INSTRUCTIONS IMPORTANT: Incorrect wiring connections can damage the unit. Follow the wiring instructions carefully, or have the installation handled by an experienced technician. RCA Input RCA Cables (Not Included) s -I (IN RCA Output 40' 10 AMP FUSE Minimum Wire She: +12V - 10 AWG Ground -10 AWG O Lej ene; RI• s s. 0 e Battery POWER GROUND REMOTE TRIGGER 1. Choose a mounting location on a flat surface away from heat and moisture. Be sure the location and the drilling of pilot holes for mounting will not present a hazard to any wires, control cables, fuel lines, fuel tanks, hydraulic lines, or other vehicle systems or components. Choose a location with unimpaired air circulation and do not mount upside down. 2. Disconnect the negative (-) battery terminal. NOTE: Check your vehicle's owner's manual before disconnecting the battery. Disconnecting the battery in some vehicles may require an anti-theft code when reconnecting for stereo operation. Some vehicles may run rough after reconnecting the battery and require service to have the on-board computer reset. Check with your local dealer if you are uncertain. 3. Run suitable AWG wire to where the subwoofer will be rrounted (run 1 foot more than you think you will need). Use rubber grommets where wires will pass through the bulkhead or other areas of the vehicle. Make certain a fuse holder is placed within 18 inches of the vehicle battery - this is mandatory. Do not place a fuse in the fuse holder at the battery at this time. 4. Ground the subwoofer using the same AWG wire size used for the power cable. Make sure the ground location is a clean, unpainted metal surace. 5. Run the RCA and Remote turn-on lead to the subwoofe- from the head unit. 6. Place the 10 amp fuse in the fuse holder at the battery. 7. Set the input level control (GAIN) to "MIN". 8. Tum head unit on and adjust as necessary. 2
-
 1
1 -
 2
2 -
 3
3 -
 4
4 -
 5
5 -
 6
6 -
 7
7 -
 8
8 -
 9
9 -
10
-
11
-
12
-
13
-
14
-
15
-
16
 |
 |
