Jensen MXA6BA Instruction Manual - Page 4
ece,e
 |
UPC - 681787013010
View all Jensen MXA6BA manuals
Add to My Manuals
Save this manual to your list of manuals |
Page 4 highlights
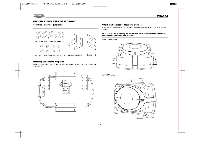
Size 216 X 279.5mm Model No. MAX6BA_Manual_P 3 Date: 05 DEC 2008 SEN' MOUNTING THE MXAGBA Mounting Hardware (included) ,eeecec,ee 000 rk) M5 x 14mm Philips Screw and Washer ( x 6) BLACK MXA6BA Attaching Brackets to Mounting Surface Attach any of the four brackets to the mounting surface using the six M5 x 14mm screws and washers. NOTE: You will not necessarily mount your amplifier as indicated in this diagram. Use whatever brackets work for your situation. Horizontal Mounting M4 x 6mm Philips Screw and Washer ( x 4) Corner Bracket (x 2) Bracket ( x 2) Attaching Brackets to Amplifier Attach any of the four brackets to the bottom of the amplifier, as needed, using the four M4 x 6mm screws. 0 g o 0 0 0 0 0 0 0 e 0 0 0 0 0 0 Vertical Mounting a° 0 0 3
-
 1
1 -
 2
2 -
 3
3 -
 4
4 -
 5
5 -
 6
6 -
 7
7 -
 8
8 -
 9
9 -
 10
10 -
11
-
12
-
13
-
14
-
15
-
16
 |
 |
