Kenmore 7901 Use and Care Guide
Kenmore 7901 - 19.0 cu. Ft. Top Freezer Refrigerator Manual
 |
View all Kenmore 7901 manuals
Add to My Manuals
Save this manual to your list of manuals |
Kenmore 7901 manual content summary:
- Kenmore 7901 | Use and Care Guide - Page 1
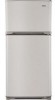
TOP FREEZER REFRIGERATOR Use & Care Guide CONGELADOR SUPERIOR REFRIGERADOR Gu_a para el Usa y Cuidado Models / ModeJos 795.7901_ 795.7930_ = color number, n_mera de color m Z Q m 3Z m Z_ 0 MFL61920624 Printedin M_xico Sears Brands Management Corporation, Haffman Estates, IL 60179 ww.sears.cam - Kenmore 7901 | Use and Care Guide - Page 2
16 When you go on vacation 24 USING YOUR REFRIGERATOR 17 When you move 24 Ensuring Proper Air Circulation 17 ABOUT AUTOMATIC ICEMAKER 25 Setting the Controls 17 CONNECTING THE WATER LINE 26 Adjusting Control Settings 18 TROUBLESHOOTING GUIDE 29 Water Dispenser 18 Food Storage - Kenmore 7901 | Use and Care Guide - Page 3
BOTTOM FREEZER REFRIGERATOR ® I(enmore Appliance Warranty One Year Limited Warranty When installed, operated and maintained according to all instructions supplied with the product, if this appliance fails due to a defect in material or workmanship within one year from the date of purchase, call 1- - Kenmore 7901 | Use and Care Guide - Page 4
U.S.A. call 1-800827-6655. *Coverage in Canada varies on some items. For tuff details call Sears Canada at 1-800-361-6655. Sears installation Service For Sears professional installation of home appliances, garage door openers, water heaters, and other major home items, in the U.S.A. or Canada call - Kenmore 7901 | Use and Care Guide - Page 5
out from the outlet. ° Repair or replace immediately all electric service cords that have become frayed or otherwise damaged. Do not use instructions before using this appliance. * Use this appliance only for its intended purpose as described inthis use and care guide. ° After your refrigerator - Kenmore 7901 | Use and Care Guide - Page 6
do not play with the appliance. Child entrapment and suffocation are not problems of the past. Junked or abandoned refrigerators are still dangerous. Even if they will sit for "just a few days". If you are getting rid of your old refrigerator, please follow the instructions at right to help prevent - Kenmore 7901 | Use and Care Guide - Page 7
become more familiar with the parts and features. NOTE: This guide covers several different models. The refrigerator you have purchased may have Shelf Dicjitai Temperature Control Water Filter Water Dispenser Button Refrigerator Light 0 Snack Drawer 00 SChriesplveerss Keeps fruits and vecjetabies - Kenmore 7901 | Use and Care Guide - Page 8
cleaners to remove tape or glue. These products can damage the surface of your refrigerator. For more information, see the Important Safety Instructions section. Refrigerator 4. NEVER install the refrigerator on a platform or a weakly supported structure. 5. Install this appliance in an area where - Kenmore 7901 | Use and Care Guide - Page 9
DOOR ° Loosen and remove the 2 bolts and the phillips head screw to remove the Middle Hinge Bracket from refrigerator housing. Set parts aside. Remove food and any Adjustable Door or Utility Bins from doors. Failure to do so could result in serious injury. REMOVING AND REPLACING DOORS - Kenmore 7901 | Use and Care Guide - Page 10
Bracket inside Hinge Pin insert on top of door (Fig. 7). Hold door in place and line up the Middle Hinge Bracket with the holes in refrigerator housing. REPLACING FREEZER DOOR ° Set the freezer door onto the Middle Hinge Pin. 9 Fig. 7 ° Use the 2 bolts and phillips screw to refasten the Middle - Kenmore 7901 | Use and Care Guide - Page 11
remove the 3 bolts and lift off the Top Hinge. Set parts aside. 13 Top Hinge ° Pry off cover on top of refrigerator on left side to uncover screw holes. ° Set freezer door and Top Hinge parts to the side and remove refrigerator door. ° Lift up refrigerator door slightly and remove it. Fig. 14 12 - Kenmore 7901 | Use and Care Guide - Page 12
REFRIGERATOR DOOR ° Using a 1/4" socket wrench, loosen and remove Hinge Pin from the Middle Hinge Bracket. Remove washer underneath the middle hinge and set aside. NOTE: At this point the door wiii be loose, lift up door slightly and remove it. * Remove Base Grille. See BASE GRILLE iNSTRUCTiONS - Kenmore 7901 | Use and Care Guide - Page 13
Door Closer/Stop is not used on all models. The model you have may note include this part. _Fig. 24 " Turn refrigerator door upside down on a non-scratching surface. ° With door upside down, loosen the 2 screws and remove the Door Closer/Stop, the loosen the other two - Kenmore 7901 | Use and Care Guide - Page 14
Bracket (Flange will now be on top) and position on left side of refrigerator and re-attach with two bolts and a Phillips screw. ° Place refrigerator door down over pin on bottom hinge. ° Place washer between refrigerator door and middle hinge and re-attach Hinge Pin to Hinge Bracket with 1/4-in - Kenmore 7901 | Use and Care Guide - Page 15
make it easier to adjust the screws. DOOR ALIGNMENT If the space between your doors is uneven_ follow the instructions below to align the doors. 1. Gently pry off: the refrigerator door Top Hinge Cover with a fiat head screwdriver and remove. Loosen the Top Hinge Bolts using a lOmm or ]3/3 2 -in - Kenmore 7901 | Use and Care Guide - Page 16
are blocked, airflow will be restricted and temperature and moisture problems may occur. iMPORTANT: Because air circulates between both sections, Any cover foods tightly. (See the Food Storage Guide section for details). NOTE: If you close the refrigerator door forcefully, the freezer door may open - Kenmore 7901 | Use and Care Guide - Page 17
normal household refrigerator use. The refrigerator control functions as the thermostat for the entire appliance (refrigerator and freezer sections in the chart below as a guide. Always remember to wait of least 24 hours between adjustments. CONDITION/REASON: REFRIGERATOR section too worm ° Door - Kenmore 7901 | Use and Care Guide - Page 18
food storage times, check a freezer guide or a reliable cookbook. Packaging Successful have food odor and taste transfer throughout the refrigerator and also dry out frozen food. Packaging creating ice crystals. Follow package or container instructions for proper freezing methods. _0 not use: - Kenmore 7901 | Use and Care Guide - Page 19
are aii glass shelves. Storing similar food items together in your refrigerator and adjusting the shelves to fit different heights of items will Puii the shelf * To replace a shelf: Tilt the front of the shelf up and guide the shelf hooks into the slots at a desired height. Then lower the B front - Kenmore 7901 | Use and Care Guide - Page 20
door bins are removable for easy cleaning and adiusting. They have slots in the sides which fit into support slots placed at intervals on refrigerator door. 1. To remove a bin, lift the bin up until it clears the support slots and lift out. 2. To replace a bin, push into door and down onto a set of - Kenmore 7901 | Use and Care Guide - Page 21
. 2. To replace the dairy bin / can rack slide it in above the desired support slots and push down until it stops. How to change the water filter 1. Remove the dispenser button (30 seconds ON, 60 seconds OFF). Open the refrigerator door and shelf area to check for water leaks. To purchase replacement water - Kenmore 7901 | Use and Care Guide - Page 22
cover. Use a vacuum cleaner with the brush attachment, at least twice a year to keep your refrigerator working emcientiy. OUTSIDE Waxing external painted metal surfaces helps provide rust protection. Do not wax plastic parts. Wax painted metal surfaces at least twice a year using appliance wax (or - Kenmore 7901 | Use and Care Guide - Page 23
Take out all removable parts, wrap them weii and tape them together so they do not shift and rattle during the move. 7. Depending on the model, lower the front of the refrigerator so it roils more back and refer to the Insfalffng Your Refrigerator section for preparation instructions. 24 - Kenmore 7901 | Use and Care Guide - Page 24
INJURY HAZARD Avoid contact with the moving parts of the ejector mechanism, or with the heating element that releases the cubes. DO NOT place fingers or hands on the automatic icemaking mechanism while the refrigerator is plugged in. OPERATION INSTRUCTIONS NOTE: Automatic Ice Maker feature is - Kenmore 7901 | Use and Care Guide - Page 25
or icemaker manufacturer. Follow these instructions carefully to minimize the risk of expensive water damage. Water hammer (water banging in the pipes) in house plumbing can cause damage to refrigerator parts and lead to water leakage or flooding. Call a qualified plumber to correct water - Kenmore 7901 | Use and Care Guide - Page 26
iNSTALLATiON iNSTRUCTiONS Install feet coiled into 3 turns of about 10 inches in diameter) to allow the refrigerator to move out from the wail after installation. 7. CONNECT THE TUBING TO THE the clamp screws until the sealing washer begins to swell. NOTE: Do not over tighten or you may crush - Kenmore 7901 | Use and Care Guide - Page 27
, worn or used waterlines, only use new for a better use and service. Connect onJy to the supply of drinking water for your safety and health. Remove the plastic flexible cap from the water valve connection. 11. PLUG IN THE REFRIGERATOR Arrange the coil of tubing so that it does not vibrate against - Kenmore 7901 | Use and Care Guide - Page 28
Firmly plug the cord into a live outlet with proper voltage (see Electrical & Grounding Requirements). Replace the fuse or reset the circuit breaker. The refrigerator Refrigerator is not cooling is in the defrost cycle. Wait about 30 minutes for defrost cycle to end. COOLING OFF light is ON "J_ - Kenmore 7901 | Use and Care Guide - Page 29
troubleshooting guide. This prevents air transfer and makes the motor work harder. Clean the back cover. Refer to the Care and Cleaning section. See the Installation section to level refrigerator See the Using Your Refrigerator section. The gaskets a thin coat of appliance polish or kitchen wax on - Kenmore 7901 | Use and Care Guide - Page 30
sounds may be normal for your refrigerator. New installation. See "Door will not close completely" in troubleshooting guide. When the door is opened, properly. A filter may need to be insatiled to eliminate taste and odor problems. See Care and aeanlng section. Empty and wash bin. Discard old cubes - Kenmore 7901 | Use and Care Guide - Page 31
section. The doors are not closing completely. See '"Doors will not close completely" guide. in troubleshooting The weather is humid. A self-defrost cycle was completed. In humid weather, air carries moisture into the refrigerator when the doors are opened. It is normal for droplets to form on - Kenmore 7901 | Use and Care Guide - Page 32
systems, no matter who made it, no matter who sold it! For,the replacement parts, accessories and owner s manuals that you need to do-it-yourself. For Sears professional installation of home appliances and it1em-8s0l0ik-e4g-aMraYge-HdOooMr Eope®ners(1a-n8d0w0a-t4er69h-e4at6er6sa. ) Call anytime
-
 1
1 -
 2
2 -
 3
3 -
 4
4 -
 5
5 -
 6
6 -
 7
7 -
8
-
9
-
10
-
11
-
12
-
13
-
14
-
15
-
16
-
17
-
18
-
19
-
20
-
21
-
22
-
23
-
24
-
25
-
26
-
27
-
28
-
29
-
30
-
31
-
32
 |
 |

®
TOP FREEZER REFRIGERATOR
Use & Care
Guide
CONGELADOR SUPERIOR
REFRIGERADOR
Gu_a para
el Usa y Cuidado
Models
/
ModeJos
795.7901_
795.7930_
=
color
number,
n_mera
de color
m
Z
Q
m
3Z
m
Z_
0
ww.sears.cam
MFL61920624
Sears Brands Management
Corporation,
Haffman
Estates,
IL
60179
PrintedinM_xico