Kenwood CA-CUT14 Operation Manual - Page 3
Disassembling The Factory Lid
 |
View all Kenwood CA-CUT14 manuals
Add to My Manuals
Save this manual to your list of manuals |
Page 3 highlights
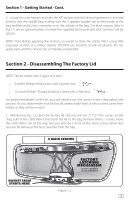
Section 1 - Getting Started - Cont. 3. Locate the wire harness and take the 48" section with the silicone grommet in line and install it into the saddle bag, making sure the 2 speaker "spades" are on the inside of the bag and the single 2-pin connector is on the outside of the bag. The black squares (also in Fig 1.1) are an approximation of where the supplied zip tie peel and stick "anchors" will be placed. NOTE: Note: Before applying the anchors, you need to clean the plastic WELL using 99% isopropyl alcohol, or a similar cleaner. DO NOT use Acetone (it will eat plastic). Do not apply pads until the cleaner has completely evaporated. Section 2 - Disassembling The Factory Lid NOTE: The kit comes with 2 types of screws: • 6 (each) Phillips head screws with a pointy end • 16 (each) Phillips "Thread Forming" screws with a "flat" end For proper installation of this kit, you will need to use the correct screws throughout the process. As you disassemble your factory lid, please make note of what screws came from where, as they will be re-used. 1. Referencing Fig. 1.2, open the factory lid and you will see 2 "T15" Torx screws on the "bag side" of the cloth tether that holds the lid to the bag. Remove these 2 screws, move the cloth tether out of the way, and you will see 2 more of the same screws which also need to be removed. The lid is now free from the bag. 4 MAIN SCREWS GASKET SEAM STARTS HERE FACTORY LATCHING MECHANISM (SHOWN ON WHITE LID FOR CONTRAST) Figure 1.2 3
-
 1
1 -
 2
2 -
 3
3 -
 4
4 -
 5
5 -
 6
6 -
 7
7 -
 8
8
 |
 |
