Kenwood CA-CUT14 Operation Manual - Page 6
Clutch Side Lid, Brake Side Lid
 |
View all Kenwood CA-CUT14 manuals
Add to My Manuals
Save this manual to your list of manuals |
Page 6 highlights
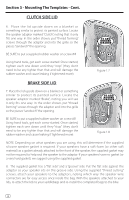
Section 3 - Mounting The Templates - Cont. CLUTCH SIDE LID 6. Place the lid upside down on a blanket or something similar to protect its painted surface. Locate the speaker adaptor marked "Clutch", noting that it only fits one way. In the order shown, put "thread forming" screws through the adaptor and into the grille so the pieces "sandwich" the opening. BE SURE to put a supplied rubber washer on screw #4! Using hand tools, get each screw started. Once started, tighten each one down until they "stop" (they don't need to be any tighter than that and will damage the rubber washer and cause leaking if tightened more). #3 #4 ADD RUBBER WASHER #1 #2 Figure 1.7 BRAKE SIDE LID 7. Place the lid upside down on a blanket or something similar to protect its painted surface. Locate the speaker adaptor marked "Brake", noting you will see it only fits one way. In the order shown, put "thread forming" screws through the adaptor and into the grille so the pieces "sandwich" the opening. BE SURE to put a supplied rubber washer on screw #3! Using hand tools, get each screw started. Once started, tighten each one down until they "stop" (they don't need to be any tighter than that and will damage the rubber washer and cause leaking if tightened more). #3 ADD RUBBER WASHER #4 #2 #1 Figure 1.8 NOTE: Depending on what speakers you are using, this will determine if the supplied silicone speaker gasket is required. If your speakers have a soft foam (or other soft material) as a gasket already attached to the front of the speaker, the supplied gasket may not be required to help seal the speaker to the adaptor. If your speakers have no gasket (or a very hard gasket), we suggest using the supplied gasket. 8. The supplied gasket has a "flat side" and a "groove" side. Put the flat side against the adaptor so your speaker sits on the groove side. Using the supplied "thread cutting" screws, attach your speakers to the adaptors, noting which way the speaker wire connectors are for easy access once inside the bag. With the speakers attached to your lids, re-attach the lids to your saddlebags and re-install the completed bags to the bike. 6
-
 1
1 -
 2
2 -
 3
3 -
 4
4 -
 5
5 -
 6
6 -
 7
7 -
 8
8
 |
 |
