Kenwood CA-LID98 Operation Manual
Kenwood CA-LID98 Manual
 |
View all Kenwood CA-LID98 manuals
Add to My Manuals
Save this manual to your list of manuals |
Kenwood CA-LID98 manual content summary:
- Kenwood CA-LID98 | Operation Manual - Page 1
DESIGNED AND ENGINEERED FOR 1998-2013 HARLEY-DAVIDSON® MOTORCYCLES WITH FACTORY-STYLE HARD SADDLEBAGS INSTRUCTION MANUAL JVCKENWOOD Corporation Take the time to read through this instruction manual. Familiarity with installation and operation procedures will help you obtain the best performance from - Kenwood CA-LID98 | Operation Manual - Page 2
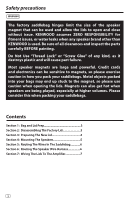
Safety precautions WARNING The factory saddlebag hinges limit the size of the speaker magnet that can be used and allow the lids to open and close without issue. KENWOOD assumes ZERO RESPONSIBILITY for fitment issues, or water leaks when any speaker brand other than KENWOOD is used. Be sure of all - Kenwood CA-LID98 | Operation Manual - Page 3
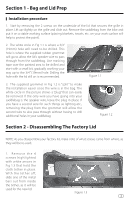
Section 1 - Bag and Lid Prep Installation procedure 1. Start by removing the 2 screws on the underside of the lid that secures the grille in place. Lift up slightly on the grille and slide out. Remove the saddlebag from the bike and put it on a stable working surface (placing blankets, towels, etc. - Kenwood CA-LID98 | Operation Manual - Page 4
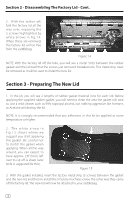
Section 2 - Disassembling The Factory Lid - Cont. 2. With the tether off, fold the factory lid all the way over, exposing the 5 screws highlighted by white arrows in Fig 1.4. When these are removed, the factory lid will be free from the saddlebag. Figure 1.4 NOTE: With the factory lid off the bike, - Kenwood CA-LID98 | Operation Manual - Page 5
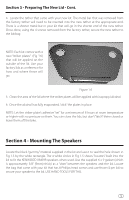
Section 3 - Preparing The New Lid - Cont. 4. Locate the tether that came with your new kit. The metal bar that was removed from the factory tether will need to be inserted into the new tether at the appropriate end. There is a shorter metal bar in your kit that will go in the shorter end of the new - Kenwood CA-LID98 | Operation Manual - Page 6
2-pin plug can go through the grommet hole and hang out approximately 4" (10cm). NOTE: Once you are satisfied that the wires are "ghost" ran as instructed, you need to plan where the adhesive pads will go so that the supplied zip ties will secure the wires inside the bag. 5. Before applying - Kenwood CA-LID98 | Operation Manual - Page 7
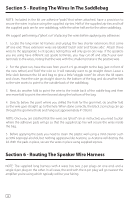
Section 6 - Routing The Speaker Wire Harness - Cont. For FLH (Batwing) Models, the harness will pass under the inner fairing where the main wire harness passes through on the brake side of the bike. For FLTR (Road Glide) Models, the harness will pass through the inner fairing where the factory wires - Kenwood CA-LID98 | Operation Manual - Page 8
and/or its affiliates. All other trademarks are the property of their respective owners. Specifications subject to change without notice. For updated information (the latest Instruction Manual, etc.), please visit the following website: https
-
 1
1 -
 2
2 -
 3
3 -
 4
4 -
 5
5 -
 6
6 -
 7
7 -
8
 |
 |

Take the time to read through this instruction manual.
Familiarity with installation and operation procedures will help you obtain the best performance from your new product.
© 2023 JVCKENWOOD Corporation
CA-LID98
REPLACEMENT 6” X 9” SADDLEBAG LIDS DESIGNED AND
ENGINEERED FOR 1998-2013
HARLEY-DAVIDSON® MOTORCYCLES
WITH FACTORY-STYLE HARD SADDLEBAGS
INSTRUCTION MANUAL
JVCKENWOOD Corporation