Kenwood CA-LID98 Operation Manual - Page 4
Preparing The New Lid
 |
View all Kenwood CA-LID98 manuals
Add to My Manuals
Save this manual to your list of manuals |
Page 4 highlights
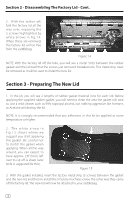
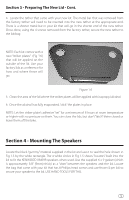
Section 2 - Disassembling The Factory Lid - Cont. 2. With the tether off, fold the factory lid all the way over, exposing the 5 screws highlighted by white arrows in Fig 1.4. When these are removed, the factory lid will be free from the saddlebag. Figure 1.4 NOTE: With the factory lid off the bike, you will see a metal "strip" between the rubber gasket and the lid itself that the screws just removed threaded into. This metal strip must be removed as it will be used to install the new lid. Section 3 - Preparing The New Lid 1. In the kit, you will see 2 lengths of rubber gasket material (one for each lid). Before applying the supplied rubber gasket, you will need to clean the area the gasket will stick to. Use a mild cleaner such as 99% Isopropyl alcohol, but nothing aggressive like Acetone, as Acetone will destroy the lid. NOTE: It is strongly recommended that any adhesives in this kit be applied at room temperature or higher. 2. The white arrow in Fig 1.5 shows where we suggest you start applying the gasket. Be careful not to stretch the gasket when applying. When all the way around, you can expect to have approx. 2.0" (5cm) left over to cut off (a sharp razor knife is suggested for this). Figure 1.5 3. With the gasket installed, insert the factory metal strip (5 screws) between the gasket and the new lid, and then re-install the 5 factory machine screws the same way they came off the factory lid. The new lid will now be attached to your saddlebag. 4
-
 1
1 -
 2
2 -
 3
3 -
 4
4 -
 5
5 -
 6
6 -
 7
7 -
 8
8
 |
 |
