Kenwood CA-PLT14RG3 Operation Manual - Page 2
Ampflier Mounting Plate Installation Instructions
 |
View all Kenwood CA-PLT14RG3 manuals
Add to My Manuals
Save this manual to your list of manuals |
Page 2 highlights
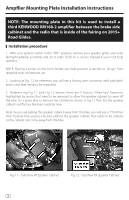
Ampflier Mounting Plate Installation Instructions NOTE: The mounting plate in this kit is used to install a third KENWOOD XM160-2 amplifier between the brake side caibinet and the radio that is inside of the fairing on 2015+ Road Glides. Installation procedure 1. With your ignition switch in the "OFF" position, remove your speaker grilles and outer fairing/headlamp assembly and set it aside. Refer to a service manual if you need help with this. NOTE: Placing a towel on the front fender can help prevent scratches or "dings" from dropped tools or fasteners, etc. 2. Looking at Fig. 1.2 for reference, you will see a factory wire connector with pink/pinkblack wires that needs to be separated. 3. Referencing Fig 1.1 and Fig 1.2 below, there are 5 factory "Allen key" fasteners highlighted by arrows that need to be removed to allow the speaker cabinet to come off the bike. It's a good idea to remove the 3 fasteners shown in Fig 1.1 first. Put the speaker cabinet and factory fasteners aside for now. Note: As you are pulling the speaker cabinet away from the bike, you will see a "Christmas Tree" fastener that secures a factory cable to the speaker cabinet. This needs to be undone so the cabinet can come away from the bike. Fig 1.1 - Side View Of Speaker Cabinet Fig 1.2 - Top View Of Speaker Cabinet 2
-
 1
1 -
 2
2 -
 3
3 -
 4
4
 |
 |
