Kenwood CA-PLT14RG3 Operation Manual - Page 3
Ampflier Mounting Plate Installation Instructions - Cont.
 |
View all Kenwood CA-PLT14RG3 manuals
Add to My Manuals
Save this manual to your list of manuals |
Page 3 highlights
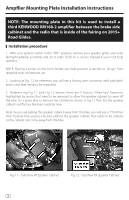
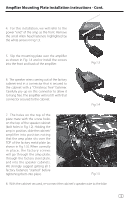
Ampflier Mounting Plate Installation Instructions - Cont. 4. For this installation, we will refer to the power "end" of the amp as the front. Remove the small Allen head fasteners highlighted by the white arrows in Fig 1.3. 5. Slip the mounting plate over the amplifier as shown in Fig 1.4 and re-install the screws into the front and back of the amplifier. Fig 1.3 6. The speaker wires coming out of the factory cabinet end in a connector that is secured to the cabinet with a "Christmas Tree" fastener. Carefully pry up on this connector to allow it to hang free. The amplifier will not fit with that connector secured to the cabinet. Fig 1.4 7. The holes on the top of the plate mate with the screw holes on the top of the speaker cabinet (bolt holes in Fig 1.2). Holding the amp in position, slide the cabinet/ amplifier into position noting that the amp plate sits over the TOP of the factory metal plate (as shown in Fig 1.5). When correctly in place, the factory screws will go through the amp plate, through the factory steel plate, and into the speaker cabinets. We strongly suggest getting all 5 factory fasteners "started" before tightening them into place. Fig 1.5 8. With the cabinet secured, re-connect the cabinet's speaker wire to the bike. 3
-
 1
1 -
 2
2 -
 3
3 -
 4
4
 |
 |
